Why use the Cleanup Options
The cleanup options are useful when automating the conversion of printed documents to one of the support image/pdf formats. The TIFF Image Printer, Raster Image Printer, and PDF Image Printer all feature support for cleanup options in version 12.0.012 and up.
For easy cleanup, there are options to delete the created files, or any other interim files that have been created from other actions such as zipping. By default, the created images/pdfs are not automatically deleted.
If you are using the Email or the ZIP actions to further process the created images, or are running your own commands using the Run Commands, you often do not want to keep the output once it is processed.
These cleanup options allow you to control if and when these files are deleted, and take place after any built-in actions occur. Note that any cleanup actions selected always take place, even when there are no other built-in actions or Run Commands set up to process the created files.
Configuring the Cleanup Options
Step by Step Instructions
- Launch the Dashboard.
- Select “Edit & Create Profiles” to open Profile Manager.
- Select “Add a profile” to create a personal profile, or create a copy of one of our system profiles.
- Name the profile, add a description, and click Save.
- For this scenario, assume we have enabled the Email options and are emailing our created files. After they have been emailed, we don’t need to keep them.
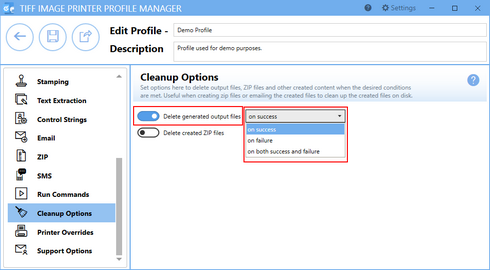
- On the Cleanup Options tab, click Delete generated output files.
- Then use the drop down to choose to delete the files “on success”. Other available options are “on failure” and “on both success and failure”.
- Click Save-Back, and close Profile Manager.
- Now when printing a file and generating the email, you will not be left with files on disk.
If you plan to use these settings regularly, you may wish to make this personal profile the default profile used by TIFF Image Printer.
- Select “Manage Printers” to open Printer Management.
- Select the printer you wish to edit and use the Profile drop box to select your desired default profile.
- Select the Save icon to save changes.
- Select the Home icon to return to the Dashboard.
- Close the Dashboard.
Now when you print any documents, the generated files are automatically deleted at the end of the conversion process. If you are not running any additional built-in actions or Run Commands to process the files, the cleanup action(s) still takes place.

