The email action can be used to automatically email the images you create, or to send an email notification on failure when a file did not convert successfully.
Options to zip the attachments, useful for serialized output or to reduce size when emailing, as well as features to control the size of the email with its attachments, and the ability to automatically split the emails based on size allow for full control over the emails created.
The created images are not deleted when the email action is enabled. To automatically cleanup the files, enabled the Delete generated output files on the Cleanup Options tab.
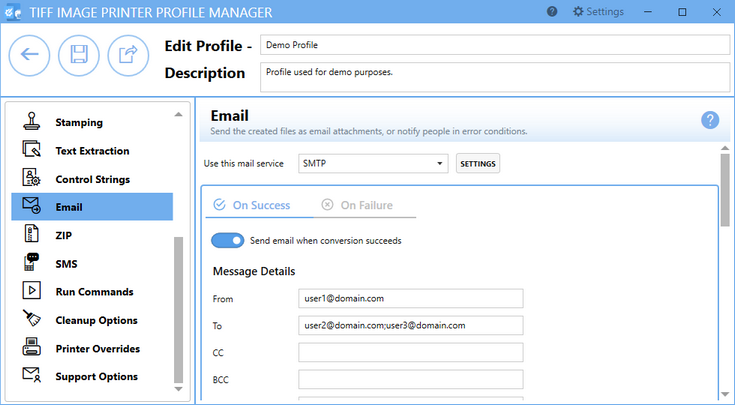
Use this mail service
Choose either Outlook or SMTP (Simple Mail Transfer Protocol) as the mail service to use to send the email.
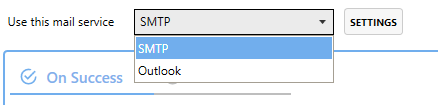
An SMTP server, which does not require an email client to be installed, can be used to send email silently; it will never prompt. When SMTP is chosen, the Settings button is available to display a flyout panel to set up your SMTP server settings. You will need your SMTP server address, and other credentials from your IT personnel. Emails sent using an SMTP server are always sent silently with no prompting.
When using Outlook, it must be installed, and an email account configured. Emails sent using Outlook can be sent silently or can prompt with the default email window.
In addition, an Outlook email template may be used to set up the initial content of the email fields From, To, CC, BCC, Subject, and Body. Addresses entered in the To, CC, and BCC fields are added to any address in the template. Text entered for the Subject and Body fields on the email tab settings will override the Subject and Message contents in the template.
On Success\On Failure
Emails can be sent when the file conversion succeeds, when it fails, or for both cases. There are two tabs at the top to switch between success and failure and enable or disable them independently. The options shown on each tab will depend on which mail service, Outlook or SMTP, is selected.

Send email when conversion succeeds\fails
By default this setting is disabled. Enabling this setting means TIFF Image Printer will use the email settings provided to send an email for that scenario.
Message Details
This section provides details for sending the email using both Outlook and SMTP. What fields are shown depends on the mail service you have chosen. The message body can be multi-line and formatted using tabs.
For advanced users and programmers automating the printer, environment variables and registry keys and run command macros can be used in the message details fields listed below.
•Path to template for Outlook templates
•The From (SMTP Only), To, CC, BCC email fields
•The subject line and message body
Outlook Settings
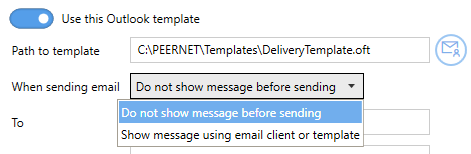
Use this Outlook template
Shown when the Outlook mail service is selected, this setting is disabled to start. Enable this setting to select a saved Outlook template file (*.oft) to use when sending email. If no template is used, the default new email window from Outlook is used.
Path to template
Shown when the Outlook is chosen as the mail service, select the mail icon to browse to your desired template. If TIFF Image Printer cannot find the template when sending the email, the default new email window will be used.
A folder named Templates has been provided in the product installation folder. Any Outlook templates used for emails can be placed here. When using a template from this folder, the location of the template is stored in the profile using a macro. This allows the template and profile to be deployed and to work on any computer, no matter where the product is installed.
When sending email
Choose if you want to prompt or send the email silently:
•Show message using email client or template
•Do not show message before sending
SMTP Settings

From
The field is only used when sending email using the SMTP mail service. Enter an email address that has permissions to send email through your SMTP server. Only a single email can be entered here.
Shared Outlook and SMTP Settings
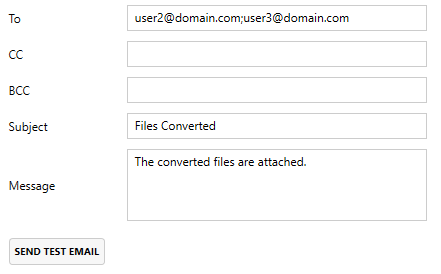
To, CC, BCC
Enter the To, CC or BCC email addresses here. Multiple email addresses can be entered separated with either a semi-colon (;) or a comma (,). When using an Outlook template, these addresses are added to any email addresses that have been included in the template.
Subject
Enter the subject line here. When using an Outlook template, this will overwrite the Subject in the template.
Message
Enter the message content here. This replaces any message content in an Outlook template.
Send Test Email
Test your email settings by sending a test message to the recipients listed. Any errors that occur when sending are displayed here as well. If you are using SMTP, your server settings must be entered before you can send a test message.
Message Attachments
This section only appears on the On Success tab when there are images to be attached.
Many email systems limit how large an email and its attachments can be. These options control adding created files as attachments, setting limits on the size of the email, and handling larger emails by splitting them into multiple email messages. Sending too many emails can also trigger spam filters so the total number of emails as well as a timeout between sending emails can also be set.
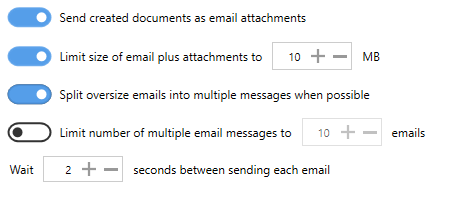
Send created documents as email attachments
Enabled by default, this attaches the created images to your email. Disable this to send an email with no attachments when the documents have been created.
Limit size of emails plus attachments to
Set the size limit for each email including the attachments, where possible, up to a maximum of 10MB. There will always be at least one file attached to the email, even if this file is larger than the size limit.
For serialized output when the individual files are under the size limit, files in the sequence will only be attached to the email up to the set size. When email splitting is not enabled, any remaining files are not included. If email splitting is enabled, the remaining files will overflow to the next email, up to the any email count limit set.
Split oversize emails into multiple messages when possible
Disabled by default, this option applies only when the size of the email is being limited, and when serialized, or single paged, output is being created. Enable this option to split the attachments between multiple emails based on the maximum size set above.
Limit number of multiple email messages to
Disabled by default, this option applies only when the size of the email is being limited and the emails are being split. Sending too many emails can sometimes be flagged by email systems as spamming and can cause issues. Setting an upper limit of the number of emails to send can help prevent this.
Wait timeout between sending multiple email messages
Disabled by default, this option applies only when the size of the email is being limited and the emails are being split. Sending emails too quickly can sometimes be flagged by email systems as spamming and can cause issues. Set a timeout interval, in seconds, to wait in between sending each emails to help prevent this.
Compression Options
This section only appears on the On Success tab when there are images to be attached.
Email attachments can be zipped, or compressed, into a single file to save space in the email as well as reducing the number of attachments to a single file.
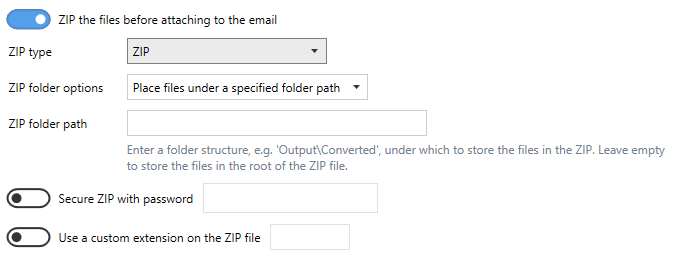
ZIP the files before attaching to the email
Disabled by default, enable this option to zip any files before attaching them to the email.
ZIP type
Select the type of zip file to create:
•ZIP
•7-Zip
•TAR
ZIP folder options
This determines the folder structure used, if any, when storing the files inside the ZIP file.
•Place files under a common parent folder - Uses the last common folder name in the path to the created files. Output files created under 'C:\PEERNET\Output' are stored in the ZIP file under a folder named 'Output'.
•Place files under a specified folder path - Selecting this option shows a folder path field to be filled in. Leave this folder path empty to store the created files inside the ZIP file with no folder structure, or provide a different folder path (folder1\folder2) to change the folder structure inside the ZIP file.
•Keep folder structure of output files - This maintains the folder structure of the created files inside the ZIP file. Output files created under 'C:\PEERNET\Output' are stored in the ZIP file under a folder path named 'PEERNET\Output'.
Secure ZIP with password
Disabled by default, enable this to apply a password to the ZIP file. A password can only be applied to ZIP files of type ZIP and 7-Zip.
Use custom extension on ZIP file
Disabled by default, enable use this to change the extension of the ZIP file. This is sometimes needed to allow ZIP files through email filters. You do not need to enter in the dot(.), and a the custom extension can be up to a maximum of five (5) characters.