
Extracting and Converting Outlook Message Attachments
With the release of Document Conversion Service 3.0.009, the Watch Folder Service now includes the ability to extract and convert any supported file attachments in an Outlook Message (*.msg) file, as well as the email message itself.
The original email and all attached files and embedded images in the email and any signature are processed. If any of the attached files are Outlook Message files, they too are recursively processed and any attachments extracted and converted as well.
All of the converted message contents are stored in a folder of the same name as the original Outlook MSG file with an auto-numbered naming sequence in place to handle any file name collisions for embedded images and the attached files.
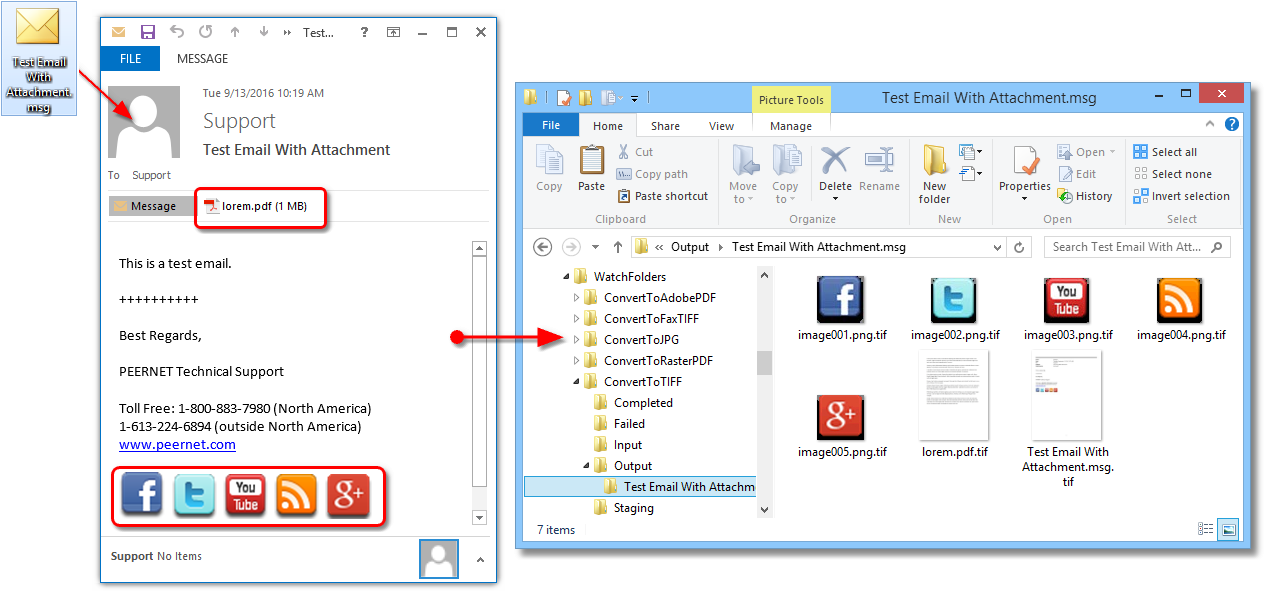
The sample message below, Test Email With Attachments.msg, contains a single attached PDF file, lorem.pdf, as well as 5 small images from the signature.
When the MSG is processed, the original message file and all attachments are processed and placed into a folder named Test Email With Attachments.msg. The attached PDF file will retain its name, and the inline images that are part of the signature named image001 through to image005.
Setting Up a Watch Folder for Message Extraction
Open the Watch Folder Service configuration file in Notepad by going to Start – All Programs – PEERNET Document Conversion Service 3.0 – Watch Folder – Configure Watch Folder Settings.
Watch Folder Service includes several sample watch folder configurations to get you started. You can modify any of them to suit your needs, or copy and paste a section to create a new one, or use an existing one you have already created. You can enable or disable message extraction in each watched folder individually in the Watch Folder Service.
Enabling Message Extraction
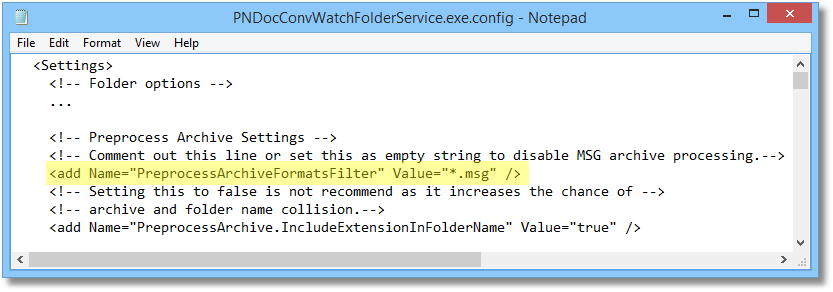
The PreprocessArchiveFormatsFilter setting in each folder will enable or disable message extraction for that folder. This setting determines which archive formats will have additional processing applied by listing them by file extension. Currently only the ‘*.msg’ extension is accepted. Set this as an empty string or comment out the line to disable processing. NOTE: By default, this line is commented out. To enable it, you need to uncomment the line.
Message Extraction Settings
A collection of settings is available to manage the email contents you want extracted.
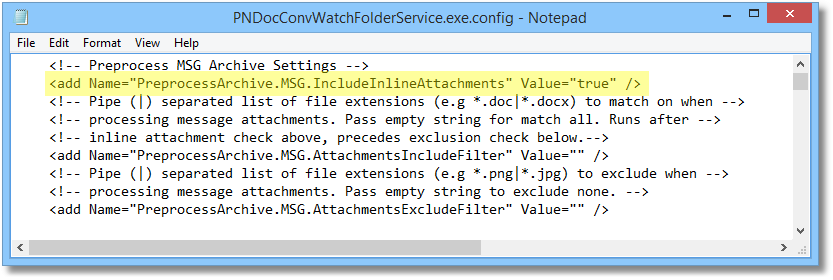
Message attachments can be inline (pasted in the message body) or attached as separate files. Images in signatures are often inline attachments. You can disable the processing of inline attachments with the setting PreprocessArchive.MSG.IncludeInlineAttachments. We recommend leaving this set to true as inline attachments can also be documents and are not always embedded images. This setting is applied to the list of attachments before the include and exclude filters below.
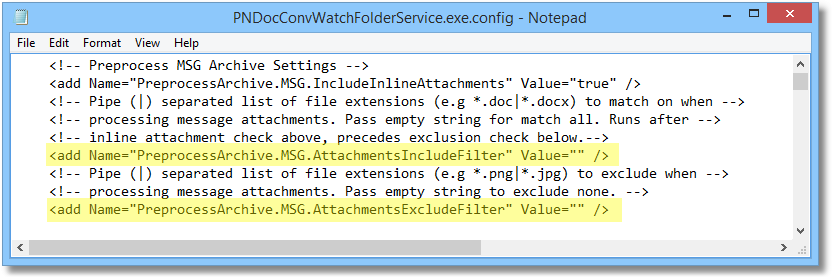
You can filter, based on file extension, which attachments to process and which to skip. To filter for specific file types, enter in the extensions for each type separated by the pipe (|) character. The include filter will be applied first, and then the exclude filter.
Most often only one of the include filter, PreprocessArchive.MSG.AttachmentsIncludeFilter , or the exclude filter, PreprocessArchive.MSG.AttachmentsExcludeFilter, will need to be set at any one time. This will depend on how you need to filter. It is easier to say exclude only “.jpg” attachments, or include only “.pdf” attachments than to write long, specific lists of all of the file types.
To include all attachments and exclude none, set both settings to an empty string.
As an example of filtering, if you only want any attached Word and PDF documents, and the original email message, you can set the include filter to “.doc|.docx|*.pdf” and leave the exclude filter as an empty string.

Controlling the Size of Images
Outlook messages often have signatures in them, and those signatures often have images such as company logos or social icons. These images are often quite small in size on disk originally but can explode in size when processed to the output type and resolution you have set for the watched folder.
If you are including the images in your message processing, the following settings can help you keep the file size of the processed images to a minimum.
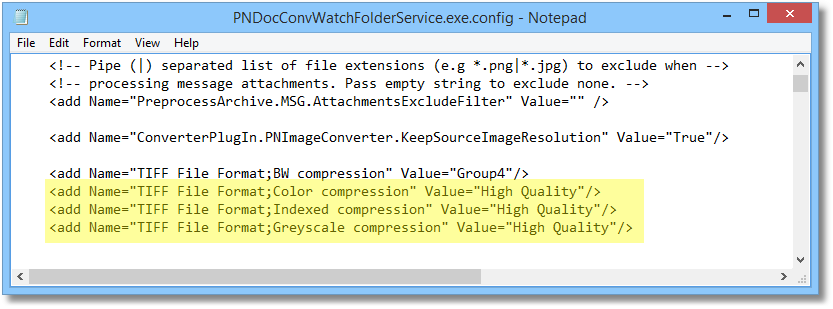
The first setting, ConverterPlugIn.PNImageConverter.KeepSourceImageResolution, will force any images to maintain their original resolution when converted to the new format. This means that if the Watch Folder is set to create 300 dpi TIFF images and one if the email images is a 96dpi JPEG image, the resulting TIFF image will also be 96dpi, and not 300dpi. This results in a much smaller image.

The compression settings used for the output file format you are creating also affect the output file’s final size.
In this example, we are creating TIFF images and using the highest JPEG compression to get a lower file size. Keep in mind that this compression will apply to all files created, and will work better on highly colored images. JPEG compression on a text-based document such as the email message itself can cause slight blurring of text. There is no one size fits all setting that works for all document types; you may have to change the compression settings to work with your style of documents.
Watch more Document Conversion Service Tutorials
Watch Folder Service
Watch Multiple Input Folders
Clustering Setup
Change the Logon Account
Extract MSG Attachments
Run Post Command

