
Batch Conversion: Optimizing For Throughput and Failover Capabilities
Batch conversion refers to converting large numbers of documents from one format to another as a single, automated step. It often allows for converting multiple documents at the time same time instead of one by one individually. Batch converting can save time and effort when dealing with large volumes of data for input into document management systems or as part of data migration.
Optimize Batch Conversion Throughput with Clustering
Beginning with version 3.0.010, Document Conversion Service introduced the concept of clustering and failover protection for batch conversion.
Clustering directs multiple computers running Document Conversion Service at a single shared location of files to convert. This location is often on a network-shared folder accessible to all computers in the cluster. It can contain an existing mass collection of files or be a drop location that periodically receives collections of files for conversion.
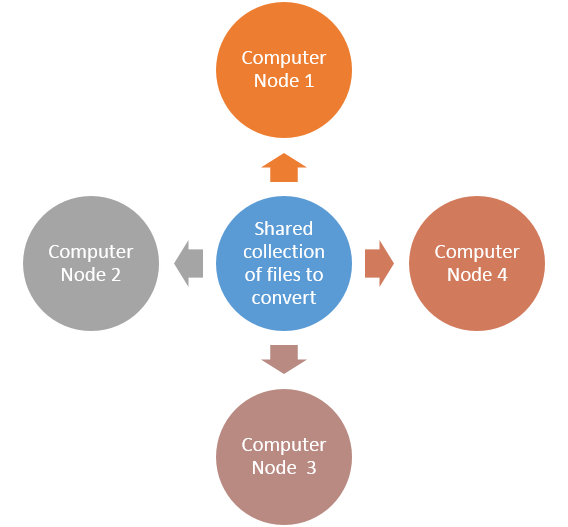
The group of computers together is a cluster, and each computer in the cluster is called a node. The computers, or nodes, work in tandem. Each computer selects a pre-set, customizable number of files from the shared location to convert, does the conversion, and places the converted files into the designated shared output location.
Spreading the work of the batch conversion out across the multiple computers, or nodes, in the cluster allows for faster conversion, load balancing, and failover protection.
A clustered approach for batch conversion works well when you have an extensive collection of stored files or need to convert a significant number of files each day. It also works well when you do not have many files but require 100% uptime on your conversion.
Failover Safety with Clustered Batch Conversion
The key advantages of clustered batch conversion include failover protection and load balancing to optimize each computer in the cluster. Multiple computers performing conversion provide failover protection. When one computer fails or is taken offline for upgrading or maintenance, the others continue to function. This failover protection is essential for environments where continuous operation is necessary.

Spreading the batch conversion work across multiple computers also allows you to tailor the workload on each computer to optimize file throughput based on its processing power.
Document Conversion Service uses its included Watch Folder Service tool to implement clustered batch conversion. Each computer in the cluster will need a separate license for Document Conversion Service. You can use different levels of licensing on each computer depending on the processing power of each computer.
Setting Up the Shared File Location for Batch Conversion
On each computer, the Watch Folder tool monitors the folder for files to pick up. When it finds files, the Watch Folder tool passes them to the Document Conversion Service running on that computer to convert. The Watch Folder then copies the converted files back to the final location.
You will need a common network share location that provides access to the files you want to convert and a folder to store the final converted files. This location needs to be accessible for all computers in the cluster. You will also need a domain level or other account with access to the network share location.
On the network share, create folders for the following four locations used for batch conversion by the shared Watch Folders:
- InputFolder – The folder to watch for incoming files to convert. Searches the root folder and, optionally, any subfolders.
- OutputFolder – The folder for storing the converted files.
- FailedFolder – This folder stores any file that failed to convert.
- CompletedFolder – This folder is optional and, when specified, stores the original file after conversion. Otherwise, after conversion, the file is deleted.
Setting Up Each Computer in the Cluster for Batch Conversion
Before you start, make sure you have the following:
- A Document Conversion service license for each computer in your cluster.
- Access to a domain level or other account with full permissions to the network share location.
To set up a cluster for batch conversion, repeat the following steps for each computer in your cluster:
- Install Document Conversion Service
- Change the Watch Folder Service Account for Batch Conversion
- Update the Watch Folder Service Settings for Clustered Batch Conversion
- Start the Document Conversion Service
- Start the Watch Folder Service
Step 1: Install Document Conversion Service
Install Document Conversion Service, and when prompted for the Logon Account, allow the install to create and use the local DCSAdmin account. Do not start the Document Conversion Service or the Watch Folder service at the end of the installation. There are a few configuration steps we need to set up for clustered batch conversion first.

Step 2: Change the Watch Folder Service Account for Batch Conversion
Next, update the PEERNET Watch Folder Service Log On credentials to use the domain or other account with access to the network share location. Updating the logon account is critical as the Watch Folder Service tool runs under this account and needs full access to the network share to read, write, and lock the files as part of the clustered conversion.
The Services app lists all installed services and allows you to edit their Log On account, start-up mode, and other properties. In the Windows taskbar, type “Services” into the search bar. Click the Services app that appears in the search results.

Find PEERNET Watch Folder Service in your list of services and double-click it to open the properties window for editing.

Click the Log On tab and change the user and password to a domain account that can access your shared or network folders. Click Apply or OK. Do not start the service at this point!
The account will be given the Log On As a Service right if it does not already have it. Your Network Admin may have to add the privilege for you.

Step 3: Update the Watch Folder Service Settings for Clustered Batch Conversion
The next step is to edit the Watch Folder Service configuration file. The configuration file will open in the PEERNET DCS Editor.
To do this, go to the DCS Dashboard, click Watch Folder Settings, and then Edit Configuration. You can also open the configuration file by going to Start – All Programs – PEERNET Document Conversion Service 3.0 – Configure Watch Folder Settings in the Windows start menu.
Set the Network Share Paths for Batch Conversion
The Watch Folder Service configuration file contains multiple watch folder sections. There is a separate section for each folder of files you want to monitor with settings to determine the type of file to create.
Find the Watch Folder section you are working with, or if this is your first time setting up a watch folder, find the closest matching section for the type of file you want to create. Here, we will set the network share paths for the InputFolder, OutputFolder, FailedFolder, and, if using, the CompletedFolder to the network paths created above.

Set the Local Paths for Temporary Working and Staging Folders
The other two folders, the StagingFolder and WorkingFolder, must be kept unique and preferably local to each computer in the cluster. Your conversion will fail if these watch folders on different computers reference identical locations. Do not do this!
The Watch Folder uses these folders as a temporary holding location when picking up and processing files. We highly recommend configuring these folders to a local drive on the computer to reduce network traffic and improve performance.

Lastly, turn on clustered processing for this watch folder section by setting the value for ClusteredProcessing.Enabled to true. This setting is essential and allows multiple Watch Folder Services on different computers to synchronize file pickup on the network share folder.

Save the updated configuration file using the Save button in the upper left. With our changes made, the last thing we need to do is to start both the Document Conversion Service and the Watch Folder Service.
Step 4: Start the Document Conversion Service
The widget at the top of the DCS Dashboard gives you easy access to start and stop the Document Conversion Service. Click the green play icon next to DCS Service to start the service.

For older versions that do not have the Dashboard, go to the Document Conversion Service system tray icon and select Run Conversion Service to start the service.

You can use the logging console to monitor the Document Conversion Service as it starts. Open the console by going to the DCS Dashboard, clicking DCS Settings, and then View Conversion Log.
If you do not have the Dashboard, go to Start – All Programs – PEERNET Document Conversion Service 3.0 – Open DCS Log Viewer.
The logging console displays status messages as the service begins and processes files. Use this tool to monitor service start-up and for troubleshooting only. Do not leave this tool open and running 24/7; doing so will cause issues with the conversion service.

Step 5: Start the Watch Folder Service
Go to the services widget at the top of the DCS Dashboard. Click the green play icon next to Watch Folder Service to start the service with your new clustered batch conversion settings.

For earlier versions without a dashboard, start the Watch Folder by going to Start – All Programs – PEERNET Document Conversion Service 3.0 – Watch Folder – Start Watch Folder Service. You can also start and stop the Watch folder service by selecting the service named PEERNET Watch Folder Service in the Services Control panel.
Like Document Conversion Service, the Watch Folder Service tool also has a logging console for viewing start-up information. Again, only use this logging console to monitor start-up and troubleshoot conversion issues. Do not leave this tool open and running 24/7. Open the Watch Folder logging console by going to the DCS Dashboard, clicking Watch Folder Settings, and then View Conversion Log.
If you do not have the Dashboard, go to Start – All Programs – PEERNET Document Conversion Service 3.0 – Open DCS Log Viewer.
Step 6: Repeat for Each Computer
Repeat the above steps 1-5 for each computer in your cluster.
Tips for Increasing Batch Conversion Speed
Adjust the Batch Conversion Throughput for Each Computer
Depending on each computer’s capabilities and the license level of DCS you have installed, you can individually configure each computer in your cluster to maximize your document conversion throughput. See the how-to article Configure DCS and Watch Folder for Optimal Performance for complete details on determining your maximum throughput and applying the settings to both DCS and Watch Folder Service.
Faster PDF Conversion
Starting with Document Conversion Service 3.0.031, we offer our fastest PDF conversion capabilities to date with a new built-in PDF converter. Say goodbye to the days of relying on Adobe Reader or Ghostscript for your PDF conversions.
To verify the usage of the new converter, please open the DCS Dashboard. Go to DCS Settings – Edit DCS Configuration to view the list of converters and their start-up state. Set the Adobe PDF – Builtin converter to Auto or On to use it instead of Adobe Reader or Ghostscript when converting PDF files.

Using Ghostscript Instead of Adobe Reader
For previous versions that do not have the new built-in PDF converter, configuring the Document Conversion Service to convert PDF files using Ghostscript instead of Adobe will speed up your batch conversion of PDF files.
While this approach is generally faster, we always recommend you test with sample documents to ensure that GhostScript can render your PDF documents correctly. You will need to run a sample set of PDF files using this approach to determine if using GhostScript instead of Adobe is an acceptable alternative.
Download and install the latest 32-bit version of GhostScript, as DCS does not work with the 64-bit version. If you have an internal version vetted by your IT department, you can use that if it is 32-bit and version 9.05 or higher.
Open the DCS configuration file by going to Start – All Programs – PEERNET Document Conversion Service 3.0 – Edit DCS Configuration File.
Search the configuration file for the Adobe Acrobat Reader AppFactory section and set the Enabled setting to False to turn off Adobe Reader processing for PDF files. DCS automatically uses GhostScript to convert PDF files when Adobe Reader is missing or disabled.

Beginning with version 3.0.014, Document Conversion Service will auto-detect when Ghostscript is available and use the highest version it finds. For earlier versions of DCS, or to use a particular version of Ghostscript, search for the Ghostscript AppFactory setting. Remove the comments from the GS_DLL and GS_LIB settings and modify the paths for your version of GhostScript.

Once modified, save your changes and restart DCS to pick up your modifications.

