Print Oil Well Logs to One Continuous TIFF Image
If you are looking to convert oil well logs, which is one long continuous page of data that can vary in length, to a TIFF file, then you can use the Printer Overrides setting in TIFF Image Printer and Raster Image Printer to force a long paper size. That way, when printing from your oil well log application, one continuous page is created. The image printer can also be configured to remove any remaining whitespace after the data, so the TIFF file ends after the well log data.
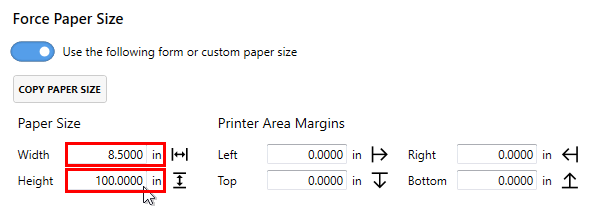
In the Printer Overrides tab, you would enter the width of the well log, and in height, you would enter a value little larger than the longest well log that you may print from your oil well log application. (The larger height value is to make sure that the well log data is not accidentally cut-off if the well log is a bit longer than the longest expected height.)
In the Pages Editing tab, you would enable the trimming of the bottom margin to have the image printer remove the extra whitespace after the well log data in the created TIFF file.
Below are instructions on how to create a profile that will correctly convert your oil well logs to your desired output format by using the Printer Overrides tab to force a custom paper size and the Page Editing tab to enabling trimming.
Step by Step Instructions
- Launch the Dashboard.

- Select “Edit & Create Profiles” to open Profile Manager.
- Select “Add a profile” to create a personal profile, or create a copy of one of our system profiles.
- Name the profile, add a description, and click Save.
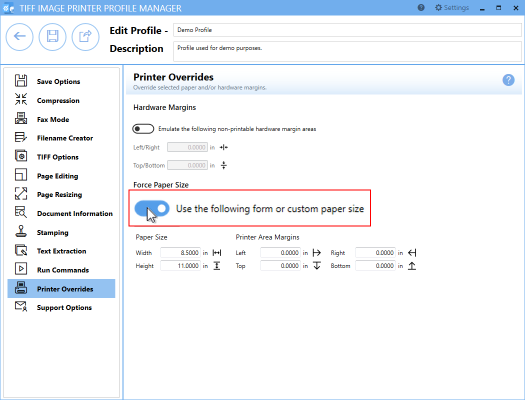
- On the Printer Overrides tab, under Force Paper Size, enable Use the following form or custom paper size.

- Enter the page size. In this example we will use Width 8.5″ and Height 100″. Since the length of oil well logs vary, we are going to enter the maximum possible page length which is 100″. This will create a varying amount of white space at the bottom of your output files which we will remove using the trimming feature.

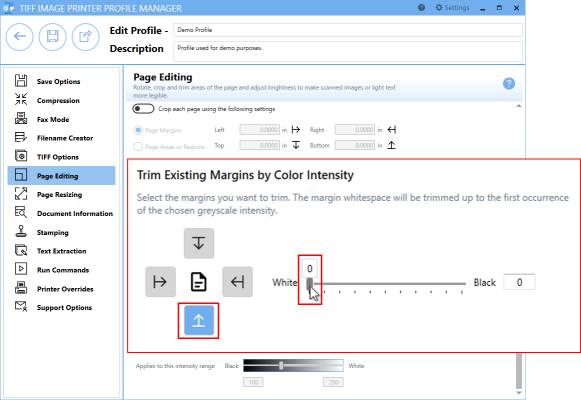
- On the Page Editing tab, under Trim Existing Margins by Color Intensity, click the bottom arrow to enable trimming of the bottom margin of the page.
- Ensure that the color intensity sliding scale is set to white. This means that your image printer will trim your output file from the bottom of the page until it reaches the first pixel that is not white.

- Click Save-Back, and close Profile Manager.
If you plan to use these settings regularly, you may wish to make this personal profile the default profile used by your image printer.
- Select “Manage Printers” to open Printer Management.
- Select the printer you wish to edit and use the Profile drop box to select your desired default profile.
- Select the Save icon to save changes.
- Select the Home icon to return to the Dashboard.
- Close the Dashboard. Now when you print your documents to your image printer, you will create output files as one continuous page of varying lengths depending on the length of the original oil well logs.


