
Email to PDF and Process Attachments
Email to PDF to archive and share MSG and EML content in a universally accessible format. While converting the email content is straightforward, extracting and converting the attachments is more complex. In this guide, we walk you through the steps to convert Outlook emails (MSG), Electronic Mail messages (EML), and their attachments to PDF files.
If you prefer video tutorials, the video below demonstrates converting Outlook emails to TIFF format instead of PDF. This method is particularly useful for those who need to archive emails in a non-editable image format. The options for creating PDFs are slightly different from the TIFF options in the video, but the steps are the same.
Emails to PDF: Why do it?
- Universal Access: Virtually any device can open PDFs without compatibility issues.
- Archiving: PDFs are ideal for long-term storage, preserving the layout and content of the email.
- Sharing: Sharing emails as PDFs ensures that recipients see the email formatted as intended, with no risk of formatting changes.
How to Convert Outlook and Other Email to PDF
Included with our Document Conversion Service, the Watch Folder Service can convert Outlook Messages (*.msg) and Electronic Mail files (*.eml) and, at the same time, extract and convert any supported file attachments in the Messages.
The original email, all attached files, and any embedded images in the email and signature are processed. We recursively extract and convert any Outlook Message (MSG) or EML files attached to the original email and any subsequent attachments until we reach the end of the attached files.
Where Do The Files Go?
A folder with the same name as the original Outlook MSG or EML file stores the converted message and all its converted attachments. An auto-numbered naming sequence is in place to handle any file name collisions for embedded images and the attached files.
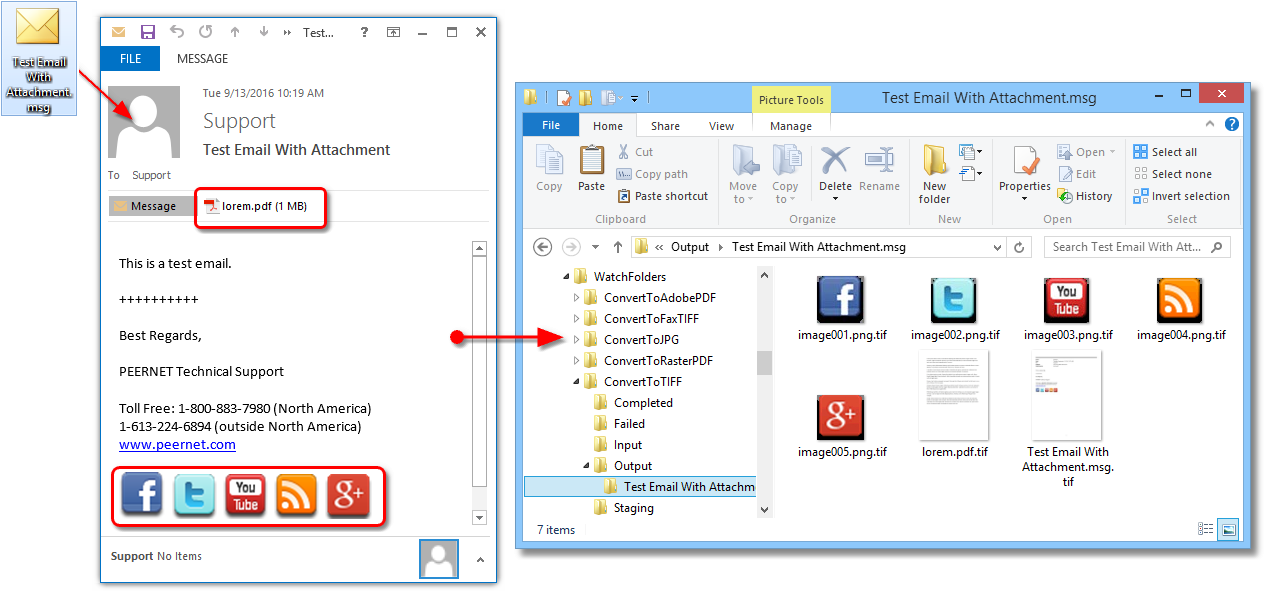
The sample message below, Test Email With Attachments.msg, contains a single attached PDF file, lorem.pdf, and five (5) small images from the signature.
When we convert Outlook email to PDF, the original message file and all attachments are processed and placed into a folder named Test Email With Attachments.msg. The attached PDF file retains its name, and the inline images from the signature are named image001 through to image005.
Configure a Watch Folder to Convert Outlook Email to PDF
The Watch Folder Service configuration includes several sample watch folder configurations to get you started. You can modify any of them to suit your needs or copy and paste the entire section to create a new one. In this guide, we are using the ConvertToAdobePDF Watch Folder section to convert Outlook Email to PDF files.
To edit the configuration for a watched folder, go to the DCS Dashboard, click Watch Folder Settings, and then Edit Configuration.
You can also open the configuration file by going to Start – All Programs – PEERNET Document Conversion Service 3.0 – Configure Watch Folder Settings in the Windows start menu.
The configuration file will open in the PEERNET DCS Editor.
Enabling Message Extraction
Scroll or search the configuration file to find the Watch Folder section you want. As we said above, we are using the ConvertToAdobePDF Watch Folder. You can turn message extraction on or off in each watched folder individually.

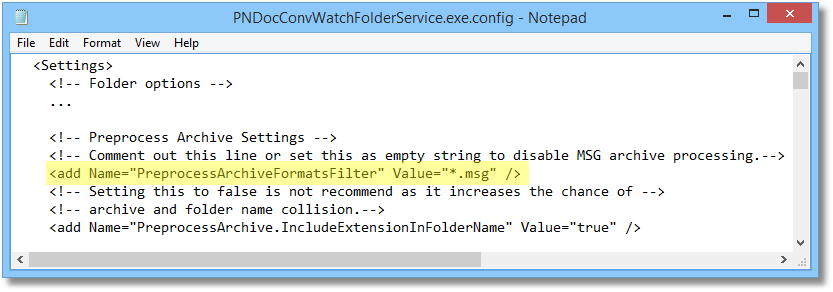
The PreprocessArchiveFormatsFilter setting in each folder controls Outlook email attachment processing for that folder. Comment out this setting or set it as an empty string to convert just the email message and ignore the attachments. To convert the attachments as well, list which email types, by extension, you want to process. The default setting is *.msg|*.eml. The *.msg will extract attachments from Outlook MSG files. The *.eml tells us to extract attachments from EML files created from Windows Live Mail, Windows Mail, Outlook Express, and Gmail.
Convert Outlook Email to PDF Settings
A collection of settings is available to manage the email contents you want to extract from Outlook email and convert to PDF.
Message attachments can be inline (pasted in the message body) or attached as separate files. Images in signatures are often inline attachments.
Use the setting PreprocessArchive.MSG.IncludeInlineAttachments to ignore inline attachments and only process attached files. We recommend leaving this set to true. Inline attachments are often images but can also be documents you want.
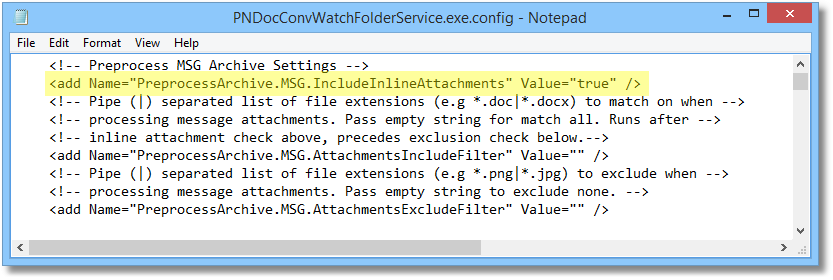
PreprocessArchive.MSG.AttachmentsIncludeFilter – You can filter by file extension which attachments to process and which to skip. To include specific file types, enter the extensions for each type separated by the pipe (|) character into this setting.
PreprocessArchive.MSG.AttachmentsExcludeFilter – To exclude a file type, enter the file extension for each file type you don’t want. List multiple file types separated by the pipe (|) character.
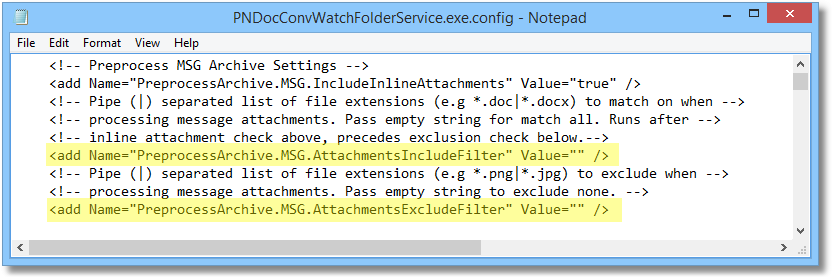
The include filter is first, followed by the exclude filter. Usually, you only need one option or the other. Which one you need depends on what you want to filter. It is easier to exclude only *.jpg attachments or include only *.pdf attachments than to write long, specific lists of file types.
Leave both settings to an empty string to include all attachments and exclude none.
As an example of filtering, if you only want to convert the email message and any attached Word and PDF documents, set the include filter to *.doc|*.docx|*.pdf. Leave the exclude filter as an empty string. When filtering, we automatically do not filter out any attached MSG and EML files.

Controlling the Size of Images
Outlook messages often have signatures at the bottom with images such as company logos or social icons.
The size of these images is usually quite small. Their size can increase significantly when processed to match the output type and resolution you’ve configured for the watched folder, especially when converting to images instead of PDF. The following settings can help you keep the file size of the processed images to a minimum.
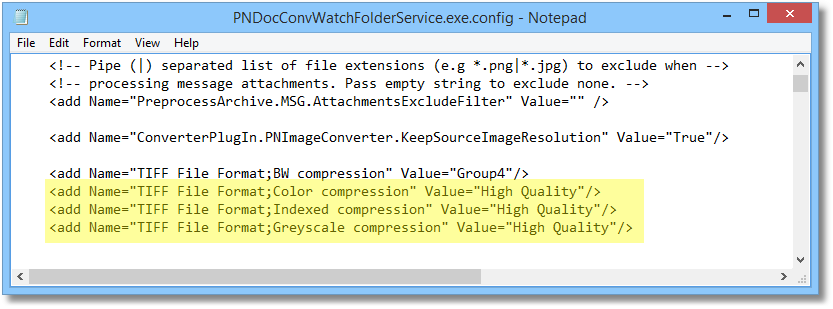
PreprocessArchive.MSG.ImageAttachmentsKeepSourceResolution – this setting forces attached images to maintain their original resolution when converted to the new format. The need for this setting is more apparent when creating images than PDF files. If you were using a Watch Folder set to create 300 dpi TIFF images, and one of the email images is a 96dpi JPEG image, the resulting TIFF image will also be 96dpi and not 300dpi. This results in a much smaller image.

The compression settings used for the output file format you are creating also affect the final size of the output file.
In this example, we embed the images into the PDF files using the highest JPEG compression for color and greyscale images to get a lower file size. Similarly, the compression method chosen for indexed and black-and-white images also helps minimize the file size of the PDF.
With compression, there isn’t a one-size-fits-all setting that will work for all document types, You may have to adjust the compression settings to work best with your documents.
Watch more Document Conversion Service Tutorials
Watch Folder Service
Watching Multiple Input Folders
Clustering Setup
Change the Logon Account
Extract MSG Attachments
Run Post Command

