
Migrating to Version 12: Compatibility Mode Quick Start Guide
Migrating to a new software version can be daunting. The old saying, if it ain’t broke, don’t fix it, is often quoted when deciding whether or not to upgrade. While this seems like it saves time, it is better to invest the time to go through the migration process when it ain’t broke, instead of scrambling later to get a production system back up and running.

Many of our clients use our printer script file to control the printing process. Each printer version looks for its version of the script file: PNTIF12S.INI for version 12, PNTIF11S.INI for version 11, and so on. The script file can contain custom settings used for each print. These are often settings for file type, where to save the file, and any automated commands to run after file creation. The settings in the script file override all other settings, making migrating more streamlined when everything is configured properly.
You can use the script file in one of two ways:
- The script file contains custom settings used to override all settings for each print.
- It integrates with a custom process that uses the script file to change settings on the fly when automating printing.
Below, we will show how to migrate from an earlier version of our TIFF, PDF, or Raster Image Printer for both scenarios.
Quick Links
Migrating PNTIF11S.INI Using Compatibility Mode
Upgrading to the latest version is now easier with our new Version 11 compatibility mode feature in Version 12.0.25. If you control the Image Printer with a PNTIF11S.ini script file and want to move to the latest version and ‘just have it work’, this new feature is for you. This new feature facilitates the process of migrating your settings smoothly.
How To Tell If You Are Using a Script File
We often encounter clients wanting to upgrade who are unfamiliar with how their file conversion process uses our printer. This occurs for various reasons, such as when the individual who developed the software is no longer with the company or if the integration was outsourced to a contractor. Here are a few quick ways to check if you use the PNTIF11S.ini script file with version 11 before migrating.
Look in the Windows TEMP Folder
The Image Printers check the Windows TEMP folder for a script file each time you print. If the printer finds one, it reads it and uses the settings in the script file to create the output file. The printer performs this check every time you print.
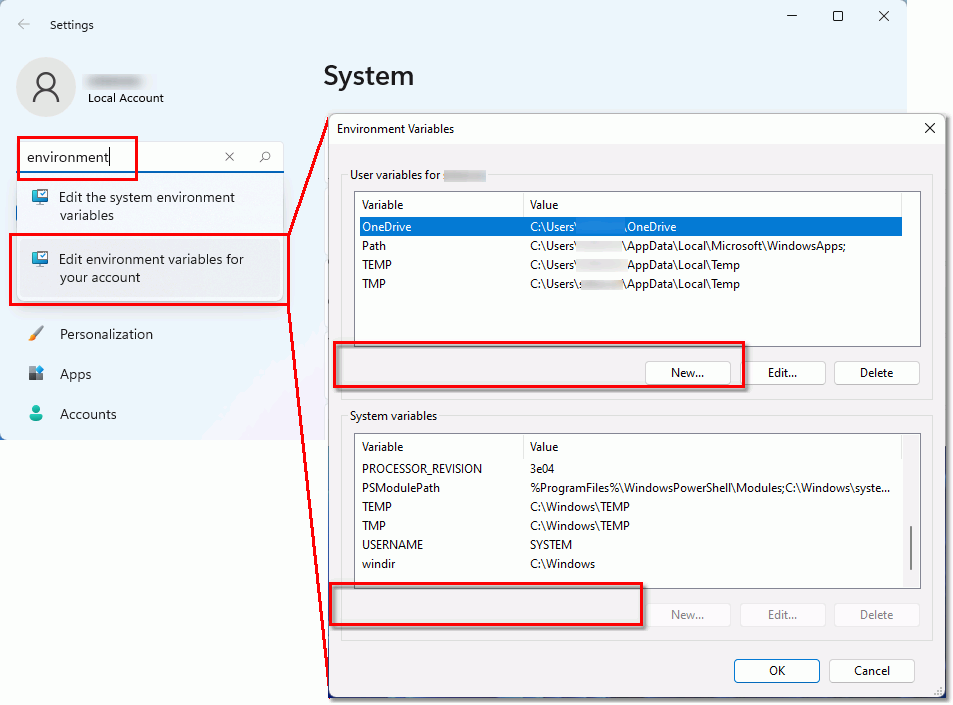
There are two TEMP folders. Printing applications will use the user TEMP folder of the account they are running under. Windows services and scheduled tasks running under SYSTEM would use the system TEMP folder. Look in both folders to see if a script file exists in one of them.
To open the temp folder, type %TEMP% into the address bar at the top of a File Explorer window.
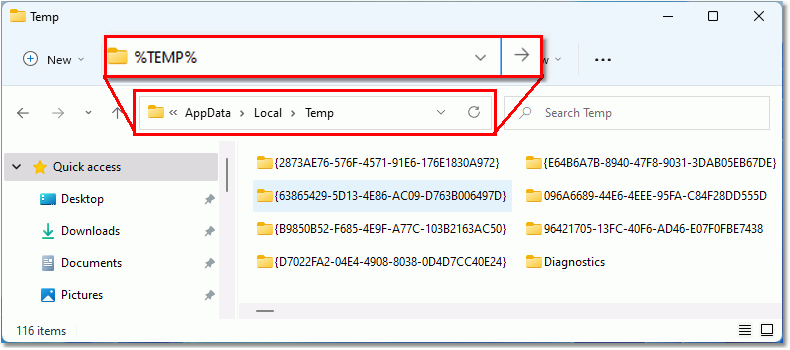
To find your TEMP paths, go to Windows Settings, and type the word environment in the search bar. Select the appropriate user or system settings.
Check the Windows Registry
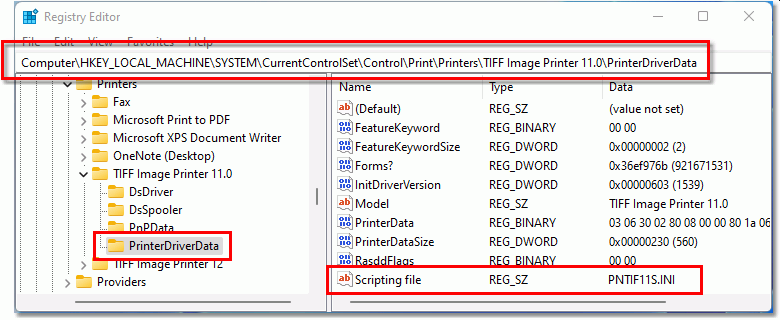
The script file can be a custom name instead of our default PNTIF11S.INI. This is often the case when you have multiple copies of the Image Printer, and each printer needs to read settings from a separate script file.
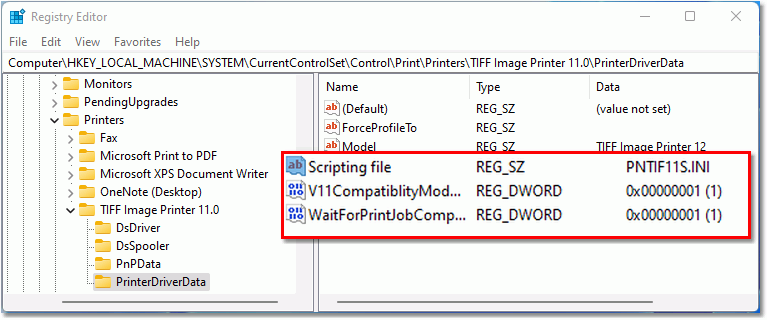
When you need to set a custom script file for one or more Image Printers, the Windows Registry stores this information in a per-printer key in the following location:
HKEY_LOCAL_MACHINE\SYSTEM\CurrentControlSet\Control\Print\Printers\Each printer key contains a subkey, PrinterDriverData. Under this key, adding a registry string value, Scripting file, allows you to specify the name of the script file in the Windows TEMP folder or the full path to the script file in a different location. This is the second place the printer looks when checking for a script file after looking in the TEMP folder.
Dynamic Script Files
Dynamic script files provide on-the-fly printer settings when automating printing to the image printer from another process. The automation process actively creates, uses, and removes script files. This means they are not always physically present on the disk.
If this is the case, migrating using the compatibility mode still works. You only need to know the name of the script file. Truthfully, in most cases, the Windows TEMP folder and default names of PNTIF11S.INI, PNTIF10S.INI, etc., are what we see used most often. When migrating, this knowledge simplifies the transition.
Turn On Compatibility Mode in the Script File
For our clients who use the script file in the Windows temp folder, we’ve added a new script file setting to toggle compatibility mode on the printer through the script file. This approach works if you use the script file to lock the printer to preset options or update the script file with new settings each time you print.
When compatibility is enabled, the script file recognizes and uses settings from previous versions. This allows most users to rename their PNTIF11S.INI (or earlier) script file to PNTIF12S.INI, add the new setting, save the file, and be done with the migration.
If you used any script file settings listed below, they were initially deprecated or replaced with new features in version 12. This compatibility mode brings them back, easing your migration to this latest version.
- Advanced File Naming
- Save;Prompt
- Save; Overwrite
- Run; RunAtStart command
- Run;RunAtEnd command
******************************* Save settings
[Save]
;
; NEW in v12 build 12.0.027 and up
;  V11 compatibility mode was introduced for customers migrating from v11 to v12
;  When set to 1, this switches the file naming style back to v11 from v12 allowing
;  existing v11 style script files to be used as well as getting the same naming
;  as configured in v11.
;
V11CompatibilityModeEnabled=1
Locking the Print Job into the Print Queue
The other compatibility setting you may need to add to your script file is to lock the print job in the print queue until the file is created. The default behavior in version 12 is that the print job leaves the queue as soon as it is spooled but before we create the file. In version 11, the print job was locked in the print queue until the output file was created. Enabling this setting will lock the print job in the queue, just like previous versions.
[Devmode settings]
Resolution=300
Printer Profile=
Orientation=
Color=1
Paper size=

;
; NEW in v12 build 12.027 and up
;  Wait For Job Completion set to 1 indicates the
;  Microsoft Print Subsystem will wait for the job to complete
;  converting all printed pages to images before the print job
;  is removed from the printer's queue.
; Default is 0, which means don't wait.
;
Wait For Job Completion=1
Turn On Compatibility Mode on the Printer
We want to make migrating to the latest version as easy as possible. To that end, we made it as simple as toggling on an option to run the printer in compatibility mode.
This option is located in the Dashboard under Manage Printers. This is where you can rename the printer, add and delete printers, and change printer settings. It is also where to go to enable compatibility mode individually for each printer. While we show the TIFF Image Printer below, the process is the same for our Raster and PDF Image Printers.
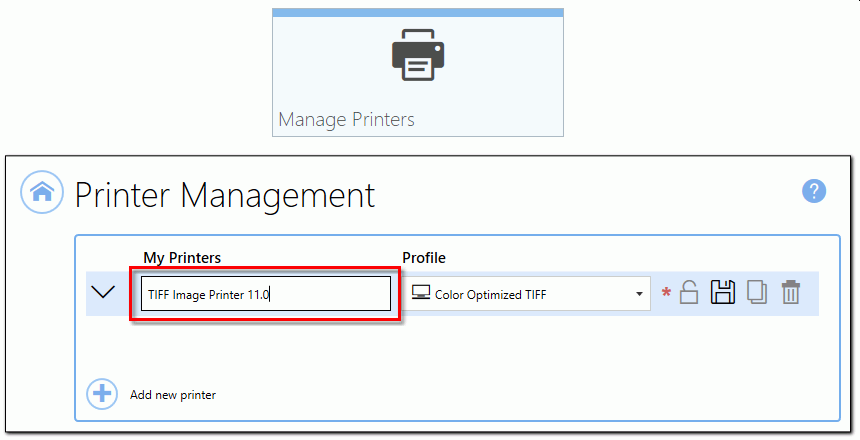
Changing the Printer Name
The first step is renaming the printer, TIFF Image Printer 12, to TIFF Image Printer 11.0, the previous version. This is especially important if you automate the printing process. Existing automation processes are often hard-coded to print to TIFF Image Printer 11.0. To emulate a version earlier than 11, change the printer name to match that version instead of 11. If the previous version is still installed, you must uninstall it before you can complete this step.
Alternatively, some clients use a custom name for the printer. This name reflects the task and is easier for a user to recognize, such as TIFF Archiver. In that case, you would rename the printer to your custom name.
When you are not automating using a specific printer name, or are simply printing files to the printer to convert them, you do not need to rename the printer.
The second step is to enable compatibility mode from the advanced settings section of the printer. Click the down arrow next to the printer name to show the advanced settings.
Under the Compatibility Options section, toggle on Run printer in version 11 compatibility mode.
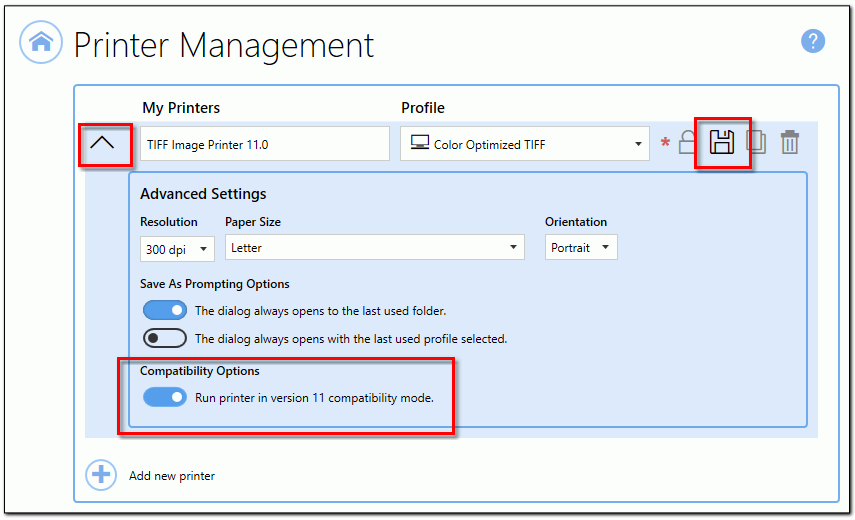
Enabling compatibility mode creates the Scripting file registry key for the printer. This key directs the printer to look for and use a PNTIF11S.INI script file in the Windows Temp folder.
It also creates the V11CompatiblityModeEnabled key that directs the printer to look and act like version 11.
Changing the Path or Name Of the Script File
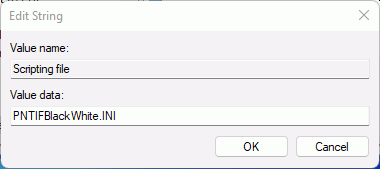
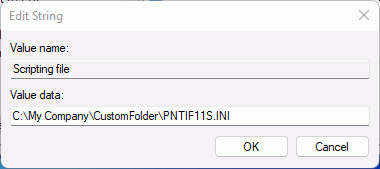
The Windows TEMP folder is the default and most commonly used location for our PNTIF11S.INI script file. However, the Scripting file registry key gives you the flexibility to use a script file with a different name and to store the script file in a custom folder.
Clients with multiple copies of the TIFF image Printer, each with unique settings, will use this feature to direct each printer to its script file. Another use for script files in a custom location is to separate the printer settings when automating printing from more than one program.
To change the name of the script file for a printer, edit the value stored in that printer’s Scripting file registry key. Turning on compatibility mode for the printer automatically creates this key for you. When the registry key contains only the name, we still look for the script file in the Windows TEMP folder.
To look for the script file in a custom location, edit the Scripting file value to contain the full path to your custom location. Here the script file name can be the default of of PNTIF11S.INI or a name of your choosing.
Making Migrating Easy
We hope this new feature makes it easier for you, our client, to migrate to our latest version. There are many new features to discover that we hope you will find beneficial. We value your feedback, so please let us know what you think or reach out with any questions. As always, our Support Team is here to help guide you through your migration process.

