Running Post-Process Commands with Watch Folder Service
Introduced in Document Conversion Service 3.0.010, and updated in version 3.0.015, the Watch Folder Service can now run post-process commands for each file it finds to convert. These commands can be batch files or other executables.
You can specify separate commands to run for when the conversion succeeds and when it fails. When the conversion is successful, we can run the command a single time, or run the command against each file created by the conversion. If the conversion fails, then we run the command against the original source file.
A sample scenario of how this could be useful would be a watched folder set up to run a command to upload all newly converted files to an FTP server or a web server when they are successfully converted, and to send an email with the name of the original file in the case of a conversion failing.
Running a Command on Success
DCS versions 3.0.010 – 3.0.014 will run this command for each file we create. This means the command will be run multiple times when creating single-paged file formats such as JPEG and serialized TIFF from multipaged documents.
Starting with version 3.0.015 the command is called once and it does not run until the file is converted and the created file, or files, have been copied to the output folder. If desired, there is an option to return to the previous behavior and run the command individually for each file created.
Also added in 3.0.015 is the option to create a Unicode text file containing a list of the created files. This text file is placed in the OutputFolder location with the created files. You are responsible for deleting this file when you are done with it.
The following variables for are available to use in the Success command line parameters, and are replaced with their appropriate values when the command runs.
- $(OutputFilePath) – The full path to the converted file. When creating serialized output this is last file created in the set unless RunAtEnd.Success.RunForEachFile is true, in which case it is the full path to the converted file.
- $(SourceFileName) – The file name of the original file.
- $(OutputFileList) – Only valid when RunAtEnd.Success.CreateOutputFileList is set to true, this variable is the full path to a Unicode text file containing a list of all the files created, one per line. This list can be a single file, for multipaged conversion, or many files in the case of serialized conversion.
- $(OutputFileNumber) – The numerical index of the file being processed in the run command. Index starts at 1.
- $(OutputFileNumberCount) – This is the total number of files created.
Running a Command on Fail
This command is run when a file conversion fails. The variables below are available to use in the Fail command line parameters, and are replaced with their appropriate values when the command runs.
- $(FailedFilePath) – The path to the original file in its failed location, usually the FailedFolder.
- $(SourceFileName) – The file name of the original file.
Waiting for a Command to Finish
When running a command, the Watch Folder will either wait for the command to complete or not wait for it to complete and will move on to the next file immediately. The default action is not to wait for the command to complete.
When waiting for the command to complete, a maximum wait time controls when to stop the running command if it has not completed in a timely fashion. This timeout can be increased but it cannot be set to 0 and it is enforced. The default timeout is three minutes.
- DoNotWait – does not wait for the command to complete. (Default)
- WaitForCompletion – wait for the command to complete before continuing.
- WaitWithExitCode – waits for the command to complete and emits the exit code in the log.
Sample Usage
Below is a sample post-conversion command setup that uploads any successfully created files to another location using command line FTP, and sends a notification email using a SMTP via a PowerShell script for any files that fail to convert.
There are many ways to do these two tasks. The scripts below are just one approach and are only provided to demonstrate setting up post-process commands. Please test accordingly if you plan to use them in a production environment.
The FTP Upload Batch File
The batch file, UPLOAD.BAT, shown here takes a single argument, the full path to the file to upload, which we pass to it using the command line variable $(OutputFilePath).
It creates a data file that is passed to Microsoft’s built-in FTP utility using its scripting option. As the Watch Folder is converting files in parallel, we use the %random% environment variable to create a uniquely named input file for each converted file.
In the batch file, replace the MyUserName, MyPassword and SERVERNAME.COM with the correct values for your ftp server, and set the upload location to the path where you want the files to be stored.
@echo off
REM
REM This code is distributed in the hope that it will be useful, but WITHOUT
REM ANY WARRANTY; without even the implied warranty of MERCHANTABILITY or
REM FITNESS FOR A PARTICULAR PURPOSE.
REM
REM Usage:
REM     UPLOAD.BAT

IF [%1]==[] GOTO NO_ARGUMENTS

REM Create a random name
set FTPCMDNAME=ftpcmd%random%.dat

REM Replace the values below with your user name, password and server.
set USERNAME=MyUserName
set PASSWORD=MyPassword
set SERVER=SERVERNAME.COM

REM Set your upload location here
set LOCATION=/ftp/SalesFiles/

REM Create the ftp script
echo user %USERNAME%> %FTPCMDNAME%
echo %PASSWORD%>> %FTPCMDNAME%
echo bin>> %FTPCMDNAME%
echo cd %LOCATION%>> %FTPCMDNAME%
echo put %1>> %FTPCMDNAME%
echo quit>> %FTPCMDNAME%

REM Upload the  file
ftp -n -s:%FTPCMDNAME% %SERVER%

REM Clean up
del %FTPCMDNAME%

REM Uncomment if you want to move uploaded files to a different location.
REM move %1 C:\FilesUploaded

GOTO DONE

:NO_ARGUMENTS
REM Add your own code here to handle missing arguments.
ECHO Missing Arguments
ECHO Usage: UPLOAD.BAT ""

:DONE
The SMTP Email Batch File
Two files are used to send the email – a batch file, FAILED.BAT, that takes the path to the failed file and sends the email via SMTP using a PowerShell script.
The batch file shown here takes a single argument, the full path to the failed file, which we pass to it using the command line variable $(FailedFilePath). This path is then passed to the PowerShell script.
@echo off
REM
REM This code is distributed in the hope that it will be useful, but WITHOUT
REM ANY WARRANTY; without even the implied warranty of MERCHANTABILITY or
REM FITNESS FOR A PARTICULAR PURPOSE.
REM
REM Usage:
REM     FAILED.BAT ""

IF [%1]==[] GOTO NO_ARGUMENTS

REM Set path to the script here
SET PS_SCRIPT="C:\ScriptFiles\sendemail.ps1"

Powershell.exe -executionpolicy remotesigned -File %PS_SCRIPT% -FailedPath "%1"
GOTO DONE

:NO_ARGUMENTS
REM Add your own code here to handle missing arguments.
ECHO Missing Arguments
ECHO Usage: FAILED.BAT ""

:DONE
The PowerShell script to send the email is listed below and needs to be updated to use your SMTP credentials. Make your changes then save this file in the location you specified for the PS_SCRIPT variable in the batch file above. For our example, we would save it as C:\ScriptFiles\sendemail.ps1.
# This code is distributed in the hope that it will be useful, but WITHOUT
# ANY WARRANTY; without even the implied warranty of MERCHANTABILITY or
# FITNESS FOR A PARTICULAR PURPOSE.
#
param([String]$FailedPath)
#
# Replace these values with your SMTP credentials
$SMTPServer = "smtp.gmail.com"
$SMTPPort = '587'
$EmailFrom = "[email protected]"
$Password = "YourGmailPassword"
$EmailTo = "[email protected]"
$Subject = "File Failed"
$Body = "The following file has failed to convert : " + $FailedPath
#
# Create the mail object and sent the email
$SMTPClient = New-Object Net.Mail.SmtpClient($SMTPServer, $SMTPPort)
$SMTPClient.EnableSsl = $true
$SMTPClient.Credentials = New-Object System.Net.NetworkCredential($EmailFrom, $Password );
$SMTPClient.Send($EmailFrom, $EmailTo, $Subject, $Body)
Configuring the Watch Folder for Post Process Commands
Each watch folder definition has separate sections for enabling and running post process commands for conversion success and failure.
Take note of the usage of HTML escape characters for the quotation marks around the variable names in the parameters in order to pass the parameters with enclosing quotes.
In the configuration below, the two batch files, UPLOAD.BAT and FAILED.BAT, and the PowerShell script sendemail.ps1 above are all located in the folder C:\ScriptFiles.
Running UPLOAD.BAT for each successful file:
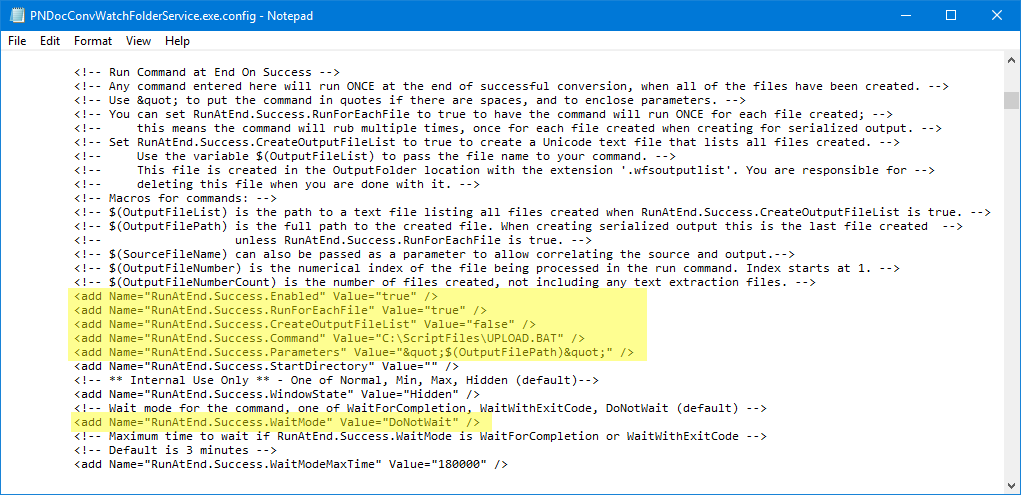
To run a command on success, set RunAtEnd.Success.Enabled to true.
We want to upload all converted files to an FTP server. The default behaviour is to run this command only once, after the created file is copied to the OutputFolder. This works as expected when creating multipaged formats such as TIFF or PDF.
To handle creating single-paged files formats such as JPG images, or serialized TIFF images where each page is its own file, we need to set RunAtEnd.Success.RunForEachFile to true.
Enter the full path to the command to run, C:\ScriptFiles\UPLOAD.BAT, into RunAtEnd.Success.Command.
The arguments to the UPLOAD.BAT batch file is the full path to the created file. We pass this using the $(OutputFilePath) variable set in RunAtEnd.Success.Parameters. To handle paths with spaces, use the HTML escape characters for quotation marks.
Running FAILED.BAT for conversion failure:
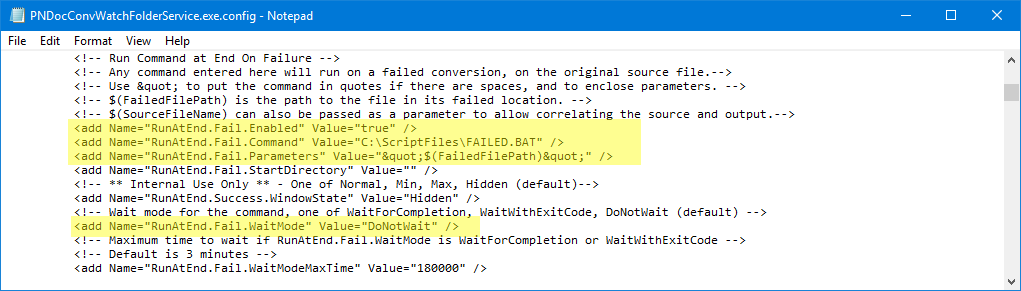
To run a command on failure, set RunAtEnd.Fail.Enabled to true.
Enter the full path to the command to run, C:\ScriptFiles\FAILED.BAT, into RunAtEnd.Fail.Command.
The arguments to the FAILED.BAT batch file is the full path to the original file that failed to convert. We pass this using the $(FailedPath) variable set in RunAtEnd.Fail.Parameters. To handle paths with spaces, use the HTML escape characters for quotation marks.