Remove and Replace Text in the Print Job File Name
At PEERNET we strive to give you the features you want and need in our software. Our best source of this is your comments and suggestions. One customer request became the Job Replacement Strings feature that allows print job name replacement. Added to TIFF Image Printer, Raster Image Printer, and PDF Image Printer in version 12.0.011, another customer request prompted enhancements to this feature in version 12.0.017.

What is a Print Job File Name?
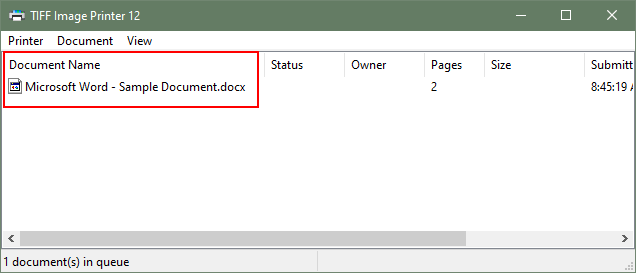
The print job file name, or print job document name, is what the Image Printers use as a base name for the file we are creating. An application creates this name when it sends your file to the printer. The printing subsystem displays this name in the print queue when your document is printing.
Often the same as your file name, some applications add text to the beginning or end of your file name. This is common with Office products, as you can see below.
Replace Text in a Print Job File Name
The original feature request was to modify the file name of the created files by removing unwanted text from the beginning of the file name.
The customer’s print job name was “ABC Print Application 12345“. They wanted to remove the first occurrence of the text ‘ABC Print Application‘ added when printing. The last part, the invoice number ‘12345‘, they wanted to keep.
Replacing All Spaces in a Print Job File Name
Later, another customer asked if we could replace all of the spaces in a print job file name with the underscore (‘_’) character. To do this, we had to update the current feature to not only replace the first occurrence of a text string but also allow replacing all occurrences. To be complete, we also added replacing the last occurrence.
Using Job Replacement Strings
Job replacement strings allow you to remove or replace up to three different parts of the print job file name. The order in which the the job replacement strings are listed determines their processing order. Each subsequent replacement uses the edited string from the previous one.
When replacing or removing strings, you can search for the first occurrence, last occurrence or all occurrences of the desired text in the print job file name.
This new feature is found in the Output Filename section on the Save tab of the Profile Manager.
With the ability to remove or replace the first occurrence of matching text the customer can remove “ABC Print Application” from the beginning of their file name. They can also replace “ABC Print Application” with different text if they wish. For example, they could look for characters matching “ABC Print Application” and replace them with “Invoice”. This would result in the output file name of “Invoice 12345.tif”.
The update to this feature now allows replacing all occurrences of matching text in a print job file name. This makes it simple to replace all spaces in a file name with another character, or remove them entirely.
This update also adds the option to replace the last occurrence of matching text to give as much flexibility as possible to create custom files names.
How is it Different from Removing Product Name and Extensions?
This feature is also a secondary way of removing the product name from the file name. Our image printers can automatically remove common patterns of product name and extension text from a print job name created by Office and Notepad.
If the text added does not follow these common patterns, you can use the job replacement strings instead to remove the product name text from the output file name.
Adding Job Replacement Text to a Profile
All our image printers include printer profiles with common conversion settings. The Job Replacement Strings are not turned on by default. You will need to create a new profile or edit an existing personal profile.
To start, open the Dashboard by double-clicking on the desktop shortcut for your printer. The screenshots below are using the TIFF Image Printer. For Raster Image Printer and PDF Image Printer your dashboard will be a different color but the steps are the same.

The Dashboard displays license information and tiles to access different tools and resources. From here select the Edit & Create Profiles tile to open the Profile Manager tool.
Adding or Editing a Profile
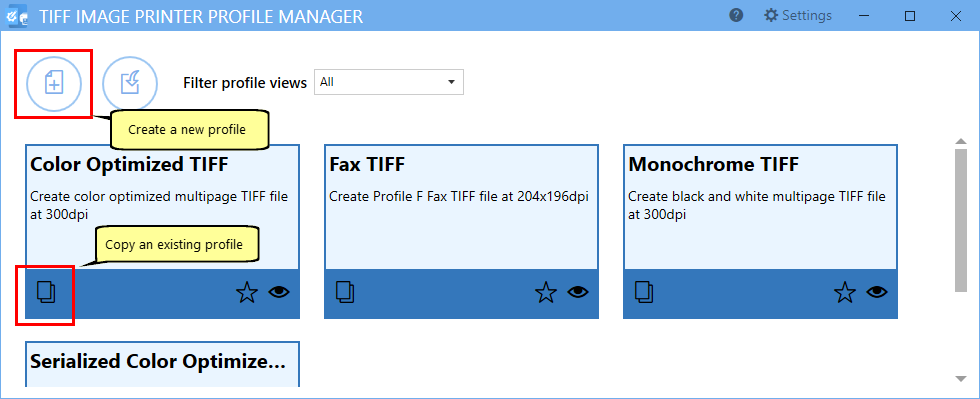
The Profile Manager displays all profiles provided by PEERNET and any new personal profiles you have created. You can copy but not edit the PEERNET profiles. You can copy and edit personal profiles. Copy an existing profile using the copy icon on the profile tile. You can also create a new profile using the Add new profile button in the upper left corner instead.
If this is a new profile, edit the name of your new profile, and add a description. Next, we will enable the job replacement strings feature and define the strings we want to remove and replace.
Enable Job Replacement String Processing
For this example, we will remove text from the beginning of a file name. We will also replace any spaces in the file name with an underscore (‘_’) character. With a fictional file name of “ABC Print Application Invoice 20230106”, the end result will be a base file name of “Invoice_20230106”.
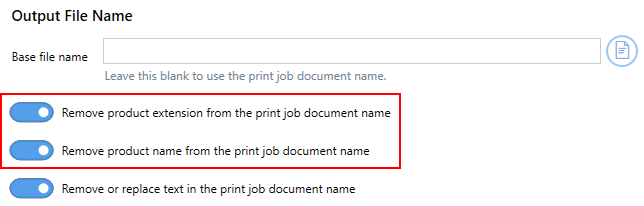
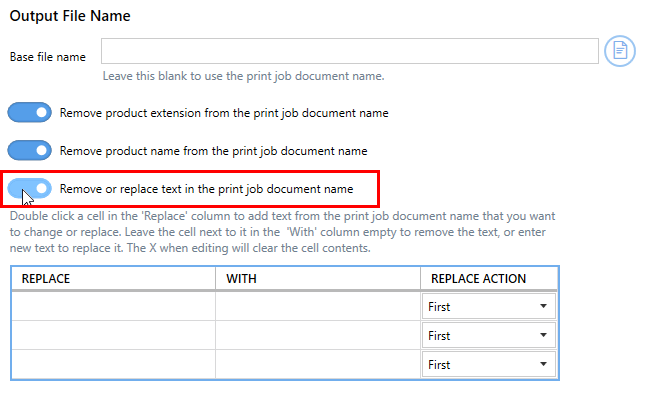
Select the Save Options tab from the list on the left. Scroll down to the Output File Name section and enable the Remove or replace text in the print job document name option.
Processing of the job replacement strings occurs after applying the options Remove product extension from the print job document name and Remove product name from the print job document name, if they are enabled.
Add Replacement Strings
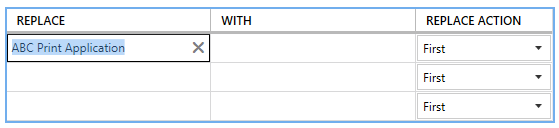
Double-click a cell in the Replace column to enter edit mode. Add the text from the print job document name that you want to remove or replace. Leave the cell next to it in the With column empty to remove the text. Set the Replace Action to First. We only want to remove the first occurrence of the text. Also note we don’t need to include the trailing space in the replace text.
In the next row, set a space character in the Replace column and an underscore (‘_’) character in the With column.

Now that the job replacement strings settings are in the profile, save it. Then close the Profile Manager and return to the Dashboard.
Using the Profile to Create Files
Print your document to the TIFF Image Printer using the profile you created or edited. This applies the job replacement strings set in the profile when creating your final output file name.
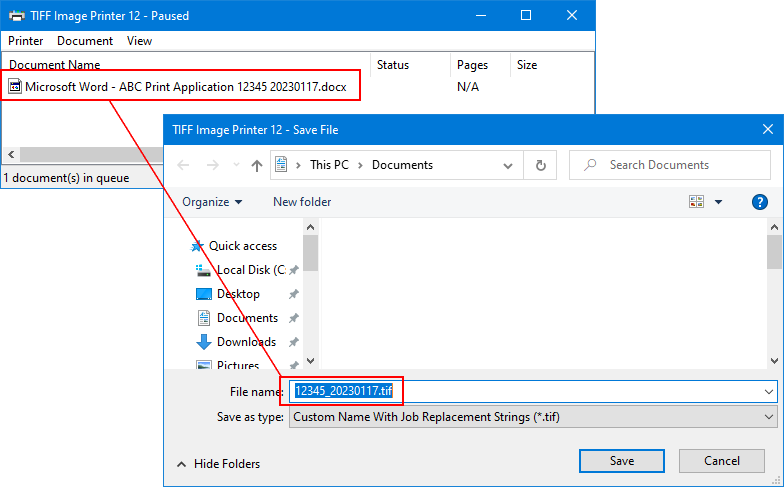
When determining the filename, we remove the text ‘Microsoft Word -‘ and the extension ‘.docx’ first. This is because of the Remove product name from the print job document name and Remove product extension from the print job document name settings.
The modified file name is now ‘ABC Print Application 12345 20230117’. From the first job replacement string, we replace ‘ABC Print Application’ with nothing, leaving the file name as ‘12345 20230117’.
Lastly, the space between ‘12345’ and ‘20230117’ becomes an underscore. This gives us the desired filename “12345_20230117.tif”.
If you plan to use these settings regularly, you may wish to make this personal profile the default profile used by TIFF Image Printer.
If you are new to the PEERNET family of image printers, the best way to get started is by downloading our free trial. As always, the PEERNET support team is more than happy to answer any of your questions and help you evaluate the trial.

