Share Settings Across Multiple Users
Shared, locked and user profiles are used to create custom printers available for all users with your desired settings.
TIFF Image Printer, Raster Image Printer and PDF Image Printer use profiles to control the creation of the output file or image. A profile is a group of settings that contains information about the type of file to create, where the file should be saved, how it is named and many other settings.
Several system profiles are provided in the base installation, and new profiles, called shared profiles, can be created to share settings across multiple users in an organization.
Shared profiles can also be locked to a printer, creating a locked profile. This restricts the printer to that single profile, effectively setting up a custom set of options for the printer that will be used by all users and preventing them from choosing different settings.
When a common set of options is wanted, but a few select settings may still need to be modified when each user prints, linked profiles can be created from a printer with a locked profile. A linked profile is a per-user copy of the locked profile. When printing to a printer with a locked profile, any user-modified linked profile, if it exists, is used. If one does not exist, the settings in the locked profile are used.
Shared profiles and printers with locked profiles can be exported as a single file and used when installing or pushing the Image Printers out into an organization to create custom printers with pre-set options.
These are the three main steps:
- Create a shared profile
- Locking the profile to the printer
- Creating the linked profile, if needed
Create a Shared Profile
Shared profiles are created by converting a personal profile into a shared profile. Shared profiles are the only type of profile that can be locked to a printer.
Step by Step Instructions
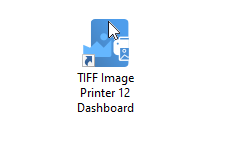
Launch the Dashboard.
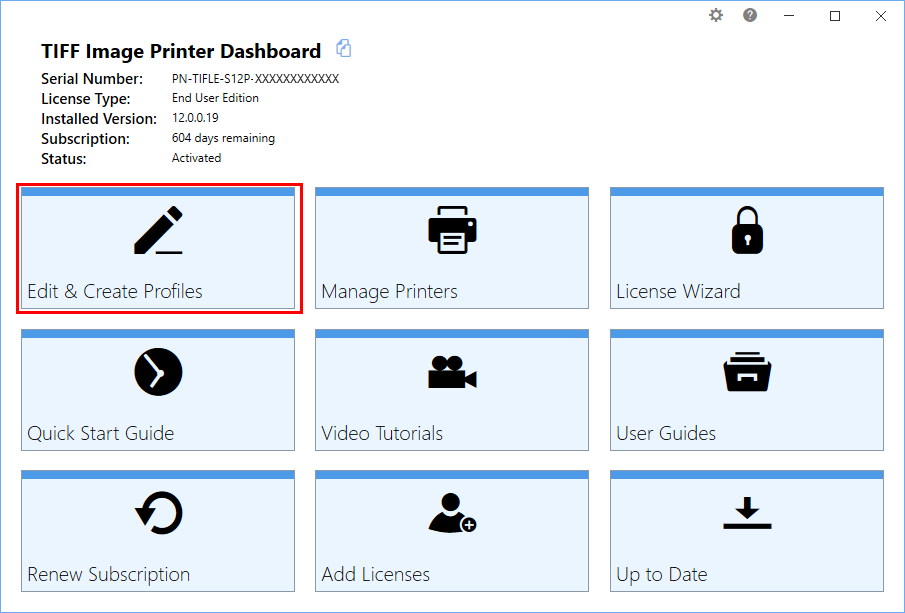
Select “Edit & Create Profiles” to open Profile Manager.
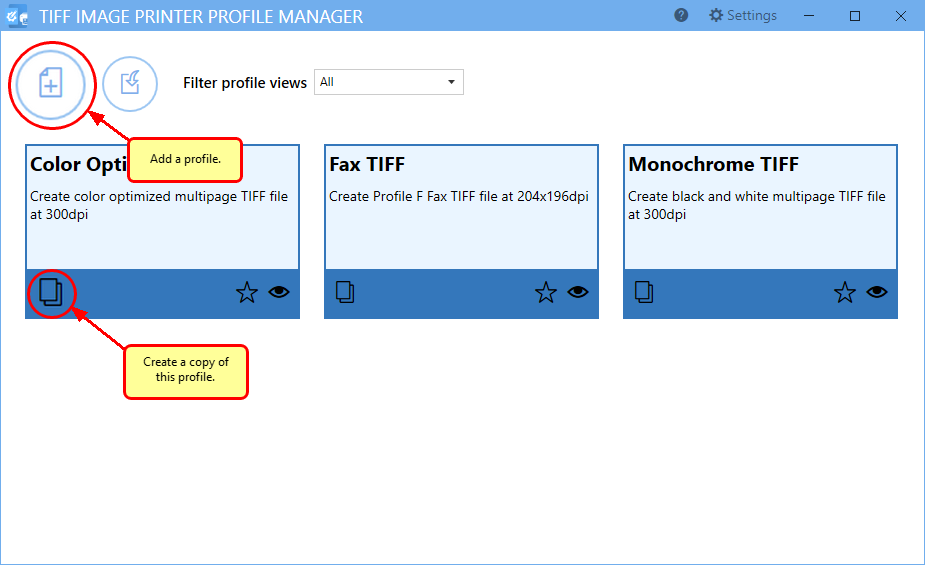
You can either create a copy of a system profile, if it has similar settings to what you require, by selecting “Create a copy of this profile”, or create a personal profile by selecting “Add a profile”.
Name the profile, add a description, and click Save.
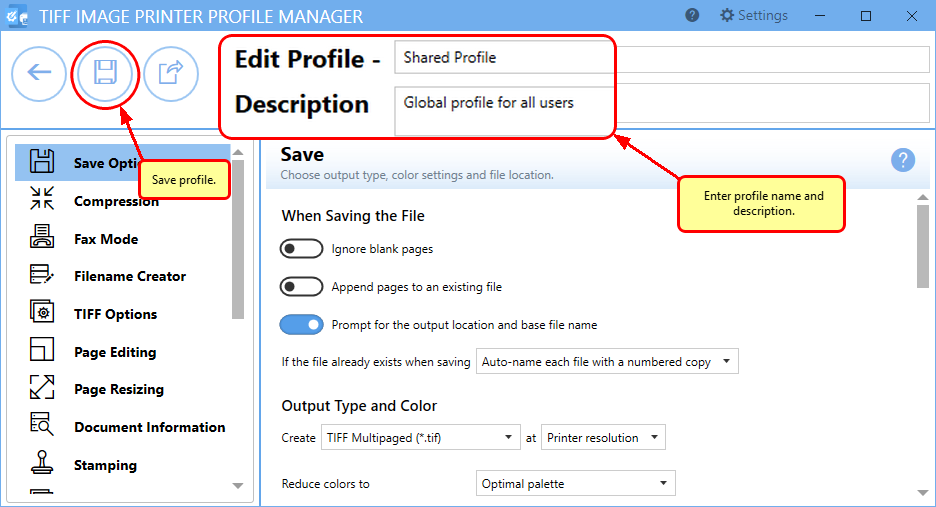
Go through the tabs and adjust the settings as desired. Click Save-Back, and return to the tiles view of the Profile Manager.
On the tile for your new profile use the share profile icon to convert this to a shared profile.
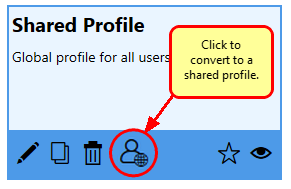
This action will convert the personal profile into a shared profile. Its position and tile color will change, and the share icon will no longer be an option on the tile.
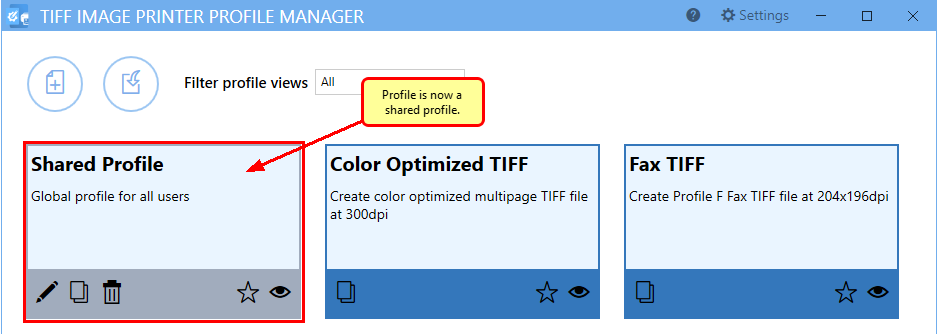
This shared profile is now accessible to anyone who logs into this computer. It can also be used to lock settings to a printer by following the steps in the next section.
Close the Profile Manager.
Locking the Profile to the Printer
Locking a shared profile to a printer restricts that printer to the settings in that profile prevent users from changing the profile on this printer to any other profile.
NOTE: Locking a profile to a printer is an action that requires administrative level permissions. See Printer Management and User Permissions for details on which actions you can do and how to run the Dashboard as an administrator to perform this task.
Step by Step Instructions
Launch the Dashboard, if you do not still have it open.

Select “Manage Printers” to open Printer Management.
Select the printer you wish to edit and use the Profile drop box to select your new shared profile. A shared profile is designated with the user and globe icon in the drop down list.
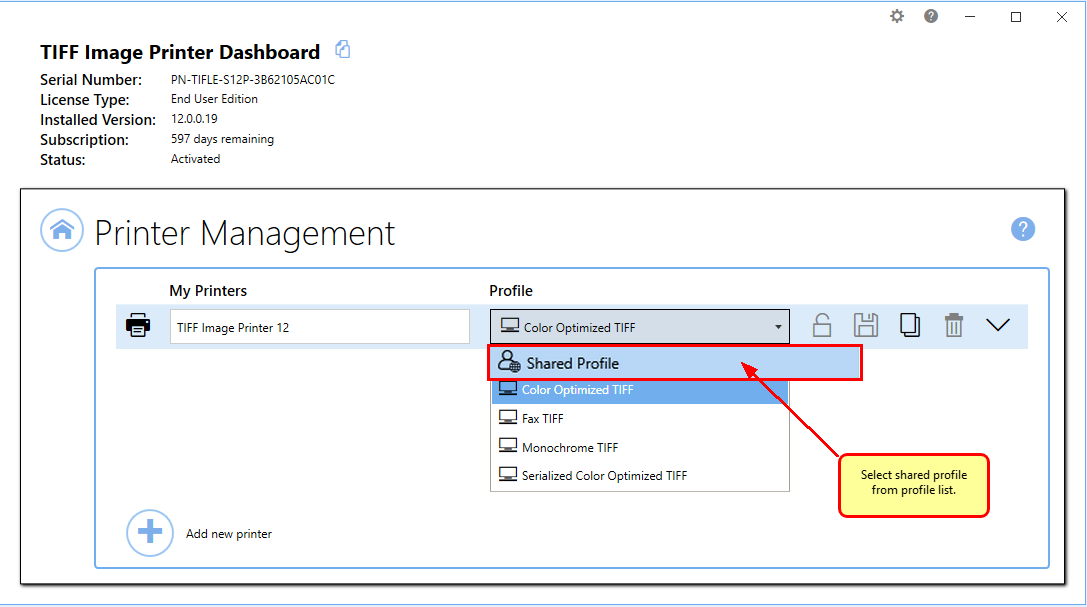
When a shared profile is selected, the lock icon will become enabled. To lock the printer to the shared profile, click the lock icon.

When locked to a shared profile the icon will change to a closed lock and the Profile combo will be disabled. Select the Save icon to save changes.

Select the Home icon to return to the Dashboard.

The printer is now locked to the settings in Shared Profile.
Using Linked Profiles to Modify Settings
When a base profile is needed for most of the image or file options, but a few settings need to be modified on-the-fly as users print, a linked profile is used. A linked profile is a personal copy of a profile that has been locked to a printer as shown in the steps above.
Linked profiles can only be created from a printer that has a locked profile, and only through the printer’s Printing Preferences dialog. The printing preferences dialog can be accessed through the printing options on most applications when printing, as well as the Printers & Scanners section of the Windows settings app, or the View Devices and printers section of the Control Panel applet.
Step by Step Instructions
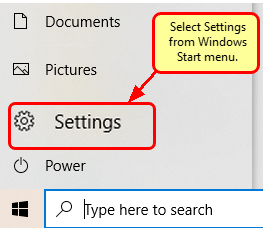
From the Windows 10 Start menu, open the Settings app (the gear icon).
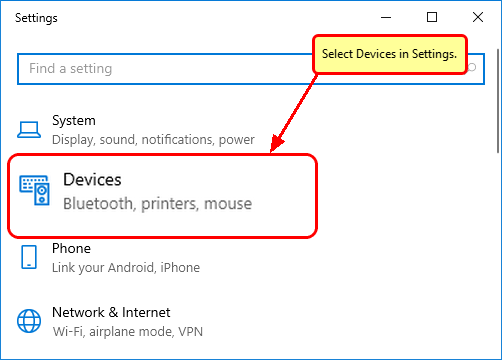
In the list of Settings options, choose Devices.
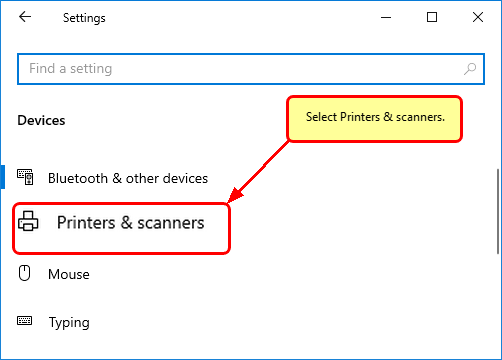
From the list of Devices, select Printers & scanners.
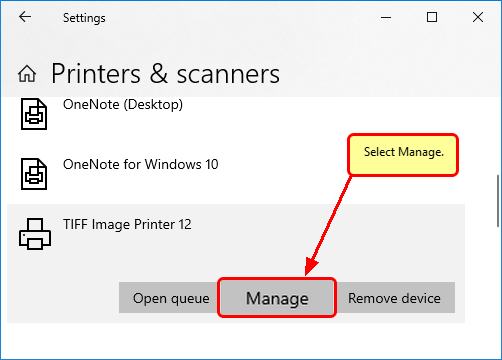
In the list of Printers & scanners, scroll to find your Image Printer 12 printer and select it. From the additional options shown, choose Manage.
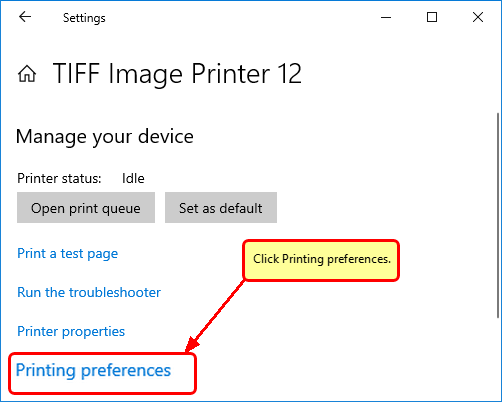
On the Manage your device screen, open the Printing preferences by clicking the text link at the bottom.
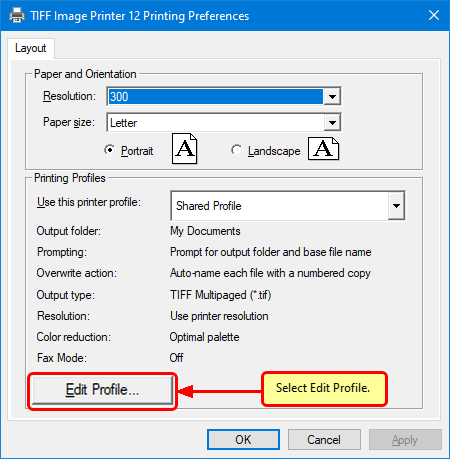
The Printing Preferences dialog lists the same options that can be set using Printer Management from the Dashboard. From here, select the Edit Profile… button. This will create the linked profile from the locked profile and open it in the Profile Editor for editing. If the linked profile has already been created, it is simply opened for editing.
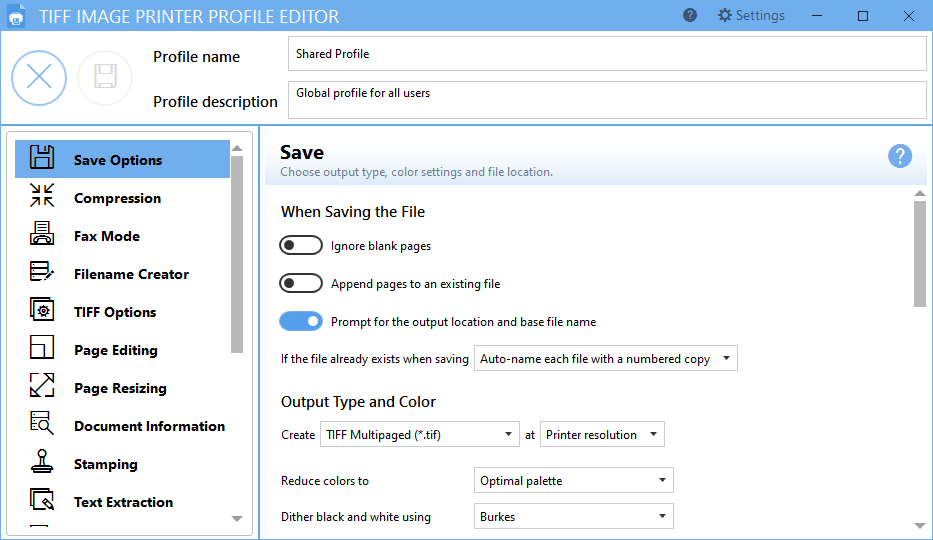
Make any changes wanted and then save the linked copy of the profile. Now when printing the settings in the linked profile will be used when creating the image or file. Leaving the Profile Editor open with the linked profile loaded allows changes to be made and saved on-the-fly as documents are printed. If only occasional changes are needed, the linked profile can be opened and edited by opening the Profile Editor from the Printing Preferences at any point.
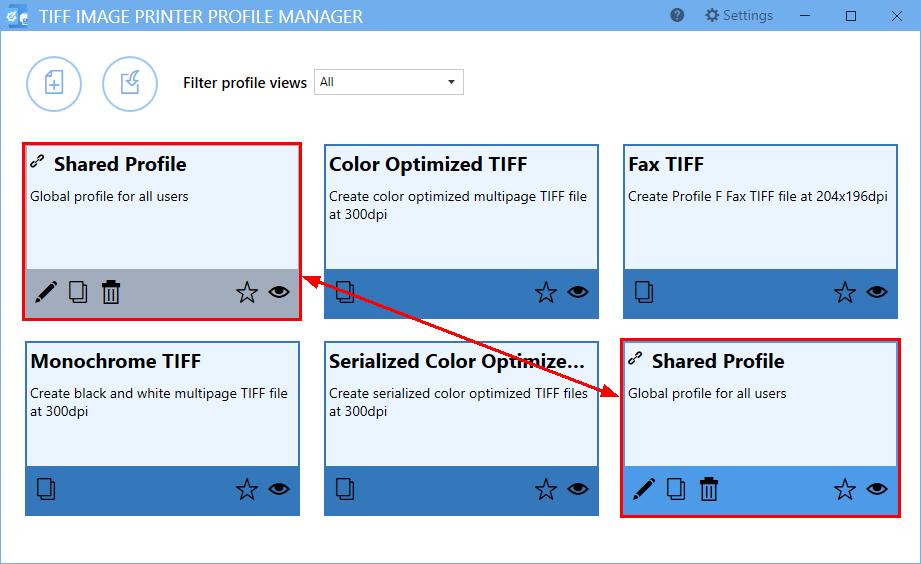
When a linked profile has been created, the two profiles are shown in the Profile Manager with a link icon beside the name of the profile to show that they are linked. Linked profiles can also be edited from within the Profile Manager.
After completing the above steps, you have now shared the same settings to multiple users by locking your Image Printer 12 to custom print settings using a shared profile. The last section shows how to create personal copies of the locked profile, or linked profiles, for times when users need a base set of settings, but also the ability to make small changes to a select set of options.


