
Installing Custom Printers and Profiles
Custom printers and profiles allow you to create bespoke versions of TIFF Image Printer, Raster Image Printer, and PDF Image Printer. You can package these printers and profiles into an import file that, when passed to the installer, will create one or more custom-named printers, each with custom settings, instead of our PEERNET printer.
This approach is common when deploying software remotely to multiple users on a network using InTune, Microsoft SCCM, or similar products with software push capability.
Our printers can be installed with multiple printing profiles when you need the flexibility of different output types. You can lock the printer to a single profile when you need files created with consistent settings.
Steps to Create Custom Printers and Profiles
- Create as many custom profiles as you require for your conversion needs. You may only need one if you need to lock the printer to pre-set options, or you may want multiple profiles that create different output. Mark these profiles as shared profiles.
- If you want to change the printer name or create multiple printers, make as many copies of our PEERNET printer as you need and rename them to your desired names.
- For each custom printer, set the default profile as one of your custom profiles. If you don’t want users to be able to change settings, you need to lock the profile to the printer at this point.
- Export your printer and custom profiles to create the printer export file. Pass this file to the PEERNET Image Printer setup when installing the software. The setup will use this to run an extra configuration step at the end.
- Deploy the PEERNET Image Printer setup with the DRIVERONLY and CONFIGPRINTER command line arguments to import your custom printer and profiles. Additional setup command line options are available to control what parts, if any, of the product interface and tools get installed.
Creating the Custom Printer and Profiles
Install TIFF Image Printer, Raster Image Printer, or PDF Image Printer Image Printer on a single computer. You do not have to license the software at this point.
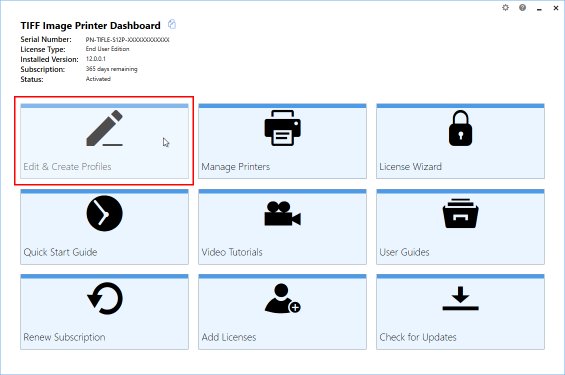
Launch the Dashboard. The custom printer, profiles, and the exported printer settings are all created using the Dashboard and the Profile Manager tool.

Select Edit & Create Profiles to open the Profile Manager. This tool allows you to copy and edit a system profile or create new shared and personal ones.
Create a Custom Profile
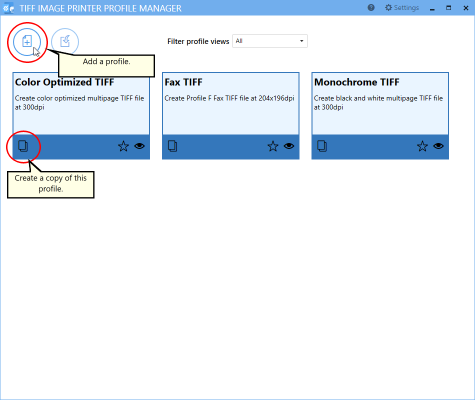
To create your custom profile, use the Create a copy of this profile icon on a system profile if it has similar settings. Alternatively, the Add a new profile button creates a new default profile for you to edit.
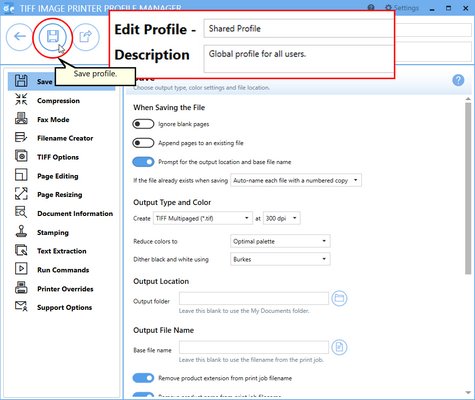
Give your new profile a name and a description. Go through the options list on the left and tailor the output file settings as desired. This step is where you set the file name and output location and modify the file type, compression, and other output settings for this profile.
Save your profile when done. Click the Back arrow in the upper left to return to the tiles view of the Profile Manager.
Set Profile as Shared
To use your new profiles to customize your printer settings, you must mark them as Shared. This step is critical for the profiles to be accessible to all users when you install the custom printer settings.
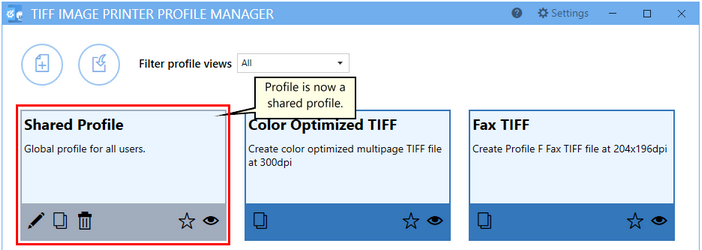
Your new profile now appears as a tile in the list of profiles. On the tile for your custom profile, use the Share profile icon to convert your profile to a shared profile.
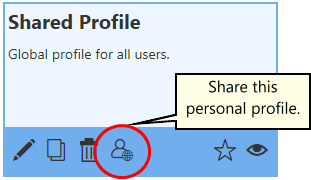
This action will convert the personal profile into a shared profile. It will change from a tile with a colored border to one with a gray border. The share icon will no longer be an option on the tile.
Repeat the above steps for any other custom profiles you may need. When done, close the Profile Manager and return to the Dashboard.
Configure the Custom Printer
The next step is to set your custom profile as the default profile for the PEERNET Image Printer or to create your custom-named printer and set its default profile to yours.
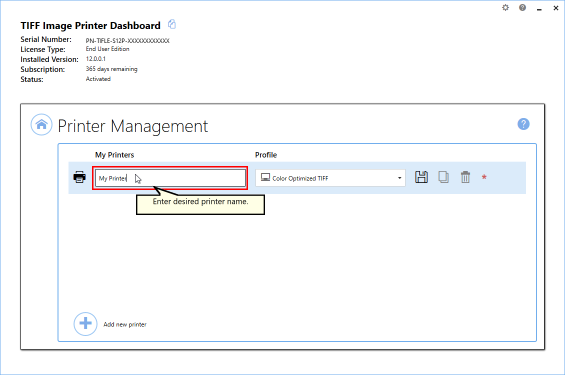
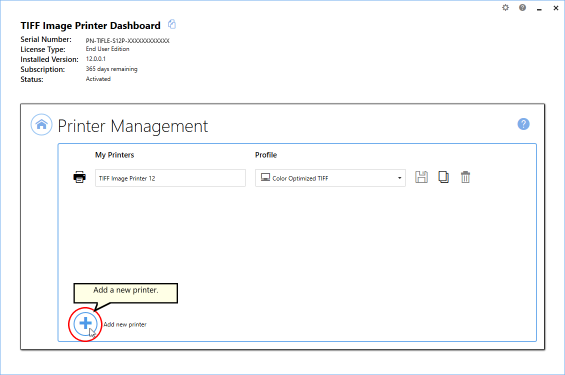
To do this, open the Image Printer Dashboard, then select Manage Printers to open the Printer Management tool.
If you want to use your custom name for the printer, instead of TIFF Image Printer, Raster Image Printer, or PDF Image Printer, change the printer name here to your desired name.
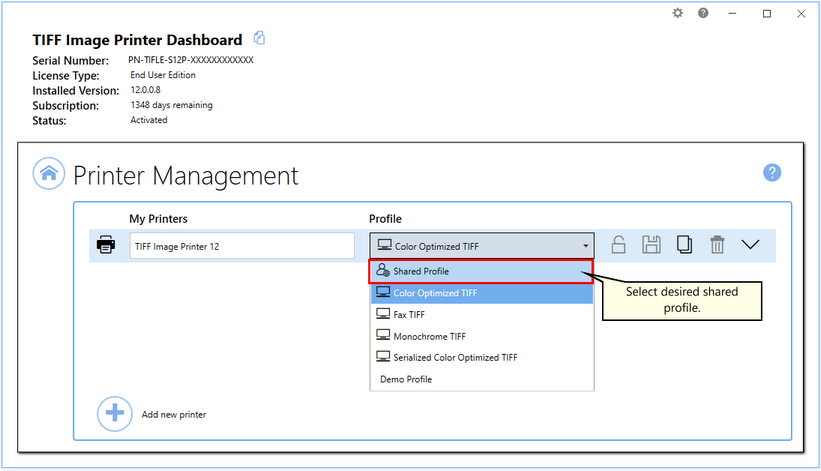
Select the PEERNET Image Printer 12 printer, or your custom printer, then in the Profile drop box next to it, choose one of your new shared profiles. A shared profile has the user and globe icon next to it in the dropdown list.
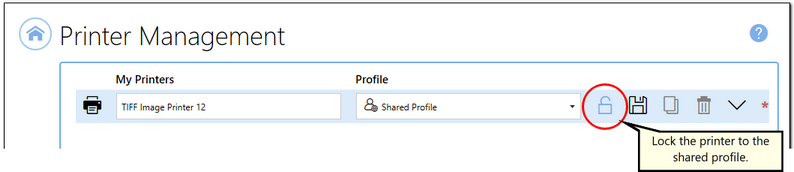
Once a shared profile is selected, you now have the option of locking this profile to the printer. If you need to be able to switch between profiles, do not lock the profile to the printer. To limit your users to only the settings in a single profile, click the lock icon to lock the profile to the printer.
When locked to a shared profile, the icon will change to a closed lock, and the Profile combo will be disabled. Clicking the closed lock icon unlocks the profile from the printer.
Locking a profile to a printer is an action that requires administrative-level access. See Printer Management and User Permissions for details on which actions need elevated permissions and how to run the Dashboard as an administrator to perform this task.
Adding Printers
If you want additional printers with unique settings, select the Add icon at the bottom of the screen to create a new printer.
Name your printer and repeat the same steps of setting the printer profile to one of your custom, shared profiles and locking the settings if desired. You can create as many custom printers and profiles as you want or need. Remember to Save your printer when done.
Creating the Custom Printer and Profiles Export File
Now that we have our custom printers and profiles, the Backup and Restore All Settings feature is used to create the export file that contains the customized PEERNET Image printers and shared or locked profiles you will use when pushing or installing the printer software.
Select the Home icon to return to the main Dashboard window. From the main window, click the gear icon from the top right-hand corner of the Dashboard window and select Export Printer Settings.

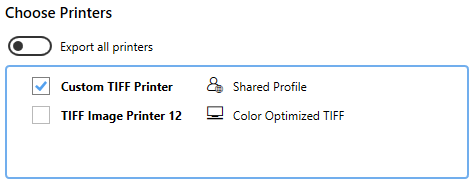
The export settings flyout that slides out contains options for choosing which printers and profiles to include in the export file.
Under Choose Printers, toggle Export all printers and select your custom-named printer with your shared profile or the PEERNET Image printer modified to use your shared profile.
Next, under Choose Profiles, toggle “Export all personal profiles” if you created any personal profiles. For custom printers, we need to use shared profiles to set any custom printer settings, not personal profiles. If you cannot unselect a profile, a printer you want to export is using it. Change this profile to a shared profile before continuing.

Last, we choose which shared profiles to export. Leave the Export all share profiles toggled when the list contains only the custom profiles you want to have available to your users. If you have others, turn off the Export all shared profiles toggle and select only the shared profiles you need to export.

Select Start Export at the bottom, and save the custom settings file to create the file we need to pass during installation to customize the printer settings during setup.
Install the Custom Printer and Profiles During Setup
When installing your custom printers and profiles on another computer, you need access to the printer setup program and the export file created above. If you use push software, the export settings file needs to be in a location that is accessible when the push software runs the setup. They can be on a local drive or a UNC path. Push software that uses the System account needs to use an export file with only shared profiles, as created above.
Your setup file may have a different version and name from that shown here, and the export file will have a different extension depending on which Image Printer you have installed.
Silent Install with Custom Printers and Profiles
When the silent install command line parameter, /S, is provided, the installation will execute silently, without a user interface or user intervention.
The CONFIGPRINTER argument is the full path to the export file with the custom printer settings.
The DRIVERONLY option, when combined with the CONFIGPRINTER option, installs your custom printers and profiles. This option is only available in Subscription installs.
pntifsubsetup_12.0.023.exe /S DRIVERONLY=TRUE CONFIGPRINTER="C:\PEERNET\PrinterSettings.pntifexport
pnrassubsetup_12.0.023.exe /S DRIVERONLY=TRUE CONFIGPRINTER="C:\PEERNET\PrinterSettings.pnrasexport
pnpdfsubsetup_12.0.023.exe /S DRIVERONLY=TRUE CONFIGPRINTER="C:\PEERNET\PrinterSettings.pnpdfexport
Silent Uninstall
Running the install with the /S with the product already installed will automatically remove the product.
If you need a command line to always force the setup into uninstall mode, a requirement with some SCCM and push software tools, add the MODIFY, REMOVE, and UNINSTALL flags to the command line.
pntifsubsetup_12.0.013.exe /S MODIFY=FALSE REMOVE=TRUE UNINSTALL=YES
pnrassubsetup_12.0.013.exe /S MODIFY=FALSE REMOVE=TRUE UNINSTALL=YES
pnpdfsubsetup_12.0.013.exe /S MODIFY=FALSE REMOVE=TRUE UNINSTALL=YES
Logging and Troubleshooting the Install
/L=<path to log file>
To create a log file when installing, use the /L parameter and pass in a full path to the name of a log file.
The log file switch creates two log files: one by the installer and another of the same name ending with PEERNET.txt. The installer creates the base log file during the product install after the setup wizard has gathered all its information. The PEERNET.txt file logs what happens during the initial install setup script, including testing for system compatibility and pre-requisites, and all post-install custom actions and going through the setup wizard.
Both log files are helpful for troubleshooting install issues, especially when using the /S silent install parameter with Intune, SCCM, or other push software.
Hiding the Printer UI For Custom Printers and Profiles
SHOWUI=FALSE
When installing custom printers and profiles you may want to limit or hide access to the PEERNET Image Printer Dashboard, Profile Manager, and other editing tools. This option is only valid for Subscription installs. It controls the creation of the desktop icon and Windows Start menu shortcut for the Image Printer Dashboard. Passing in FALSE for the SHOWUI option installs the product but does not create the desktop icons and start menu shortcuts.
pntifsubsetup_12.0.023.exe /S SHOWUI=FALSE DRIVERONLY=TRUE CONFIGPRINTER="C:\PEERNET\PrinterSettings.pntifexport
pnrassubsetup_12.0.023.exe /S SHOWUI=FALSE DRIVERONLY=TRUE CONFIGPRINTER="C:\PEERNET\PrinterSettings.pnrasexport
pnpdfsubsetup_12.0.023.exe /S SHOWUI=FALSE DRIVERONLY=TRUE CONFIGPRINTER="C:\PEERNET\PrinterSettings.pnpdfexport
Learn more regarding customizing the printer settings and hiding all or part of the Image Printer user interface throug the following links.
For more options, see the full list of all command line setup arguments for each printer.

