
Create Color TIFF Images
Color TIFF images are suitable for use in document archiving, desktop publishing and print production applications where keeping the color and quality of the image is important. TIFF images can store image data in a lossless, compressed format that maintains the image quality, even after editing and saving the image again. The caveat is that these types of files can be larger in size than when using other compression formats to store the image data. When you need to keep both the color and reduce the file size for storage, TIFF images can instead use a lossy compression format like JPEG to store the image data.
Viewing TIFF Images
A TIFF image file can be a single image or it may contain multiple images. A TIFF image that contains multiple images is a multi-paged TIFF image. Image viewers will display a page navigation control when viewing a multi-paged TIFF image to allow moving between the pages. A TIFF image of only one page will not show the page navigation. Windows Photo Viewer, included on the Windows operating system since Windows 7, supports multi-paged TIFF. The newer Photos app introduced in Windows 8, on the other hand, does not.
TIFF Images for Archiving
When creating TIFF images for a document management system you need a balance between document fidelity and file size. Storing the document as monochrome images reduces the file size but doesn’t work if you need to maintain color in the document in the final image. A technique called color-counting is often used when creating TIFF images for archiving.
This technique counts the minimum number of colors needed for each page and stores each page accordingly. Depending on the each pages’ contents the resulting TIFF image can be a mix of monochrome, greyscale and color pages. This maintains document fidelity while also keeping the file size smaller.
TIFF Images for Print Publishing
The submission of images for publishing in journals and magazines often have specific requirements for image quality and color. An image consists of rows and columns of pixels, and each pixel translates into a dot of color. That dot of color maps to a color model. The two color models for storing color in an image are RGB (red, green, blue) and CMYK (cyan, magenta, yellow, black).
RGB color is widespread and used in images meant for digital display on a computer – in websites, blogs, archiving programs. For images destined for print publication, color in the images needs to be CMYK so that the correct colors appear on the printed material.
When creating TIFF images for print publishing with TIFF Image Printer and Raster Image Printer , use the color compression algorithm LZW CMYK to ensure you get the proper colors. You can also use Uncompressed CMYK but with no compression the image file size will be significantly larger. See Creating High Resolution TIFF Images For Journal Publication if this is the type of color TIFF you need to create.
Creating Color TIFF Using the ‘Color Optimized TIFF’ Profile
This profile gives a balance between size and maintaining color and is a good choice when archiving documents. Both image printers include a Color Optimized TIFF profile as part of the install. This profile reduces each page down to the smallest number of colors needed to represent that page. This can produce a mix of pages with some black and white, some greyscale and some color, depending on the page contents. This can often result in a smaller file size while still maintaining color from the original document.
Setting the Printer Profile
A printer profile is a collection of settings controlling the image output created by the printer. After installing either printer you will see a Dashboard icon on the desktop. The dashboard is the central location for setting the printer profile for your printer and creating and editing printer profiles. It also provides access to video tutorials and other help resources.
The screenshots below are using the TIFF Image Printer. For Raster Image Printer your dashboard will be a different color but the steps are the same.
To start, open the Dashboard by double-clicking on the desktop shortcut for your printer.

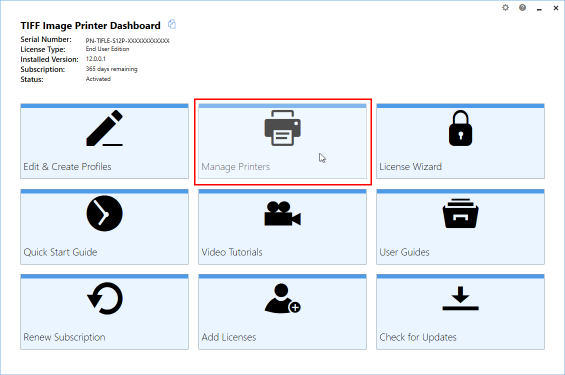
The Dashboard gives access to your license information, tools and resources. From the Dashboard tiles, select “Manage Printer” to open Printer Management.
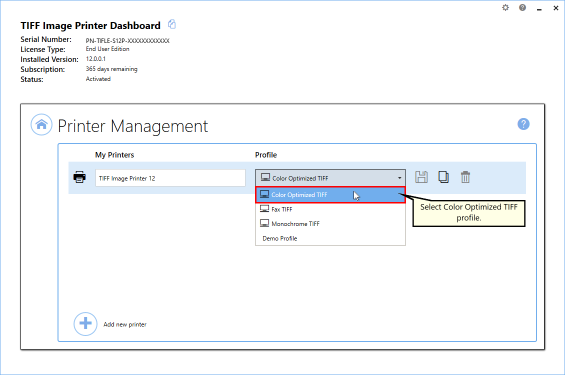
The Printer Management screen lists all of your TIFF or Raster Image Printers and provides access to selecting which profile to use when creating files, and other printer settings. Beside the printer name, use the printer profile drop box to set the default profile as “Color Optimized TIFF”. This profile creates multi-paged TIFF images at 300 dpi with colors reduced to optimal palette.
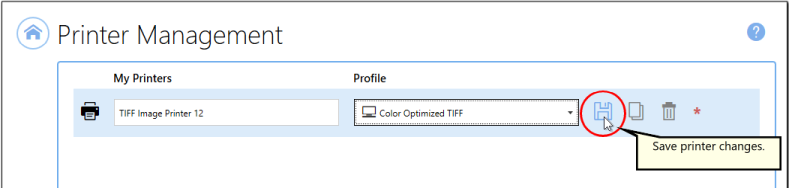
Next, click the Save icon beside the list of profiles to save the changes to your printer.
Now the printer will create the type of TIFF image we want. We can close Printer Management and also the Dashboard.

Creating the TIFF Image
Open the document you want to convert into a TIFF image. Here we are using a Word document but you can use any document you need to convert to TIFF.
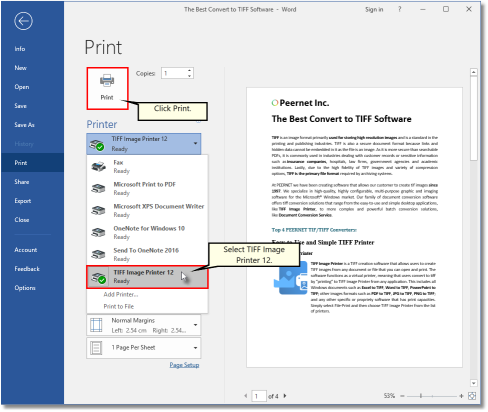
Once you have opened your document, go to File – Print from your application to select any printing options. Choose TIFF Image Printer 12 (or Raster Image Printer 12) from your printer list, then click the Print button to send your file to the printer.
A Save File prompt appears before creating the TIFF image. From here, choose where to save your new color optimized TIFF image. The default location is your Documents folder.
In the Filename field, enter in a name for your TIFF image. The new file name is based on the original document name when possible.
The Save as type drop box below the name field already has the Color Optimized TIFF profile selected as we set this in Print Management above.
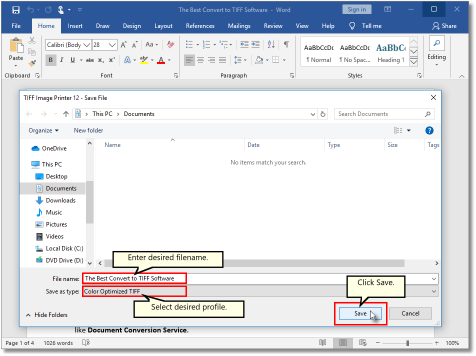
When you have set your desired name and location set, click Save to create your TIFF image.

