PDF Image Printer
Convert to Searchable PDF from any Windows document or application
PDF Image Printer – FAQs
These are frequently asked questions about PDF Image Printer.
What is the latest release and how can I obtain it?
For the current release number of the PDF Image Printer, please read the release notes.
All Software Downloads for your purchased software products are located in your PEERNET online account to the right of the applicable serial number.
For registered owners of a subscription license of the Image Printer with an active subscription contract, the latest update is available in your online account.
For registered owners of a one-time license of the Image Printer, you do not have access to the latest update. You will need to purchase either a new one-time license or switch to a subscription license to access the latest update.
For owners of versions 10.0 and 11.0 of the Image Printer you can upgrade directly via your online account at a discount. Please go to your PEERNET online account and select Purchase Upgrade, when the order has been completed, your online account will be populated with Image Printer version 12 software download and applicable serial number. If you have an active On-Going Licensing and Support subscription you will receive the upgrade free of charge.
Do I need to uninstall the previous Image Printer release before installing the new release?
Major releases (upgrades i.e. 11.0 to 12) of the Image Printer can both be installed (co-exist) on the same computer. For the prior version, the licensing and the settings will remain unchanged. The new version will have to be licensed and the settings set up to match the prior version.
NOTE: Multiple instances of version 12 of the Image Printer cannot co-exist on the same computer. The software will not allow you to install the purchased copy of the software until the trial of the software has been uninstalled. In addition, you cannot install both a subscription license and one-time license on the same computer.
Minor releases (updates or patches i.e. 12.0.001 to 12.0.002) will install over an existing installation. The licensing will remain unchanged and your printer settings will be maintained.
What version of the product is installed on my computer?
How do I upgrade to the newly release PDF Image Printer 12?
PDF Image Printer 12 features a new modern and clean user interface, profiles that can be easily edited and shared, and major driver improvements to significantly improve TIFF quality.
Existing PDF Image Printer users can upgrade to version 12 through their PEERNET online account. If you currently have an active On-Going Licensing and Support Subscription your upgrade to our new PDF Image Printer 12 Subscription license is free of charge. As part of this transition, PEERNET will grandfather your current On-Going Licensing and Support subscription annual renewal rate.
Step by Step Instructions
-
- Install the purchased copy of PDF Image Printer 12 on your computer. With major releases (ex. version 11 and version 12), the two version of the Image Printer can both be installed (co-exist) on the same computer.
- Launch the Image Printer Dashboard (double-click the PDF Image Printer icon on your desktop or click Start – All Programs – PDF Image Printer 12 Dashboard).
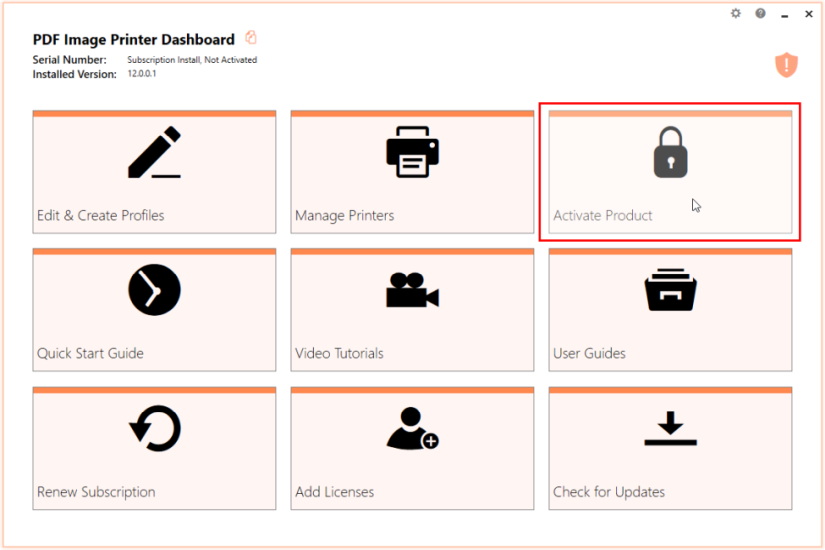
- Select “Activate Product” to launch the license wizard and enter your version 12 serial number.
- If you made signification customizations to your Image Printer settings in the previous version, open Printer Properties (click Start – All Program – PDF Image Printer 11.0 – Properties…) so that you can create a personal profile in version 12 with the same custom settings.
- From the Image Printer Dashboard, select “Edit & Create Profiles” to open Profile Manager.
-
- Select “Add a profile” to create a personal profile, or create a copy of one of our system profiles.
-
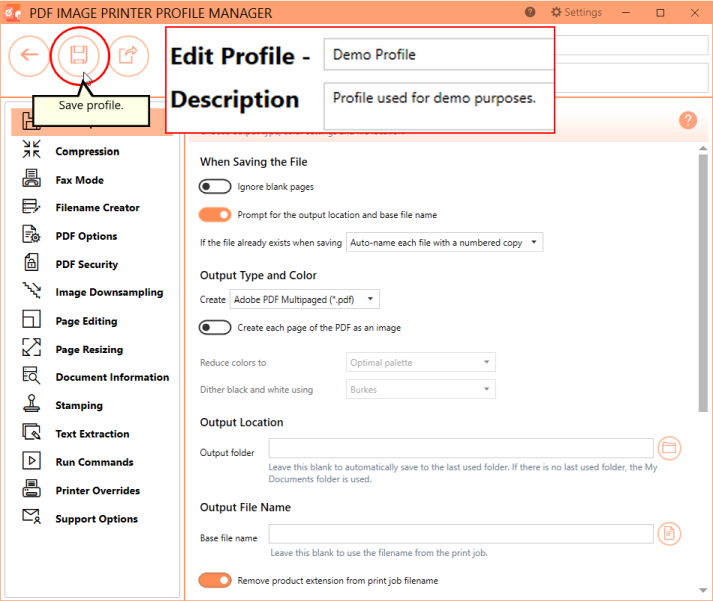
- Name the profile, add a description, and click Save.
-
- Go through the tabs, comparing the available settings to the Printer Properties window of your previous version in order to re-create your custom settings.
- Click Save-Back, and close Profile Manager.
If you plan to use these settings regularly, you may wish to make this personal profile the default profile used by the Image Printer.
-
- Select “Manage Printers” to open Printer Management.
- Select the printer you wish to edit and use the Profile drop box to select your desired default profile.
- Select the Save icon to save changes.
- Select the Home icon to return to the Dashboard.
- Close the Dashboard. Now when you print a document to PDF Image Printer 12, the same settings used in your previous version will be applied to your created file.
NOTE: Some of the available settings and features have changed in version 12. If you need any assistance re-creating your settings in the version 12, do not hesitate to contact the PEERNET team. We would be happy to assist you with configuring the new version to meet you needs.
What is a subscription license vs. one-time license?
The difference between a subscription license and a one-time license is that a subscription license is an annual fee that must be renewed in order to continue using PDF Image Printer, whereas a one-time license is a perpetual license.
That said, a one-time license can only be activated, as the name implies, one time. This is a classic software license meaning that you can go on using any license(s) you purchase for as long as you like, but once a license is consumed it can never be moved/transferred to a new computer or re-used after an operating system upgrade, computer crash or reformatting (any action that would change the computer identity). A one-time license is only available for the End User license level.
With a subscription license, users can:
- activate and use the software up to the limit of the number of licenses purchased
- move the software to a new computer or re-load the software after a computer crash or operating system upgrade, either through your PEERNET online account or by contacting PEERNET
- access all updates and upgrades released free of charge
- rely on priority technical support from the PEERNET team
A subscription license gives you the confidence to switch computers, upgrade your operating system or reformat your computer without worrying about your PEERNET software. Furthermore, a subscription license provides the security that should your computer crash unexpectedly you know that you have not lost access to your software. In all of these situations, you can simply edit your activation details through your PEERNET online account or contact PEERNET to adjust your license so that you are able to re-load your license and continue using the software.
How do I find my serial number?
If you have yet to activate your product please sign into your PEERNET online account to obtain your serial number. Your online account contains a complete list of your purchased products with the applicable serial number and software download link.
Alternatively, if your product has been activated you can view your activation information, including your serial number, on the Image Printer Dashboard. Double-click the PDF Image Printer icon on your desktop or click Start – All Programs – PDF Image Printer 12 Dashboard.
How do I activate my software?
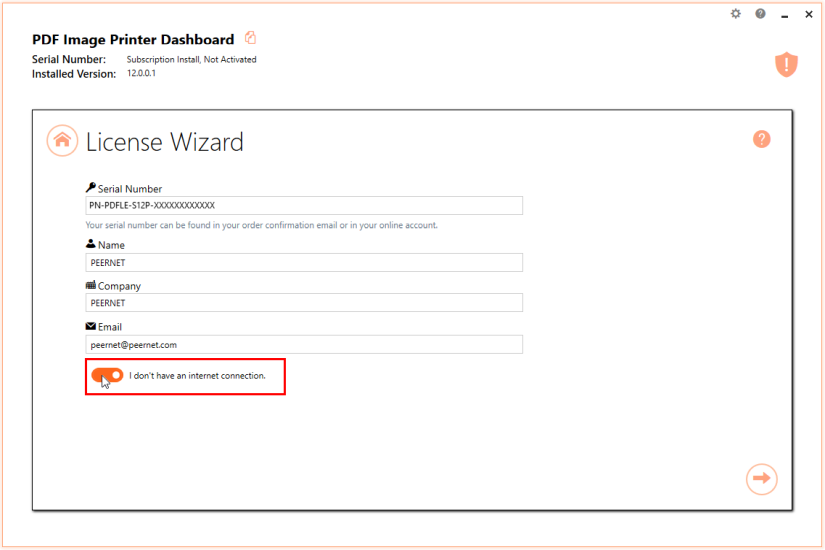
The Image Printer software is activated by entering your serial number into the license wizard which activates and authenticates your license by communicating with the PEERNET License Server via the internet. If the computer you are activating does not have an internet connection, we do offer a manually licensing process where you email a PROD ID file to [email protected] and we return a PROD AU file.
First, ensure that you have the purchased copy of your software installed on the computer. Then open the Image Printer Dashboard (double-click the PDF Image Printer icon on your desktop or click Start – All Programs – PDF Image Printer 12 Dashboard) and select Activate Product to launch the license wizard.
For detailed instructions on how to activate PDF Image Printer 12, please see the video below:
In addition, detailed instructions on activating your software can also be found in the PDF Image Printer User Guide.
How do I activate my software if my computer is not connected to the Internet?
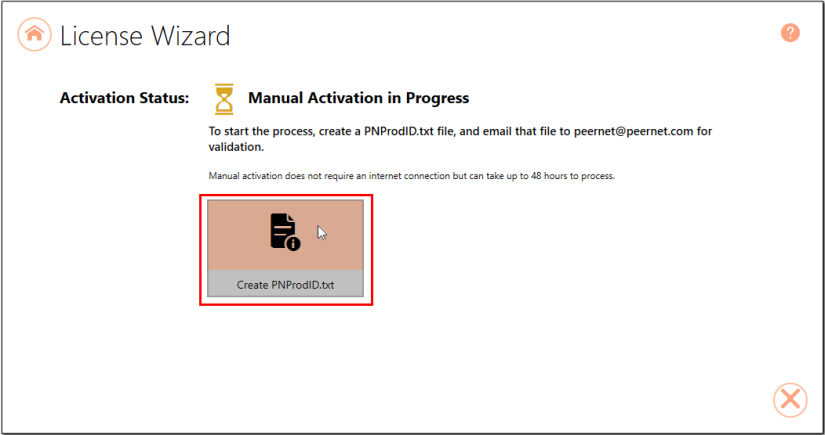
If you are not connected to the Internet, you will have to send us a manual license file that we will authorize and return. Please note that these files (PNProdID files) are only authorized during business hours, which are 09h00 to 17h00, Monday through Friday, Eastern Standard Time (excluding statutory holidays).
First, ensure that you have the purchased copy of your software installed on the computer. Then open the Image Printer Dashboard (double-click the PDF Image Printer icon on your desktop or click Start – All Programs – PDF Image Printer 12 Dashboard) and select Activate Product to launch the license wizard.
-
- Use the License Wizard to create the encrypted file, PNProdID.txt.
-
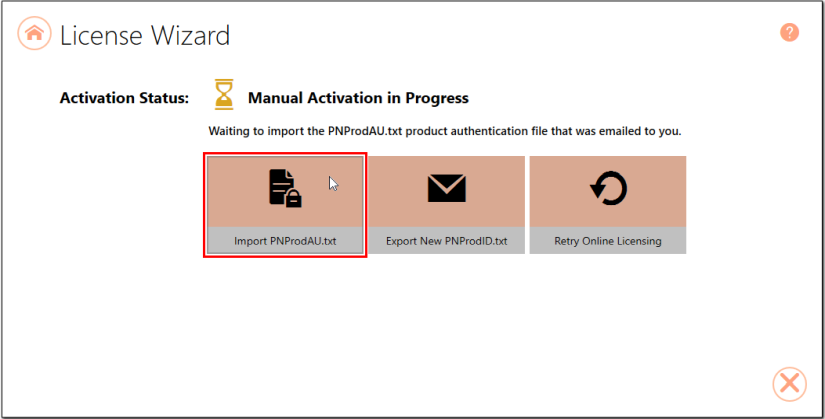
- Email the file to [email protected] for manual activation. For computers with no email capability, you can save the file to a shared network drive, or use an external storage device such as a USB flash drive (also known as thumb drives), or a MicroSD storage card to copy the file to a computer with email capabilities.
- A file named PNProdAU.txt will be emailed back to you. Copy this file back to the computer where the Image Printer is installed and restart the License Wizard to complete the license activation.
Please refer to the Image Printer’s User Guide and follow the instructions in the chapter for your license type under Activating – Manually Activating.
Why am I still getting an evaluation watermark after purchasing?
If you are getting a watermark on your output files, you have the trial version of the Image Printer installed.
If you have already purchased a serial number of the Image Printer, you need to install your purchased copy of the software. You can download the purchased software download from your PEERNET online account.
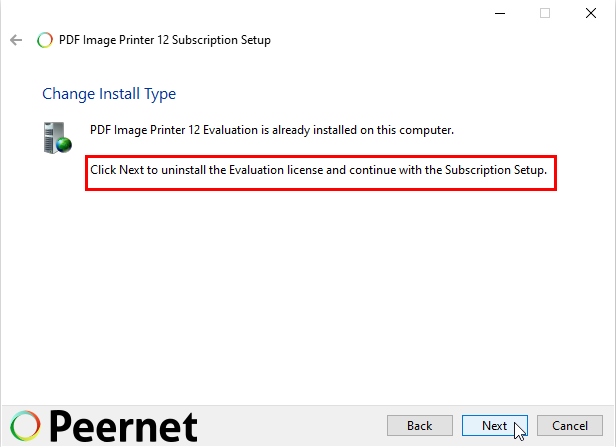
When you run the install for your purchased copy of the Image Printer, you will be prompted to uninstall the trial version.
Once the purchased copy has been installed, you need to activate the product using your serial number. Open the Image Printer Dashboard (double-click the PDF Image Printer icon on your desktop or click Start – All Programs – PDF Image Printer 12 Dashboard) and select Activate Product to launch the license wizard.
How do I move my license from one computer to another?
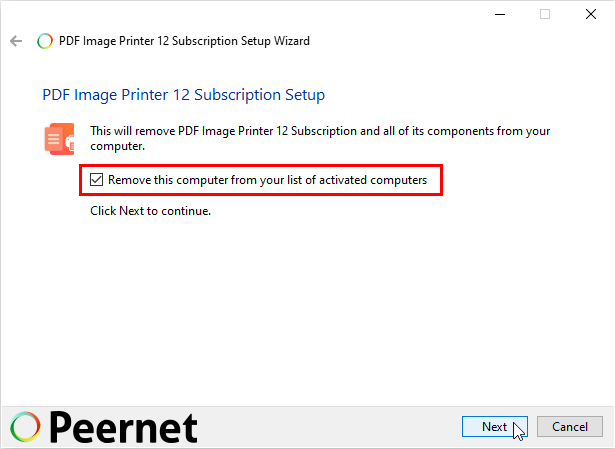
The simplest way to move the Image Printer from one computer to another is to uninstall the software from the old computer and then install and activate the license on the new computer.
When you uninstall the software on the old computer, you will be prompted to deactivate the Image Printer. Check “Remove this computer from your list of activated computer” in order to make the license available for re-use when you activate the new computer.
If you no longer have access to the old computer, you can deactivate on the old computer through your PEERNET online account by editing your activation details. Alternatively, please email [email protected] with your serial number and the old computer name so that the PEERNET team can complete the license adjustment on your behalf.
NOTE: The ability to move a license from one computer to another is only available for active subscription licenses. If your subscription license has expired, you are required to renew your annual subscription before you will be able to move a license to a new computer. If you own a one-time license of the Image Printer, you do not have the ability to move your license to a new computer. In this situation you will either need to purchase a new one-time license or a new subscription license to activate the Image Printer on a new computer.
How do I activate my computer if I had to reformat it?
If a computer where the Image Printer was previously activated has been re-formatted, you will have reinstall and reactivate the software on the computer.
In addition, a license adjustment is required in order to remove the previous activation for the computer so that the license can be re-used on the reformatted computer. A license adjustment is required when the software is being installed on a computer whose identity has changed.
The simplest way to remove the previous activation for the computer is to uninstall the software from the computer before reformatting. When you uninstall the software on the old computer, you will be prompted to deactivate the Image Printer. Check “Remove this computer from your list of activated computer” in order to make the license available for re-use when you activate the reformatted computer.
If the computer has already been reformatted, you can remove the previous activation for the computer through your PEERNET online account by editing your activation details. Alternatively, please email [email protected] with your serial number and the old computer name so that the PEERNET team can complete the license adjustment on your behalf.
NOTE: The ability to activate a computer after reformatting is only available for active subscription licenses. If your subscription license has expired, you are required to renew your annual subscription before you will be able to activate a reformatted computer. If you own a one-time license of the Image Printer, you do not have the ability to activate a reformatted computer. In this situation you will either need to purchase a new one-time license or a new subscription license to activate the Image Printer on a reformatted computer.
How do I reactivate the software?
There are two situations where you may need to reactivate the Image Printer software.
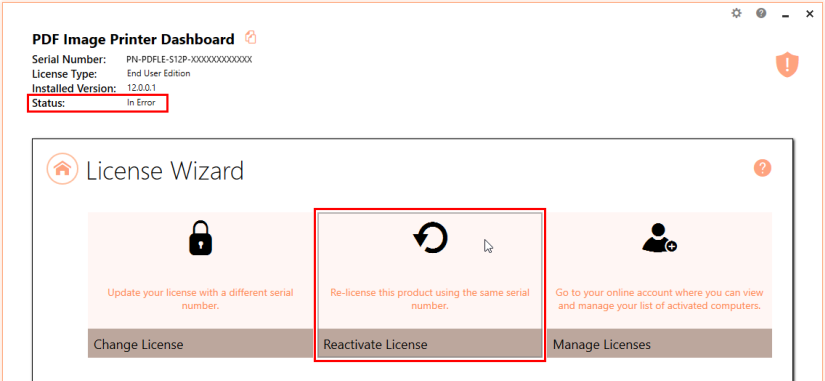
Activation Status: Error
If the software was previously activated and is now reporting an error with the activation status, this means that something on the computer has changed so that the Image Printer believes it is no longer activated correctly.
Examples of items that effect the license validity are:
- change of domain or workgroup
- change in the network
- change in the computer name
- reformatting and reloading the computer
- system has virus
In this situation you will need to reactivate the computer by:
- Opening the Image Printer Dashboard (double-click the PDF Image Printer icon on your desktop or click Start – All Programs – PDF Image Printer 12 Dashboard)
- Selecting Activate Product to launch the license wizard
- Selecting Reactivate License to go through the license wizard again using the same serial number that was used to originally activate the software on the computer.
If you the computer is identical, then “license authentication server” will reactivate without the need for a license adjustment. A license adjustment is required when the software is being moved from one computer to another computer or computer identity has changed.
You can remove the previous activation for the computer through your PEERNET online account by editing your activation details. Alternatively, please email [email protected] with your serial number and the old computer name so that the PEERNET team can complete the license adjustment on your behalf.
NOTE: The ability to carry out a license adjustment is only available for active subscription licenses. If your subscription license has expired, you are required to renew your annual subscription before you will be able to carry out a license adjustment. If you own a one-time license of the Image Printer, you do not have the ability to carry out license adjustments. You can try reactivating the software but if the computer identify has changed requiring a license adjustment you will either need to purchase a new one-time license or a new subscription license to reactivate the Image Printer.
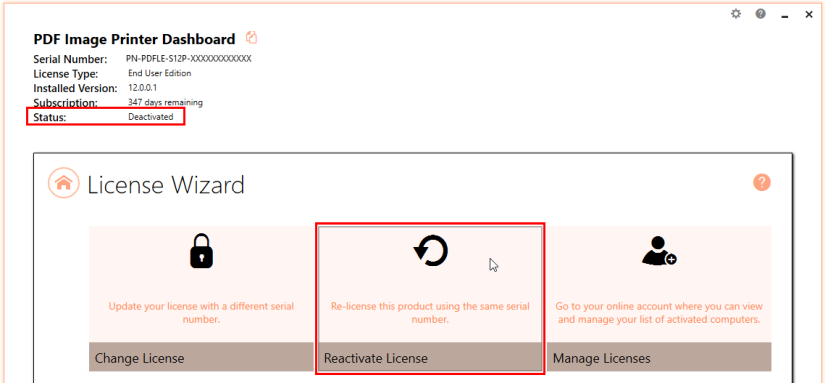
Activation Status: Deactivated (only applicable to subscription licenses)
If the activation for a computer was deactivated either by you through your PEERNET online account by editing your activation details, or by PEERNET at your request, the software will become deactivated.
If you change your mind or purchase additional licenses on the same serial number, you can reactivate the computer by:
- Opening the Image Printer Dashboard (double-click the PDF Image Printer icon on your desktop or click Start – All Programs – PDF Image Printer 12 Dashboard)
- Selecting Activate Product to launch the license wizard
- Selecting Reactivate License to go through the license wizard again using the same serial number that was used to originally activate the software on the computer.
If you have already re-used the license and have not purchased additional licenses, you may receive an error message that you have reached your activation limit on this serial number. This means that you do not have any licenses left to assign to this computer and need to purchase additional licenses.
How do I edit my activation details?
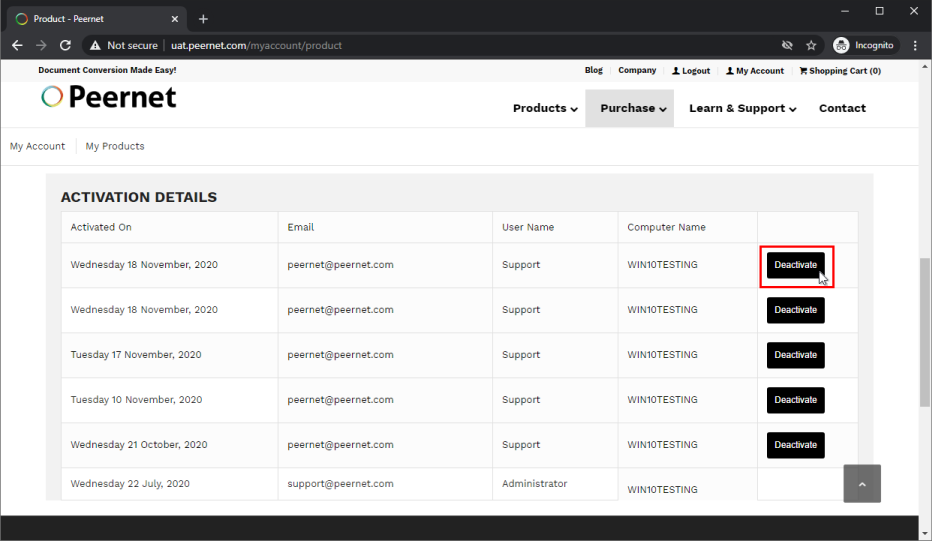
Users can view their activation details through their PEERNET online account. The activation details will show you which computer(s) have been activated using that serial number. For users with a subscription license of version 12 of the Image Printer, you can also edit your activation details directly through your online account.
- Please go to Login.
- Please sign in using your email address and password.
- Select the My Products tab.
- Your purchased software will be listed. Select Manage Product for your desired serial number.
- Under Activation Details, you will see a list of all computers currently activated with the serial number. Select Deactivate if you are no longer using the Image Printer on any of the listed computers. This will allow you to activate a new computer using the available license.
Alternatively, please email [email protected] with your serial number and the old computer name so that the PEERNET team can complete the license adjustment on your behalf.
NOTE: The ability to edit your activation details through your online account is only available for active subscription licenses. If your subscription license has expired, you are required to renew your annual subscription before you will be able to edit your activation details. If you own a one-time license of the Image Printer, you do not have the ability to edit your activation details. In this situation you will either need to purchase a new one-time license or a new subscription license of the Image Printer.
What applications or products work with the PDF Image Printer?
The PDF Image Printer is designed to work with any Windows application or product that can print. It virtually gives you an unlimited number of applications that can be used to create image files.
If you can print it, then the PDF Image Printer can create the PDF image file you requested. Simply choose the PDF Image Printer from the Print dialog of your application.
Can files produced by the PDF Image Printer contain viruses?
Files created by the PDF Image Printer are guaranteed to be 100% virus-free, even if your source files or computer have a virus. PDF Image files cannot contain viruses as each page is an image, so there is no executable code.
When I send image files produced by PDF Image Printer, can they change the files?
The files created by the PDF Image Printer cannot be easily changed as each page is an image. Therefore making the PDF format the industry accepted choice for many archiving and retrieval systems and used by industries such as legal, medical and insurance.
How do I Save and Restore settings?
If you are moving your Image Printer to a new computer, or you plan to upgrade your computer operating system or reformat your computer, you may wish to save and restore your Image Printer settings.
There are two options to saving and restoring settings:
Export and Import Personal Profile
If you have created a personal profile with your custom settings, you can simply export your personal profile so that it can be imported when you install the Image Printer on your new computer.
Step by Step Instructions
Export
- Launch the Image Printer Dashboard (double-click the PDF Image Printer icon on your desktop or click Start – All Programs – PDF Image Printer 12 Dashboard).
- Select “Edit & Create Profiles” to open Profile Manager.
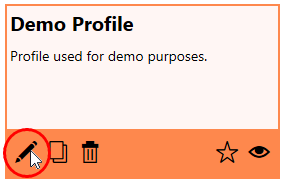
- Select “Edit this profile” to open the personal profile that you want to save.
- Select “Export profile”, and name and save the file.
Import
- Install and activate the Image Printer on the new computer.
- Launch the Image Printer Dashboard (double-click the PDF Image Printer icon on your desktop or click Start – All Programs – PDF Image Printer 12 Dashboard).
- Select “Edit & Create Profiles” to open Profile Manager.
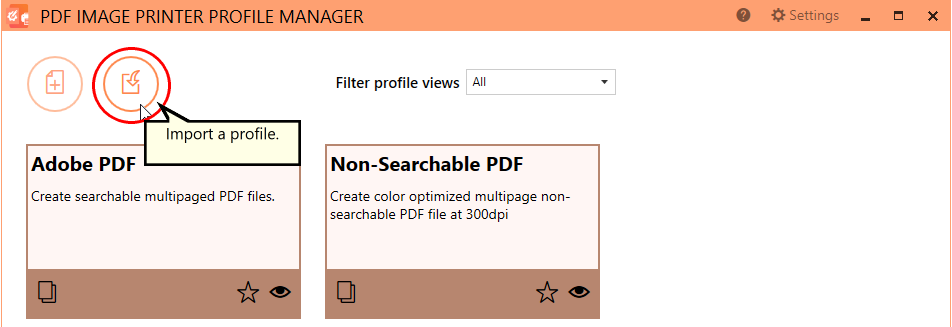
- Select “Import a Profile” and browse to the file that you want to restore.
- Close Profile Manager.
- Select “Manage Printers” to open Printer Management.
- Select the printer you wish to edit and use the Profile drop box to select your desired default profile.
- Select the Save icon to save changes.
- Select the Home icon to return to the Dashboard.
- Close the Dashboard. Now when you print a document to the Image Printer, the custom settings in the restored personal profile will be applied to the created file.
If you plan to use these settings regularly, you may wish to make this personal profile the default profile used by the Image Printer.
Backup and Restore All Settings
If you have made significant customizations to your Image Printer settings, such as creating several personal profiles and/or creating multiple copies of the Image Printer with custom names and default profiles, you may prefer to save all of your Image Printer settings by running a back up and then restoring these settings on the new computer computer.
Step by Step Instructions
Export
- Launch the Image Printer Dashboard (double-click the PDF Image Printer icon on your desktop or click Start – All Programs – PDF Image Printer 12 Dashboard).
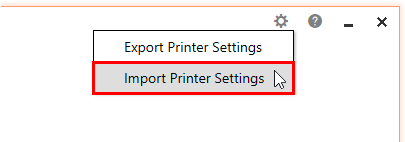
- Click the gear icon from the top right hand corner of the Dashboard window, and select “Export Printer Settings”.
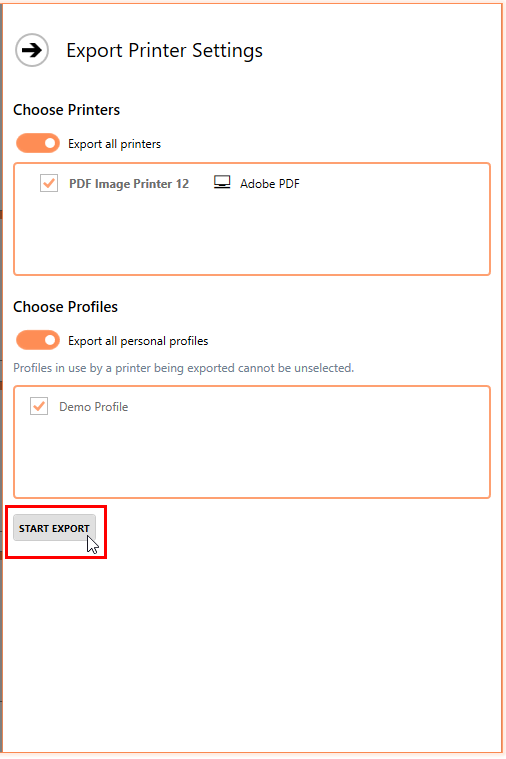
- Under Choose Printers, choose if you want to export all printers, or disable “Export all printers” and check the printers you want to export.
- Under Choose Profiles, choose if you want to export all personal profiles, or disable “Export all personal profiles” and check the personal profiles you want to export. Profiles in use by a printer being exported cannot be unselected.
- Select Start Export, and save the export file.
Import
- Install and activate the Image Printer on the new computer.
- Launch the Image Printer Dashboard (double-click the PDF Image Printer icon on your desktop or click Start – All Programs – PDF Image Printer 12 Dashboard).
- Click the gear icon from the top right hand corner of the Dashboard window, and select “Import Printer Settings”.
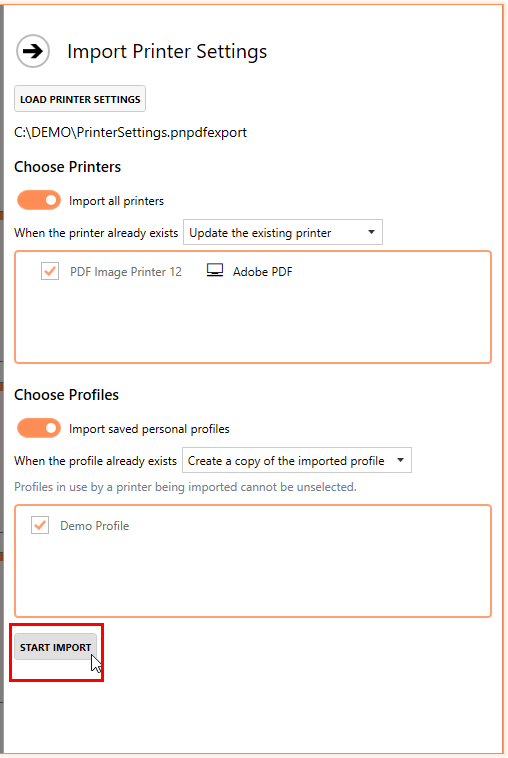
- Select Load Printer Settings and browse to where you saved the settings file.
- Under Choose Printers, choose if you want to import all printers, or disable “Import all printers” and check the printers you want to import. By default, when the printer already exists, the import function will “Update the existing printer”. You can change this to “Create a copy of the imported printer” instead.
- Under Choose Profiles, choose if you want to import all personal profiles, or disable “Import saved personal profiles” and check the personal profiles you want to import. By default, when the profile already exists, the import function will “Create a copy of the imported profile”. You can change this to “Update the existing profile” instead. Profiles in use by a printer being imported cannot be unselected.
- Select Start Import.
NOTE: If you are moving the Image Printer to a new computer or planning to activate the Image Printer on a reformatted computer, after you have saved your settings, we recommend uninstalling the Image Printer so the the license can be deactivated and reused on the new / reformatted computer. This feature is only available for active subscription licenses. If your subscription license has expired, you are required to renew your annual subscription before you will be able to move / reactivate a license. If you own a one-time license of the Image Printer, you do not have the ability to move / reactivate your license. In this situation you will either need to purchase a new one-time license or a new subscription license to activate the Image Printer on a new / reformatted computer.
How do I change the resolution?
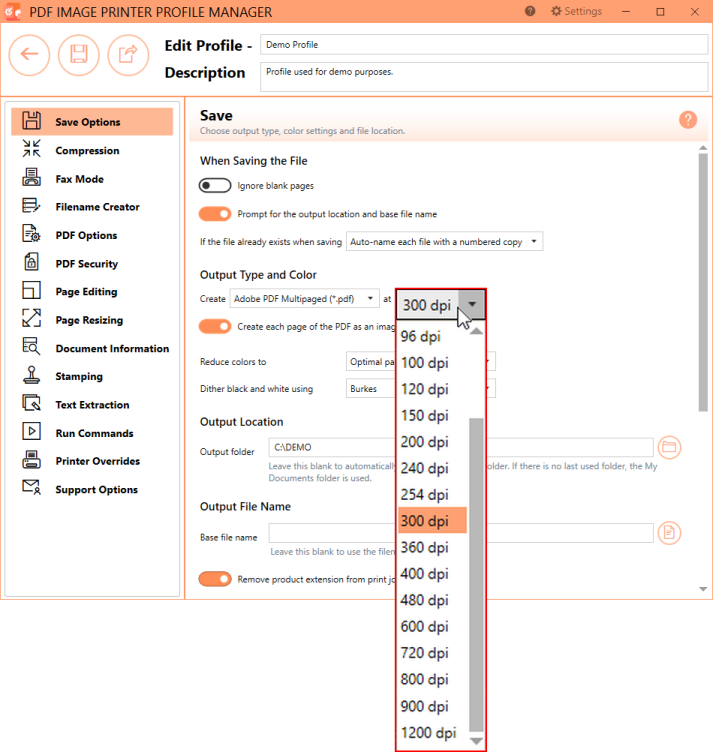
By default, resolution is set to 300 DPI. To change the resolution you will need to create a personal profile. Note: Resolution is only applicable when creating PDF images. Resolution is not applicable when creating Adobe PDF files.
Step by Step Instructions
- Launch the Image Printer Dashboard (double-click the PDF Image Printer icon on your desktop or click Start – All Programs – PDF Image Printer 12 Dashboard).
- Select “Edit & Create Profiles” to open Profile Manager.
- Select “Add a profile” to create a personal profile, or create a copy of one of our system profiles.
- Name the profile, add a description, and click Save.
- On the Save Options tab, under Output Type and Color, enable Create each page of the PDF as an image.
- Drop the box next to “Create” to select your desired output type, and drop the box next to “at” to select your desired resolution.
- Click Save-Back, and close Profile Manager.
- Select “Manage Printers” to open Printer Management.
- Select the printer you wish to edit and use the Profile drop box to select your desired default profile.
- Select the Save icon to save changes.
- Select the Home icon to return to the Dashboard.
- Close the Dashboard. Now when you print a document to the Image Printer, your created PDF images will be created at the resolution you set.
If you plan to use these settings regularly, you may wish to make this personal profile the default profile used by the Image Printer.
Can the install be setup so users do not need to configure the PDF Image Printer?
The Image Printer uses Profiles, which are a group of settings, to create the output file you want. Your personal profiles can be exported and imported by another user. Therefore, in order to install the Image Printer so that another user does not need to configure the Image Printer, you just need to export and import a personal profile containing your custom settings.
Step by Step Instructions
Export
- Launch the Image Printer Dashboard (double-click the PDF Image Printer icon on your desktop or click Start – All Programs – PDF Image Printer 12 Dashboard).
- Select “Edit & Create Profiles” to open Profile Manager.
- Select “Edit this profile” to open the personal profile that you want to export.
- Select “Export profile”, and name and save the file.
Import
- Install and activate the Image Printer on the user’s computer.
- Launch the Image Printer Dashboard (double-click the PDF Image Printer icon on your desktop or click Start – All Programs – PDF Image Printer 12 Dashboard).
- Select “Edit & Create Profiles” to open Profile Manager.
- Select “Import a Profile” and browse to the file that you previously exported.
- Close Profile Manager.
- Select “Manage Printers” to open Printer Management.
- Select the printer you wish to edit and use the Profile drop box to select your desired default profile.
- Select the Save icon to save changes.
- Select the Home icon to return to the Dashboard.
- Close the Dashboard. Now when you print a document to the Image Printer, the custom settings in your personal profile will be applied to the created file.
If the user plans to use these settings regularly, they may wish to make this personal profile the default profile used by the Image Printer.
How do I share the PDF Image Printer?
The Image Printer uses Profiles, which are a group of settings, to create the output file you want. Your personal profiles can be exported and imported by another user. Therefore, in order to share the Image Printer, you just need to export and share your personal profile so it can be imported by another user.
Step by Step Instructions
User 1: Export
- Launch the Image Printer Dashboard (double-click the PDF Image Printer icon on your desktop or click Start – All Programs – PDF Image Printer 12 Dashboard).
- Select “Edit & Create Profiles” to open Profile Manager.
- Select “Edit this profile” to open the personal profile that you want to export.
- Select “Export profile”, and name and save the file.
- Share saved file with another user.
User 2: Import
- Launch the Image Printer Dashboard (double-click the PDF Image Printer icon on your desktop or click Start – All Programs – PDF Image Printer 12 Dashboard).
- Select “Edit & Create Profiles” to open Profile Manager.
- Select “Import a Profile” and browse to the file that was shared with you.
- Close Profile Manager.
- Select “Manage Printers” to open Printer Management.
- Select the printer you wish to edit and use the Profile drop box to select your desired default profile.
- Select the Save icon to save changes.
- Select the Home icon to return to the Dashboard.
- Close the Dashboard. Now when you print a document to the Image Printer, the custom settings in the shared personal profile will be applied to the created file.
If you plan to use these settings regularly, you may wish to make this personal profile the default profile used by the Image Printer.
How do I install more than one copy of PDF Image Printer?
By default, there is a single copy of the Image Printer. Use Printer Management to create copies of the Image Printer.
Step by Step Instructions
- Launch the Image Printer Dashboard (double-click the PDF Image Printer icon on your desktop or click Start – All Programs – PDF Image Printer 12 Dashboard).
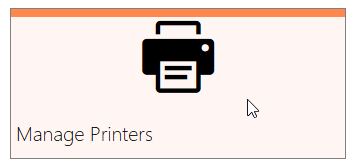
- Select “Manage Printers” to open Printer Management.
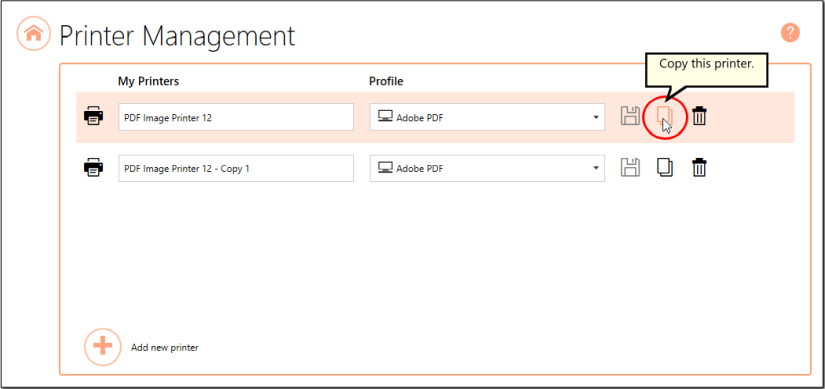
- Beside the printer, select the Copy icon to create a copy of the Image printer.
- By default, the newly copied printer will be named “Printer Name – Copy 1″. You can change the name by selecting the current name of the printer and entering your desired printer name.
- You can also assign a different default profile to your newly created printer.
- Select the Save icon to save changes.
- Select the Home icon to return to the Dashboard.
Now when you print a document to the Image Printer, there will be two listings for the Image Printer in the printers list.
How do I setup multiple image printers with different configurations?
By default, there is a single copy of the Image Printer. Use Printer Management to create copies of the Image Printer. You can then assign each copy of the Image Printer a different default profile so that they will each have different configurations.
Step by Step Instructions
- Launch the Image Printer Dashboard (double-click the PDF Image Printer icon on your desktop or click Start – All Programs – PDF Image Printer 12 Dashboard).
- Select “Manage Printers” to open Printer Management.
- Beside the printer, select the Copy icon to create a copy of the Image printer.
- By default, the newly copied printer will be named “Printer Name – Copy 1″. You can change the name by selecting the current name of the printer and entering your desired printer name.
- Create as many copies of the Image Printer as you require.
- Assign a different default profile to each of your newly created printer. This means that a different group of settings / configurations will be applied to the output files created by each copy of the Image Printer. If you need to create more profiles, return to the Dashboard, and select “Edit & Create Profiles”.
- Select the Save icon to save changes.
- Select the Home icon to return to the Dashboard.
Now when you print a document to the Image Printer, there will be multiple listings for the Image Printer in the printers list, each with different configurations.
How can I avoid being prompted every time I print with the Save As dialog?
By default, each time you print to the Image Printer you will be prompted with a Save As dialog to choose where you want save the output file. You can change this so that the output file is always saved in the same location without showing the dialog.
To change the prompting settings you will need to create a personal profile.
Step by Step Instructions
- Launch the Image Printer Dashboard (double-click the PDF Image Printer icon on your desktop or click Start – All Programs – PDF Image Printer 12 Dashboard).
- Select “Edit & Create Profiles” to open Profile Manager.
- Select “Add a profile” to create a personal profile, or create a copy of one of our system profiles.
- Name the profile, add a description, and click Save.
- On the Save Options tab, disable Prompt for the output location and base file name.
- The default setting, Auto-name each file with a numbered copy, will add a copy number to the new file if the file name already exists in the output folder.
- Show prompt to let me choose my action, will prompt if the file name already exists in the output folder allowing you to choose whether to overwrite, create a copy, append to existing file, or cancel print.
- Always overwrite the existing file, will replace the old file with the new file if the file name already exists in the output folder. No warning dialog will be shown.
- Change the overwrite method if you wish or leave it as the default, Auto-name each file with a numbered copy.
- By turning off the prompting each time your print, that means you will no longer be able to set the output location and the output file name during each print. You may wish to set the Output Location and/or the Output File Name. If these fields are left blank, the Image Printer will save files to the My Documents folder and use the filename from the print job.
- Click Save-Back, and close Profile Manager.
- Select “Manage Printers” to open Printer Management.
- Select the printer you wish to edit and use the Profile drop box to select your desired default profile.
- Select the Save icon to save changes.
- Select the Home icon to return to the Dashboard.
- Close the Dashboard. Now when you print a document to the Image Printer, you will not be prompted by the Save As dialog.
When you turn off prompting, it is important to consider how the Image Printer will handle overwrite situations. There are three options:
If you plan to use these settings regularly, you may wish to make this personal profile the default profile used by the Image Printer.
How do I create a black and white image from a color file or document?
The Image Printer uses Profiles, which are a group of settings, to create the output file you want. PDF Image Printer comes with a few system profile including: Adobe PDF and Non-Searchable PDF. Both of these system profiles will maintain the colors found in the original document.
To create other output formats in black and white, you will need to create a personal profile. Note: You cannot create black and white Adobe PDF files.
Step by Step Instructions
- Launch the Image Printer Dashboard (double-click the PDF Image Printer icon on your desktop or click Start – All Programs – PDF Image Printer 12 Dashboard).
- Select “Edit & Create Profiles” to open Profile Manager.
- Select “Edit this profile” for your personal profile.
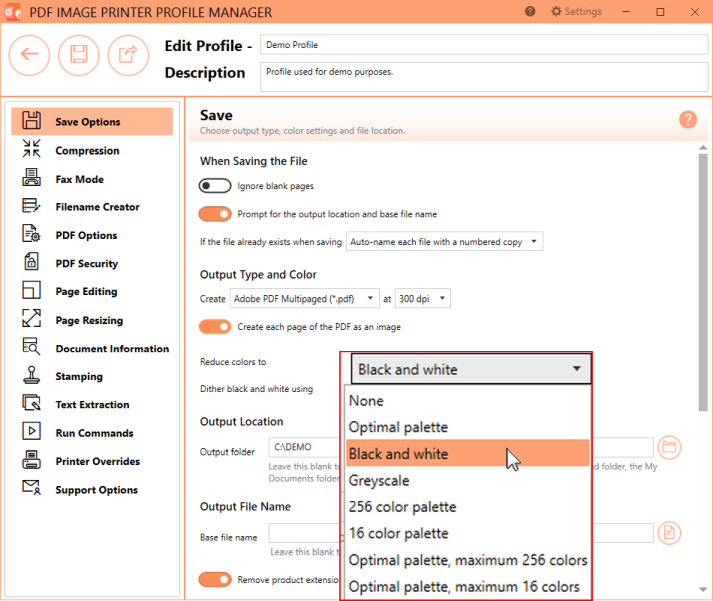
- On the Save Options tab, under Output Type and Color, enable Create each page of the PDF as an image.
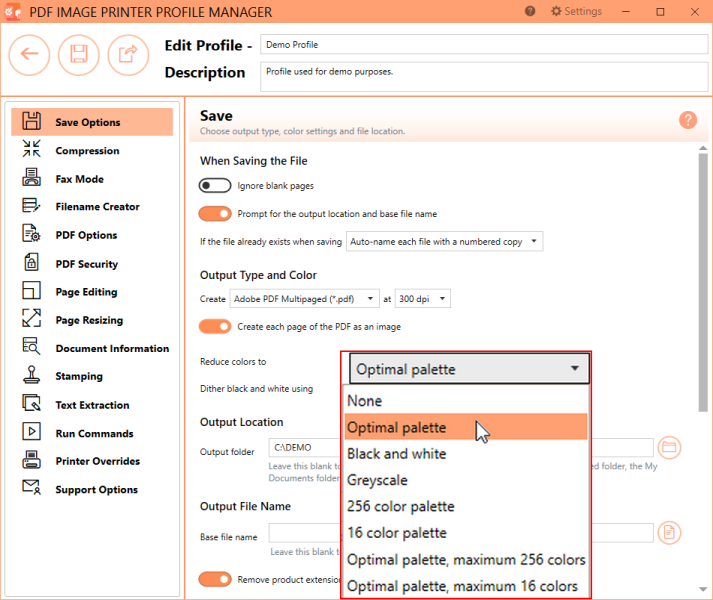
- Drop the box next to “Create” to select your desired output type and drop the box nest to “Reduce colors to” to select black and white. (“Reduce colors to” is not applicable to Adobe PDF.)
- Click Save-Back, and close Profile Manager.
- Select “Manage Printers” to open Printer Management.
- Select the printer you wish to edit and use the Profile drop box to select your desired default profile.
- Select the Save icon to save changes.
- Select the Home icon to return to the Dashboard.
- Close the Dashboard. Now when you print a document to the Image Printer, your created PDF images will be black and white.
If you plan to use these settings regularly, you may wish to make this personal profile the default profile used by the Image Printer.
Why do I get a black and white image when original document is in color?
If your original document is in color, the color will always be maintained in the output file when creating Adobe PDF files. If you are creating PDF images, the color will be maintained in the output file as long as color reduction is set to Optimal palette (default setting) or None.
The Image Printer uses Profiles, which are a group of settings, to create the output file you want. PDF Image Printer comes with a few system profile including: Adobe PDF and Non-Searchable PDF. Both of these system profiles will maintain the colors found in the original document.
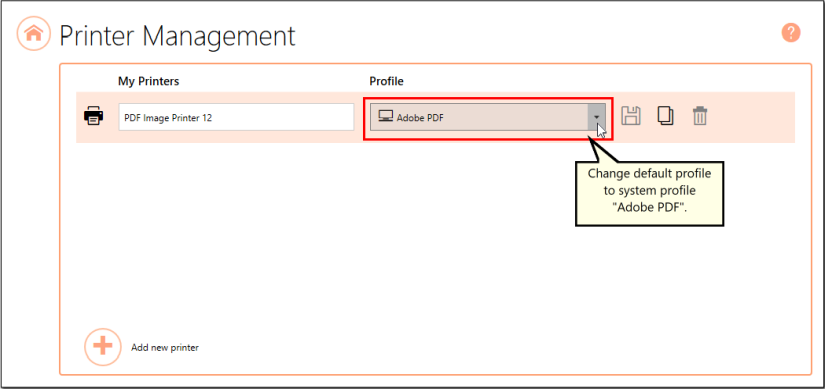
To create Adobe PDF files with the same colors found in the original document use the Adobe PDF system profile.
Step by Step Instructions
- Launch the Image Printer Dashboard (double-click the PDF Image Printer icon on your desktop or click Start – All Programs – PDF Image Printer 12 Dashboard).
- Select “Manage Printers” to open Printer Management.
- Ensure that the default profile is set to Adobe PDF.
- Select the Save icon to save changes.
- Select the Home icon to return to the Dashboard.
- Open the document you want to convert to a TIFF image.
- Select File – Print from your application, and select PDF Image Printer 12 from the list of printers.
- Print, and then set the name and save location of your new color PDF file.
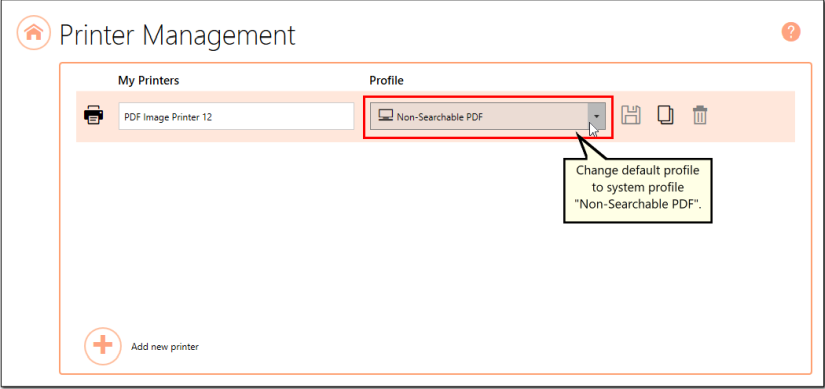
To create non-searchable PDF images with the same colors found in the original document use the Non-Searchable PDF system profile.
Step by Step Instructions
- Launch the Image Printer Dashboard (double-click the PDF Image Printer icon on your desktop or click Start – All Programs – PDF Image Printer 12 Dashboard).
- Select “Manage Printers” to open Printer Management.
- Change the default profile to Non-Searchable PDF.
- Select the Save icon to save changes.
- Select the Home icon to return to the Dashboard.
- Open the document you want to convert to a TIFF image.
- Select File – Print from your application, and select PDF Image Printer 12 from the list of printers.
- Print, and then set the name and save location of your new color PDF image.
If you are using a personal profile, ensure that the profile you are using is reducing colors to Optimal palette or None.
Step by Step Instructions
- Launch the Image Printer Dashboard (double-click the PDF Image Printer icon on your desktop or click Start – All Programs – PDF Image Printer 12 Dashboard).
- Select “Edit & Create Profiles” to open Profile Manager.
- Select “Edit this profile” for your personal profile.
- On the Save Options tab, under Output Type and Color, enable Create each page of the PDF as an image.
- Drop the box next to “Reduce colors to” to select either Optimal palette or None.
- Click Save-Back, and close Profile Manager.
- Close the Dashboard. Now when you print a document to the Image Printer using this personal profile, the colors from the original document will be maintained in your output files.
How do I print landscape drawings from AutoCAD?
The AutoCAD application controls if Landscape drawings get auto rotated or not.
If your AutoCAD does not auto rotates Landscape pages, then do the steps in Option A.
If your AutoCAD does auto rotates Landscape pages, then do the steps in Option B.
Option A:
- Open your drawing in AutoCAD.
- From the File menu, select Page Setup.
- On the Plot Device tab, select the Image Printer.
NOTE: Do not select a .pc3 file (if you have one). - Select the Properties button.
- Through the Properties dialog, set your desired paper size and set the orientation to Landscape.
NOTE: If you do not see your custom paper size, you may need to add a new custom paper form. - Click the Plot button.
Option B:
- Close AutoCad.
- Launch the Image Printer Dashboard (double-click the PDF Image Printer icon on your desktop or click Start – All Programs – PDF Image Printer 12 Dashboard).
- Select “Edit & Create Profiles” to open Profile Manager.
- Select “Add a profile” to create a personal profile, or create a copy of one of our system profiles.
- Name the profile, add a description, and click Save.
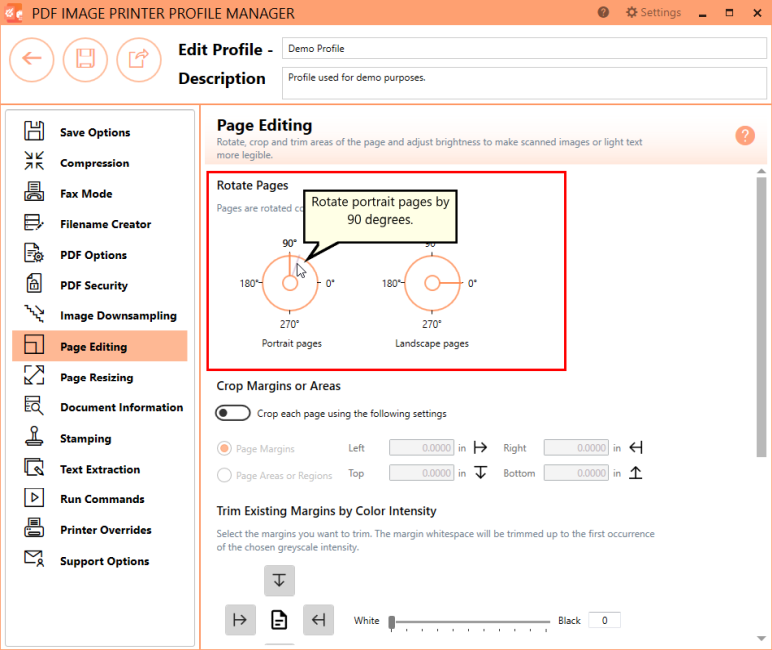
- On the Page Editing tab, set Portrait pages to be rotated by 90 degrees.
- Click Save-Back, and close Profile Manager.
- Select “Manage Printers” to open Printer Management.
- Select the printer you wish to edit and use the Profile drop box to select your desired default profile.
- Select the Save icon to save changes.
- Select the Home icon to return to the Dashboard.
- Close the Dashboard
- Open your drawing in AutoCad.
- From the File menu, select Page Setup.
- On the Plot Device tab, select the Image Printer.
- Select the Properties button.
- Through the Properties dialog, make sure your desired paper size is set and the orientation is set to Portrait.
- Click the Plot button.
If you plan to use these settings regularly, you may wish to make this personal profile the default profile used by the Image Printer.
Why can I not see my AutoCAD paper sizes or why is the paper size incorrect?
When AutoCAD is installed it adds a collection of new paper sizes, the most commonly used being ARCH C, D and E. To use these new paper sizes you need to manually add these paper sizes, or forms, to the list of all paper sizes available on your computer.
Below are the necessary steps to add the AutoCAD paper sizes so they are visible when using the Image Printer.
IMPORTANT: Please close all applications before making these changes.
Windows 10 and Windows Server 2016
- Right click the Windows icon
on the start bar.
- Click Control Panel.
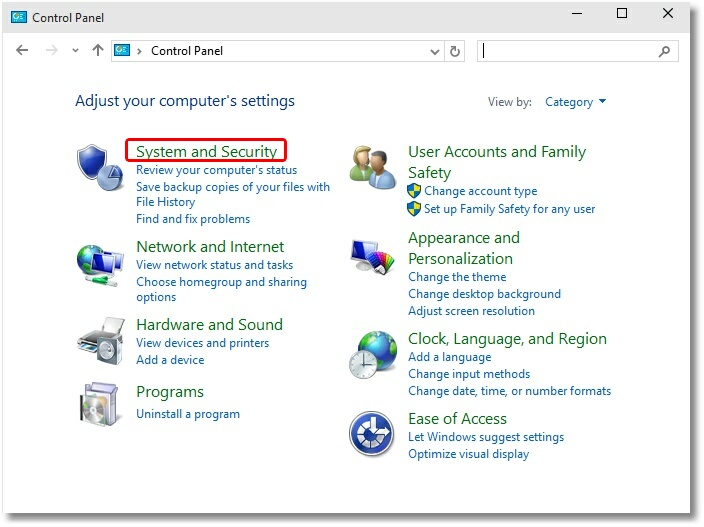
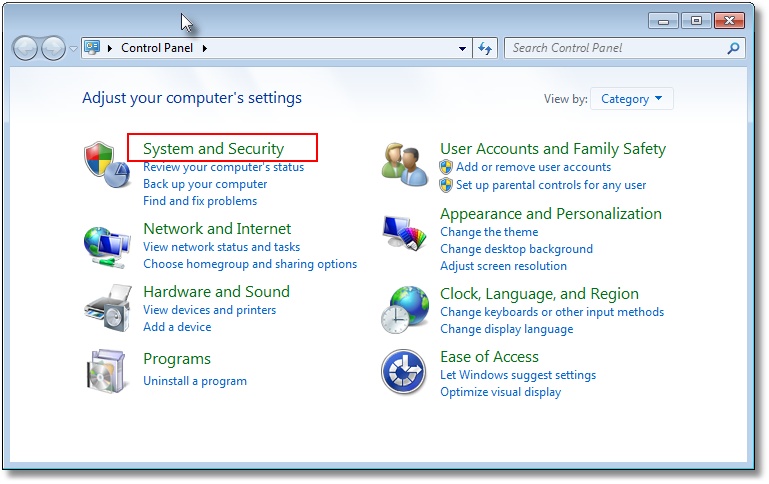
- Click System and Security.
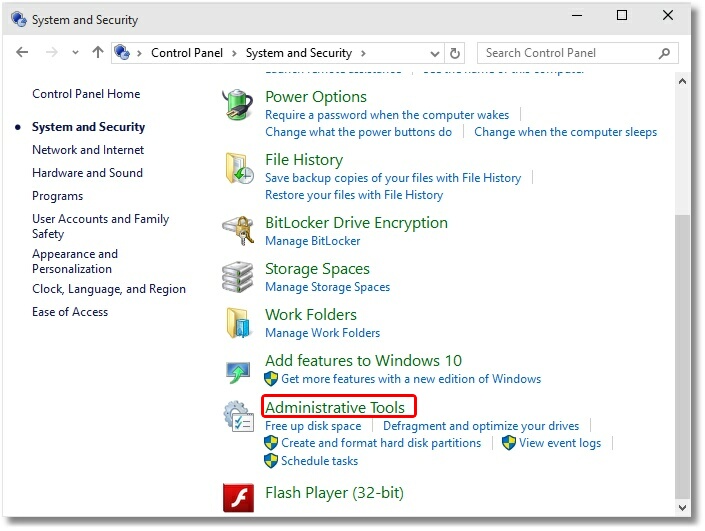
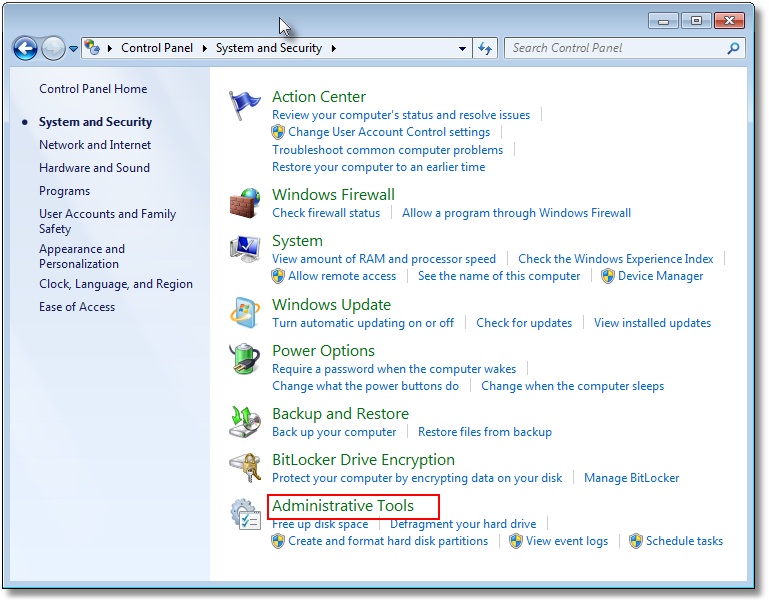
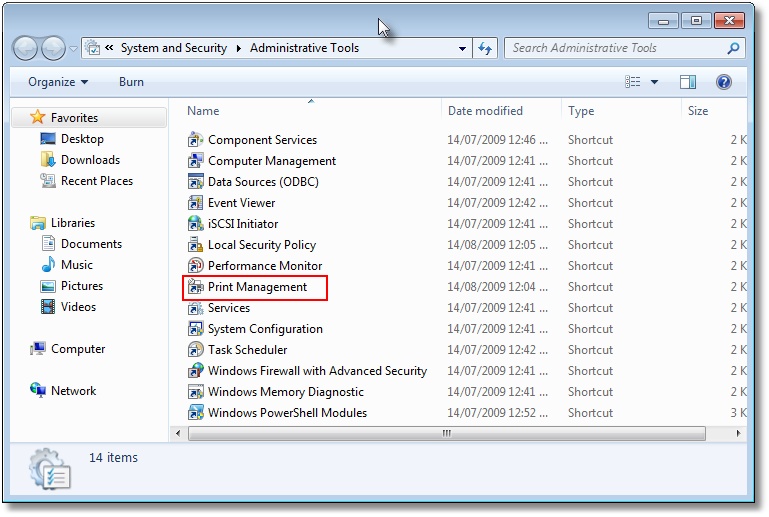
- Click Administrative Tools.
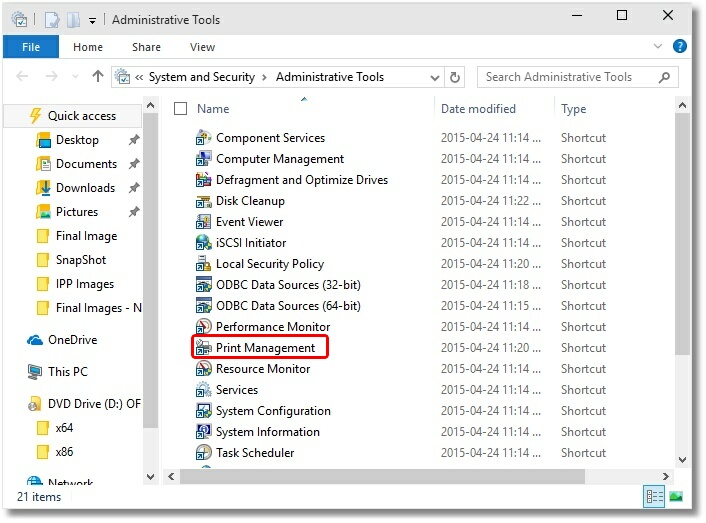
- Double click Print Management.
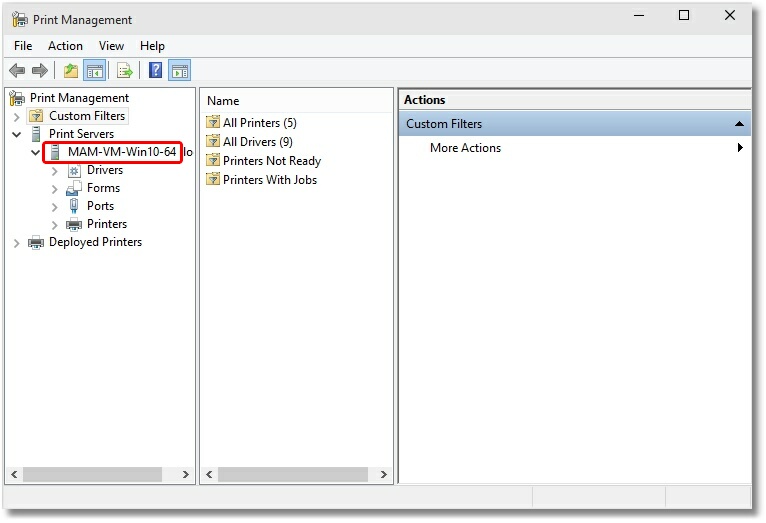
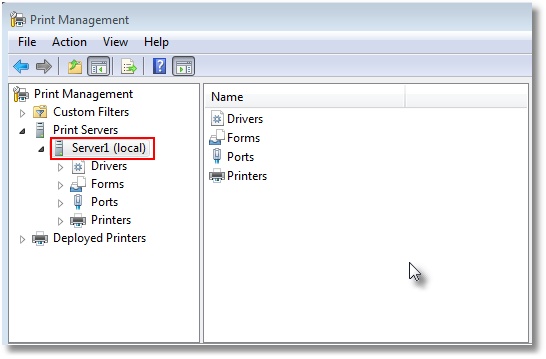
- Select Print Servers and then select the name of your computer (ie Server1).
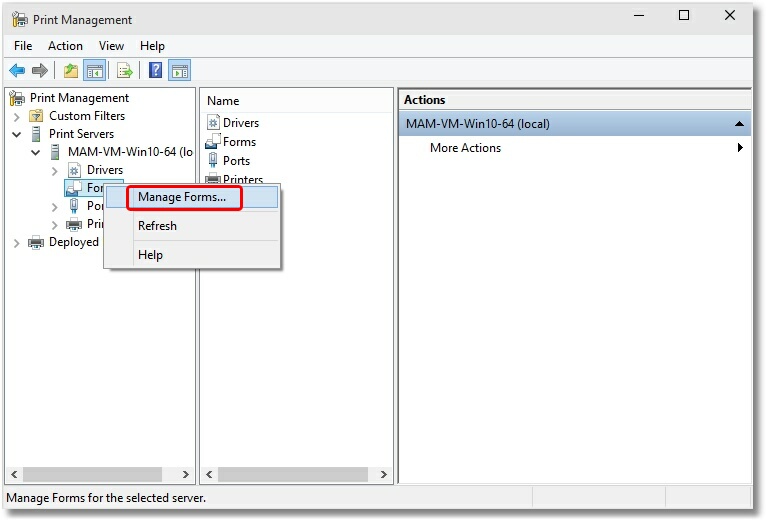
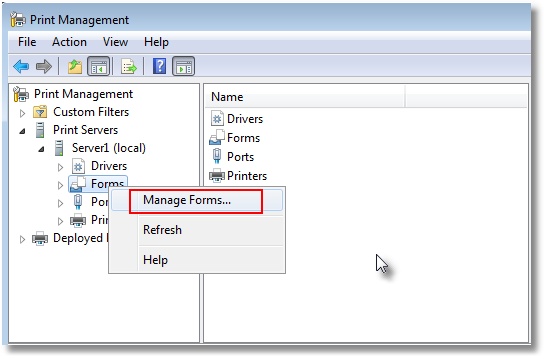
- Right click Forms item and select Manage Forms.
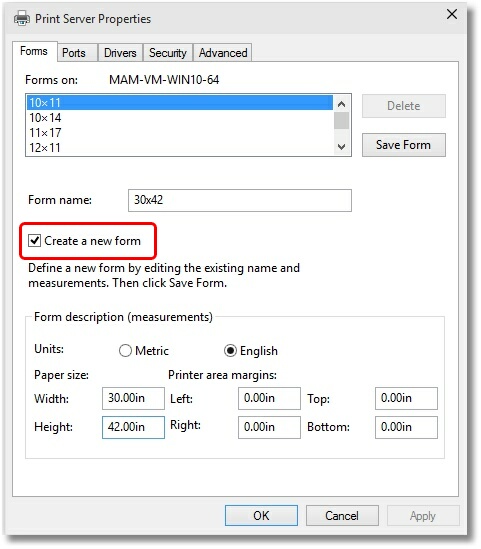
- Check “Create a new form”.
- Enter a descriptive name in the “Form name:” field (e.g. “30 x 42” or “36 x 48”).
- Set the Measurement units to “English” or “Metric”.
- Enter the desired Width and Height for your paper size. NOTE: Always make the Width less than the Height (e.g. Width 30, Height 42) as you can always choose Landscape orientation later.
- Click “Save Form”.
- Repeat steps 8-12 for each new paper size you want to create.
- Click Close when you are done.
- Open your drawing in AutoCAD. Select File – Plot, and in the Plot dialog, set the Plot device to the Image Printer.
- On the Plot Settings tab, select the desired paper size, orientation (Landscape), and scale (Scale to fit), and click OK.
Windows 8 and Windows 2012
- Click the Windows logo key
+I.
- Click Control Panel.
- Click System and Security.
- Click Administrative Tools.
- Double click Print Management.
- Select Print Servers and then select the name of your computer (ie Server1).
- Right click Forms item and select Manage Forms.
- Check “Create a new form”.
- Enter a descriptive name in the “Form name:” field (e.g. “30 x 42” or “36 x 48”).
- Set the Measurement units to “English” or “Metric”.
- Enter the desired Width and Height for your paper size. NOTE: Always make the Width less than the Height (e.g. Width 30, Height 42) as you can always choose Landscape orientation later.
- Click “Save Form”.
- Repeat steps 8-12 for each new paper size you want to create.
- Click Close when you are done.
- Open your drawing in AutoCAD. Select File – Plot, and in the Plot dialog, set the Plot device to the Image Printer.
- On the Plot Settings tab, select the desired paper size, orientation (Landscape), and scale (Scale to fit), and click OK.
On Windows 7 and Windows 2008 R2
- Go to Start – Control Panel.
- Click System and Security.
- Click Administrative Tools.
- Double click Print Management.
- Select Print Servers and then select the name of your computer (ie Server1).
- Right click Forms item and select Manage Forms.
- Check “Create a new form”.
- Enter a descriptive name in the “Form Description for:” field (e.g. “30 x 42” or “36 x 48”).
- Set the Measurement units to “English” or “Metric”.
- Enter in the desired Width and Height for your paper size. NOTE: Always make the Width less than the Height (e.g. Width 30, Height 42) as you can always choose Landscape orientation later.
- Click “Save Form”.
- Repeat steps 7-11 for each new paper size you want to create.
- Click Close when you are done.
- Open your drawing in AutoCAD. Select File – Plot, and in the Plot dialog, set the Plot device to the Image Printer.
- On the Plot Settings tab, select the desired paper size, orientation (Landscape), and scale (Scale to fit), and click OK.
How to print a long page (oil well logs) as one continuous image?
If you need one image produced from a long page (for example an oil well log) then you will need to create a personal profile configured with a custom paper size to match the width and length of the paper required to print the single continuous page as one image.
Example: If you needed a 8.5″ x 100″ page as output.
Step by Step Instructions
- Launch the Image Printer Dashboard (double-click the PDF Image Printer icon on your desktop or click Start – All Programs – PDF Image Printer 12 Dashboard).
- Select “Edit & Create Profiles” to open Profile Manager.
- Select “Add a profile” to create a personal profile, or create a copy of one of our system profiles.
- Name the profile, add a description, and click Save.
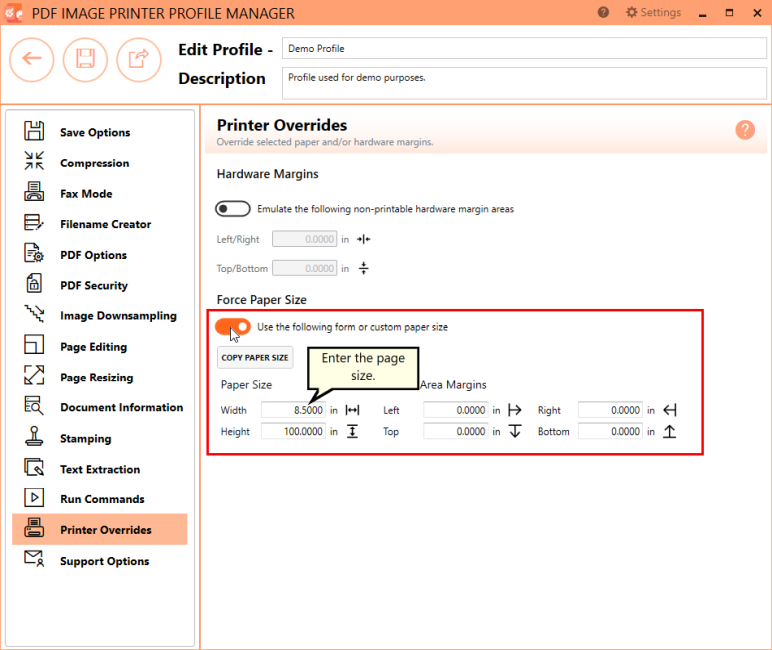
- On the Printer Overrides tab, under Force Paper Size, enable Use the following form or custom paper size.
- Enter the paper size. In this example we will use Width 8.5″ and Height 100″ Since the length of oil well logs vary, we are going to enter the maximum possible length which is 100″. This will create a varying amount of white space at the bottom of your output files which we will remove using the trimming feature.
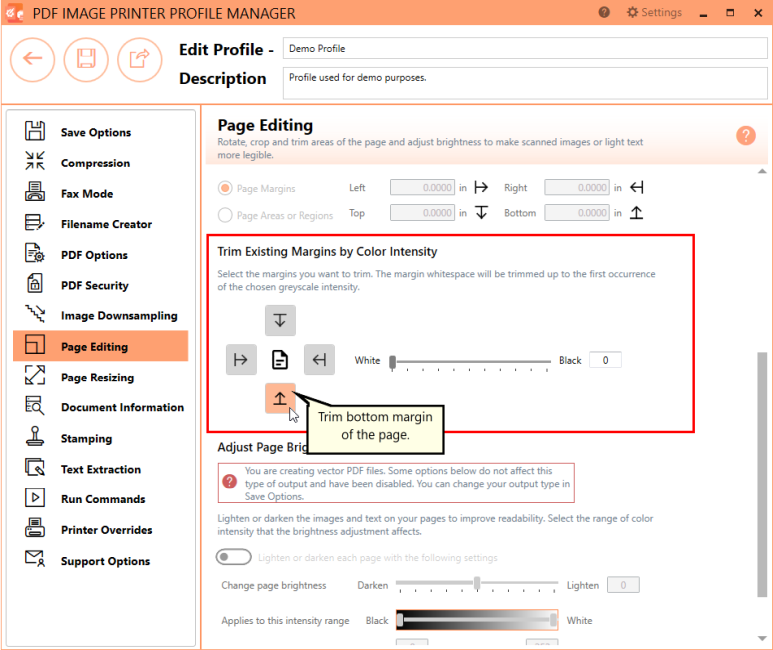
- On the Page Editing tab, under Trim Existing Margins by Color Intensity, click the bottom arrow to enable trimming of the bottom margin of the page.
- Ensure that the color intensity sliding scale is set to white. This means that the Image Printer will trim your output file from the bottom of the page until it reaches the first pixel that is not white.
- Click Save-Back, and close Profile Manager.
- Select “Manage Printers” to open Printer Management.
- Select the printer you wish to edit and use the Profile drop box to select your desired default profile.
- Select the Save icon to save changes.
- Select the Home icon to return to the Dashboard.
- Close the Dashboard. Now when you print an oil well log to the Image Printer, you will create output files as one continuous page.
If you plan to use these settings regularly, you may wish to make this personal profile the default profile used by the Image Printer.
When printing from Internet Explorer the background color and images are missing?
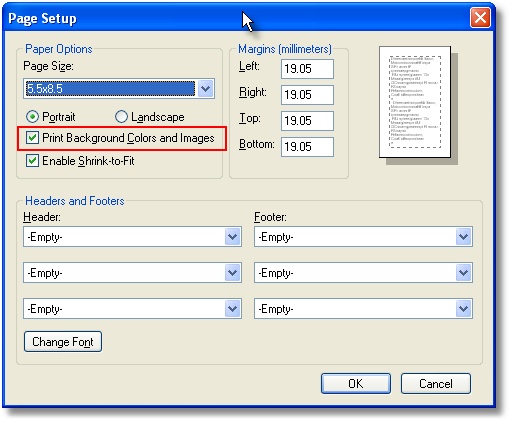
Internet Explorer does not print background color and images by default. To include background color and images when printing from Internet Explorer do the following for your version of Internet Explorer:
Running Internet Explorer 7.0 to 11.0:
- Open Internet Explorer.
- Click File – Page Setup.
- Check “Print Background Colors and Images”.
- Click OK.
When printing from Microsoft Word the linked images are not displayed?
In certain situations, particularly when printing a large Microsoft Word document with linked images (not embedded), the opening and printing of the document results in missing image icons (black outline with red x) after a certain point.
This happens because Microsoft Word only loads a certain amount of pages in advance, and its printing default is to background print. This causes the latter pages to be printed before their images are loaded.
There are two options to workaround this problem with Microsoft Word:
Option 1: Turn off background printing
- Click File – Options.
- From the left column, click Advanced.
- Scroll down to the Print section.
- Uncheck Print in background.
- Click OK.
- Then print.
Option 2: Scroll and view all the pages of the document to force load all linked images and then print.
Why does my application no longer work after upgrading to the latest release?
The most common reason a vendor’s application won’t work with the new release of the software is that the name of the printer and related files were hard-coded into the logic of the printing application.
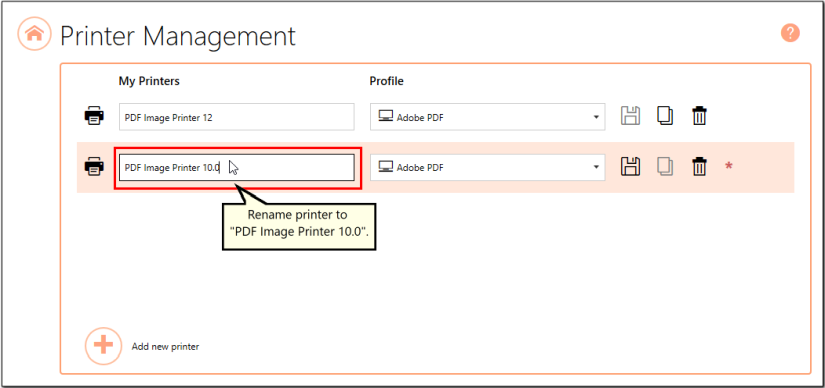
When this is the case, you can use Printer Management to create copies of the Image Printer and rename it to match the old release (ex. PDF Image Printer 10.0).
Step by Step Instructions
- Launch the Image Printer Dashboard (double-click the PDF Image Printer icon on your desktop or click Start – All Programs – PDF Image Printer 12 Dashboard).
- Select “Manage Printers” to open Printer Management.
- Beside the printer, select the Copy icon to create a copy of the Image printer.
- By default, the newly copied printer will be named “Printer Name – Copy 1″. You can change the name by selecting the current name of the printer and entering your desired printer name (ex. “PDF Image Printer 10.0”).
- You can also assign a different default profile to your newly created printer.
- Select the Save icon to save changes.
- Select the Home icon to return to the Dashboard.
Now when you print a document to the Image Printer, there will be two listings for the Image Printer in the printers list – “PDF Image Printer 12” and “PDF Image Printer 10.0”.
Version 11.0 FAQs
These are frequently asked questions specific to users who have not yet upgraded to version 12.
What version of the product is installed on my computer?
If you need to know the version of Image Printer 11.0 installed on your computer, follow the applicable instructions below. Please note that this is not the latest version of the software. We recommend upgrading to the latest version of the software – PDF Image Printer 12.
Windows 10, Windows Server 2019, and Windows Server 2016
- Click the Windows logo key
on the start bar.
- Launch Control Panel.
- Click Programs and Features.
- Check the Version column for the version you have installed.
Windows 8 and Windows 2012
- Click the Windows logo key
+I.
- Click Control Panel.
- Under Programs, click Uninstall a program.
- Check the Version column for the version you have installed.
Windows 7 and Windows 2008 R2
- From the Start Menu click on Control Panel.
- Under Programs. click Uninstall a program.
- Check the Version column for the version you have installed.
Windows Vista and Windows 2008
- From the Start Menu click on Control Panel.
- Under Programs, click Uninstall a program
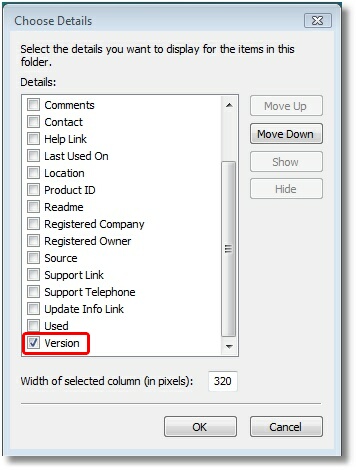
- If the Version column is not showing, right click the Name column title and click More. Then scroll down and click Version, then click OK to add the column.
- Check the Version column for the version you have installed.
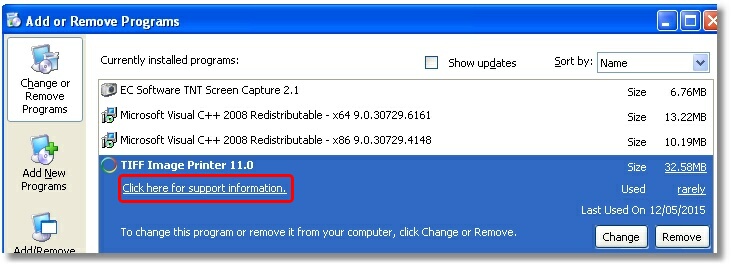
Windows XP, Windows 2003 and Windows 2000
- From the Start Menu click on Control Panel.
- In the Control Panel click Add/Remove Programs.
- Scroll and highlight the product name
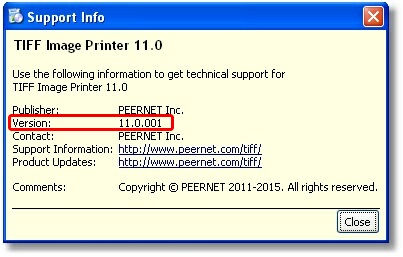
- Click on the text “Click here for support information.
- The version number is listed with the support information.
How do I find my serial number?
You can find your Image Printer 11.0 serial number either through your PEERNET online account or on the computer where the software is activated. Please note that this is not the latest version of the software. We recommend upgrading to the latest version of the software – PDF Image Printer 12.
Your PEERNET online account contains a complete list of your purchased products with the applicable serial number and software download link.
Alternatively, on the computer where the software is activated, you can view your activation information, including your serial number, by clicking Start – All Programs – PDF Image Printer 11.0 – License…
Why is the licensed software now in Trial mode?
If the software was previously licensed and has now reverted back to Trial mode, this means something on the computer has changed so the product believes it is no longer licensed.
Examples of items that effect the license validity are:
- change of domain or workgroup
- change in the network
- change in the computer name
- reformatting and reloading the computer
- system has virus
In this situation you will need to re-license the computer using your existing serial number, or upgrade to the latest version of the software – PDF Image Printer 12.
If you are re-licensing and the computer is identical, then “license authentication server” will re-license without the need for you to request a license adjustment.
A license adjustment is when PEERNET adjusts your serial number to un-license your existing computer, which then allows you to license your new computer using the same serial number.
Customers with active On-Going Licensing and Support subscription have the authority to request license adjustments. To do so please, email [email protected] with your Serial Number, name of the computer and the reason for the license adjustment so the reset can be authorized and completed. That said, we highly recommend that customers with active On-Going Licensing and Support subscription take their free upgrade to the latest version.
If you do not have an active On-Going Licensing and Support subscription PEERNET cannot authorize your request. Please go to your PEERNET online account and select Purchase Upgrade to receive a new software download and serial number for the latest version.
How do I reactivate the software?
With Image Printer 11.0, a license adjustment request is required if you are trying to move your license from one computer to another, re-load the software on your reformatted computer, or reactivate the software for any other reason. A license adjustment is when PEERNET adjusts your serial number to un-license your existing computer, which then allows you to license your new computer using the same serial number.
Please note that this is not the latest version of the software. We recommend upgrading to the latest version of the software – PDF Image Printer 12.
If you are re-licensing and the computer is identical, then “license authentication server” will re-license without the need for you to request a license adjustment.
Customers with active On-Going Licensing and Support subscription have the authority to request license adjustments. To do so please, email [email protected] with your Serial Number, name of the computer and the reason for the license adjustment so the reset can be authorized and completed. That said, we highly recommend that customers with active On-Going Licensing and Support subscription take their free upgrade to the latest version.
If you do not have an active On-Going Licensing and Support subscription PEERNET cannot authorize your request. Please go to your PEERNET online account and select Purchase Upgrade to receive a new software download and serial number for the latest version.
How do I change my settings (resolution, color, Save As prompting, etc.)
If you have Image Printer 11.0 installed on your computer and need to change your settings such as resolution, color, Save As prompting, etc., follow the instructions below to launch the Printing Preferences. Please note that this is not the latest version of the software. We recommend upgrading to the latest version of the software – PDF Image Printer 12.
Note: PDF Image Printer 11.0 can only create non-searchable PDF Image, while PDF Image Printer 12 includes the ability to create searchable Adobe PDF files.
Step by Step instructions
- Open Control Panel.
- Select Devices and Printers (or Printers & Faxes on older operating systems).
- Right-click on PDF Image Printer 11.0, then click the Printer Properties item from the context menu.
- On the Advanced tab, click the Printing Defaults button in the lower left corner.
- In the Printing Preferences dialog:
- Change the resolution by selecting Layout – Advanced and clicking the down arrow beside Print Quality to select the resolution you want.
- Change the color by selecting Paper/Quality and selecting Color.
- For black and white, go to the Save tab and set color reduction to reduce to black and white.
- For color, go to the Save tab and set color reduction to reduce to optimal palette.
- Change the Save As prompting by selecting Save and checking the Prompt Only When Needed and Overwrite Always options.
- Click OK.
- Click OK.
- Now your created files will be created with the settings you configured.
Why is the printer not functioning correctly on Citrix 10.x and greater?
Citrix 10.x introduced a new print processing path. In order for the Image Printers to work you need to turn on the old printing path used by the previous releases of Citrix.
For the steps involved in making the change to Citrix refer to the article – https://support.citrix.com/article/CTX115553 .
INTERESTING LINKS
Below are some interesting links for you! Enjoy your stay :)
OUR PRODUCTS
LATEST NEWS
- ARM64 Support For PEERNET ProductsJuly 23, 2024 - 11:24 am
- PDF, Text and Cadd Converters, OCR Support, and a Dashboard for DCSJune 13, 2024 - 2:00 pm
- Batch OCR PDF – Make PDF SearchableJune 13, 2024 - 1:30 pm
- Batch Convert Text to PDF with Page Size FormattingJune 13, 2024 - 1:00 pm
BUSINESS INFORMATION
Toll Free: 1-800-883-7980 North America
Tel: 1-613-224-6894Our office hours are Monday to Friday, from 0900 hrs to 1700 hrs, Eastern Standard Time.
Email Address: [email protected]
