Adjust Page Orientation / Rotate Pages
There are two methods available that you can use to adjust page orientation or rotate pages with TIFF Image Printer, Raster Image Printer or PDF Image Printer. You can either carry out a basic page rotation using the Page Editing tab, or you can copy page contents to a new page size on the Page Resizing tab.
Both methods of rotating pages are controlled through the profile.
Page Editing
The steps below demonstrate how to take a multipaged document with a mixture of portrait and landscape pages, and produce an output file with only portrait pages, using basic page rotation settings available on the Page Editing tab.
Step by Step Instructions
- Launch the Dashboard.

- Select “Edit & Create Profiles” to open Profile Manager.
- Select “Add a profile” to create a personal profile, or create a copy of one of our system profiles.
- Name the profile, add a description, and click Save.
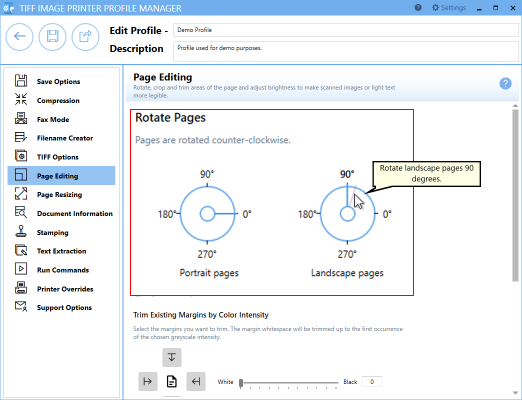
- On the Page Editing tab, under Rotate Pages, set the landscape dial to rotate landscape pages 90 degrees. This means that all landscape pages in our mixed orientation document will be rotated to portrait orientation during conversion.
- Click Save-Back, and close Profile Manager.
If you plan to use these settings regularly, you may wish to make this personal profile the default profile used by your image printer.
- Select “Manage Printers” to open Printer Management.
- Select the printer you wish to edit and use the Profile drop box to select your desired default profile.
- Select the Save icon to save changes.
- Select the Home icon to return to the Dashboard.
- Close the Dashboard. Now when you print your document to your image printer, any landscape pages will be rotated 90 degrees, changing their orientation to portrait in the output file.
Page Resizing
The steps below demonstrate how to take a multipaged document with a mixture of portrait and landscape pages, and produce an output file with only portrait pages, using the copy page contents to a new page size settings available on the Page resizing tab. Use this method if you do not want to rotate the contents of the page, but still want the output file to only have portrait pages.
Step by Step Instructions
- Launch the Dashboard.

- Select “Edit & Create Profiles” to open Profile Manager.
- Select “Add a profile” to create a personal profile, or create a copy of one of our system profiles.
- Name the profile, add a description, and click Save.
- On the Page Resizing tab, enable Copy and scale each page onto this new page size inside the set margins. This setting means that the printer will take a snapshot of each page and copy it onto the new page size.
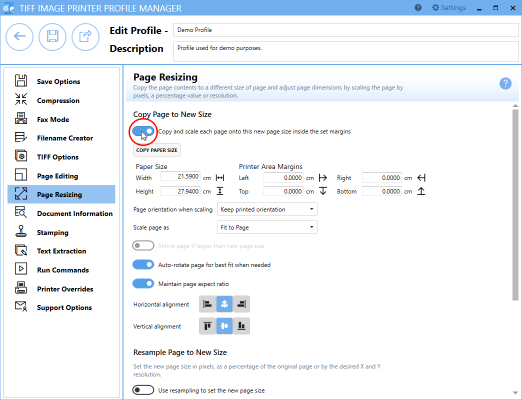
- You can amend the Paper Size if you wish, but by default page size is set to Letter. Click “Copy Paper Size” to copy a new paper size from our list of paper sizes.
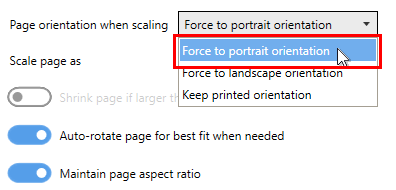
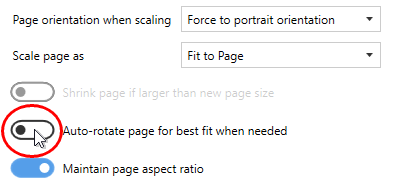
- Beside Page Orientation when scaling, drop the box and select Force to portrait orientation. This means that the contents of all landscape pages in our mixed orientation document, will be copied to portrait pages during conversion.
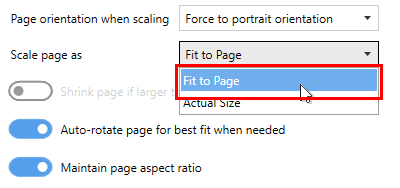
- Ensure page scaling is set to Fit to Page.
- Disable Auto-rotate page for best fit when needed.
- Click Save-Back, and close Profile Manager.
If you plan to use these settings regularly, you may wish to make this personal profile the default profile used by your image printer.
- Select “Manage Printers” to open Printer Management.
- Select the printer you wish to edit and use the Profile drop box to select your desired default profile.
- Select the Save icon to save changes.
- Select the Home icon to return to the Dashboard.
- Close the Dashboard. Now when you print your document to your image printer, any page contents on landscape pages will be copied to portrait pages in the output file.


