
Add a Watermark to Your Image or PDF
A watermark is a semi-transparent image, logo, text, or pattern that is placed on top of the content of your page when creating an image or PDF file from your document. When you add a watermark, the content underneath remains visible.
You could need, or want, to add a watermark for many reasons. Watermarks are used for copyright protection to make it harder for others to use your material without permission. Another use is branding identity where a watermark creates a visual association between your content and your brand.
TIFF Image Printer, PDF Image Printer, and Raster Image Printer all allow you to add a text or image watermark to your created file.
Copyright or Watermark Created Images
TIFF files, being high-quality image files, are sometimes used by photographers, artists, and content creators to showcase their work. Adding a text stamp in the form of a copyright notice or watermark helps protect the image from unauthorized use and gives credit to the original creator.
File Status
To ensure efficient project management or workflow, it is helpful to have a text stamp that indicates the status of a file. This can include labels such as “Draft,” “Approved,” or “Urgent,” which can help keep track of the progress of the file.
File Identification
Adding a text stamp helps identify the file, especially if the original filename is generic or unclear. The stamp can include relevant information like the title, date, version, or any other descriptive label.
Adding a Logo or Company Name
Including a logo image is a simple and effective way to indicate ownership of files and prevent unauthorized usage. Logos can also help promote your brand and increase brand visibility.
How to Add a Watermark
All three of PEERNET’s image printers use printer profiles that control what type of file to create and its name and where to save it. The printer profile also contains options to add watermarks, either text or image, to the created file.
We are using TIFF Image Printer here, the steps are the same for Raster Image Printer and PDF Image Printer.
In order to set up the watermark options in a profile, the initial step is to create a new profile. Or, if you already have an existing personal profile, you can edit it to make your changes as well.
To access all features for your printer, simply double-click the Dashboard desktop shortcut. On the Dashboard, you will find license information, tools, and resources, as well as the ability to create and edit profiles.

In the Dashboard. click the Edit & Create Profiles tile to open the Profile Manager tool.
Creating and Editing Profiles
The Profile Manager tool is where you create and edit the profiles used by the printer. Each printer includes profiles created by PEERNET to start you off. You can create your own personal profiles from scratch using the Add new profile button. You can also start with a copy of an existing profile using the copy icon on the profile tile. By using profiles, you have easy access to creating multiple different types of files.
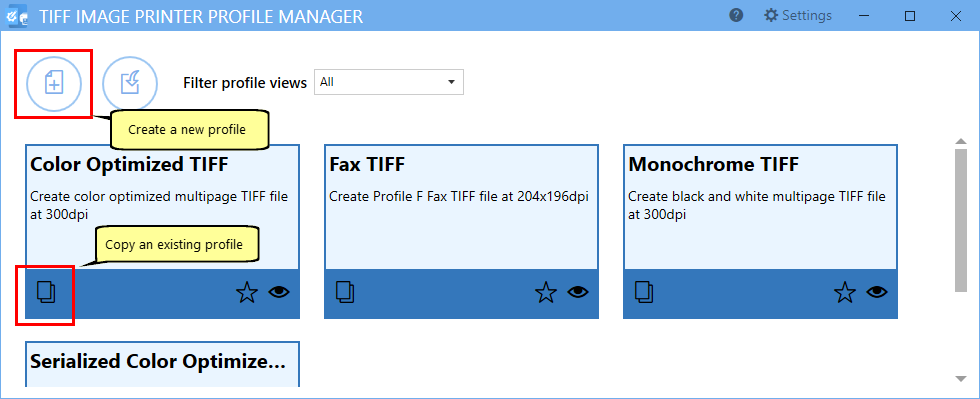
New profiles automatically open in edit mode. It’s a good idea to give them a name you will remember and add a short description. Do that first at the top of the editor before making any other changes to the profile.
A Watermark is a Stamp
With our image printers, you create a watermark is using our Stamping features. Stamps include text, images, and customized stamps for page numbering and date and time information. You have the ability to align and rotate the stamps on the page. Additionally, you can select specific page sets on which to include the stamps.
To start, select Stamping on the left-hand side to see the options on the right.
Adding a Text Watermark
Here, we will add a text watermark to every page by choosing to add a Text stamp. Here we are just adding a text watermark, but you can add as many stamps as you want and layer them.
Once added, the text stamp opens for editing. The desired text and format are set on the Text tab. In the edit field next to Display this text, type in your desired text. We’re going to change ours to “Draft Copy”.
Text stamps can be formatted and colored as needed. For our stamp, we have chosen the font Arial, black, and a font size of 22. We also chose to draw the outline of the text instead of solid text.

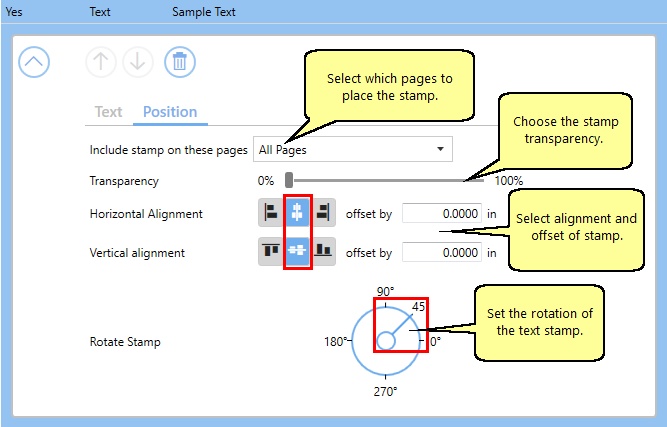
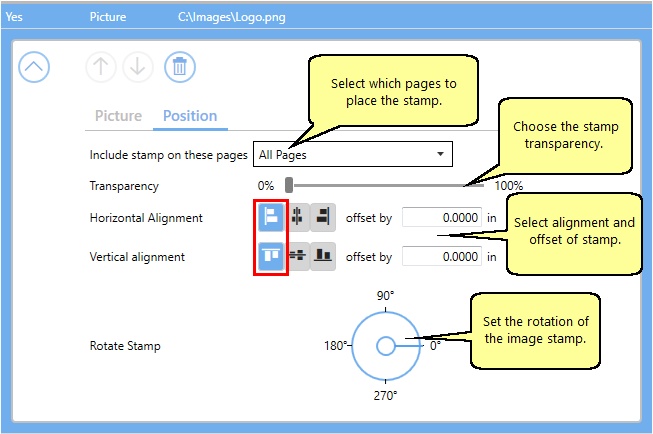
The next step is to decide where to place the watermark on the page by moving to the Position tab. Here you can choose which pages we will apply the stamp to and any transparency you want to apply to the stamp. Other positional options are the horizontal and vertical alignment and the rotation of the stamp.
Our text will be rotated at a 45° angle from the lower left to the top right and aligned in the center of all the pages.
Adding an Image Watermark
If you want to add your company logo or a signature as a watermark, these are often images such as PNG or JPG files. Use the Image stamp to add this type of watermark to your page.
You can have this stamp as the only one on the page or add it to the list of other stamps already present. Stamps will be added to the page in the order they appear on the list.
Provide the path to the image you want to use. Next, set the width and height you want the logo to be on the page. We are using a PNG file and the default image size of 1 inch. You will likely need to change the image size to match your logo.
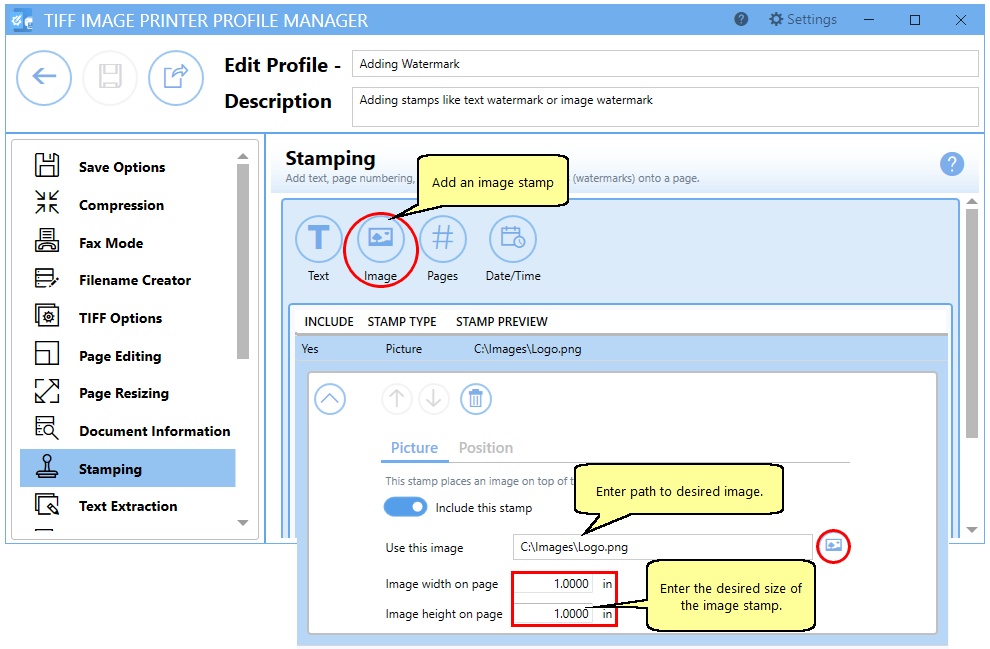
Just like a text watermark, you can also use the Position options to choose which pages to apply the stamp to and the transparency of the stamp. Again, as with a text stamp, the horizontal and vertical alignment and the rotation of the stamp can be set.
For our example, we are placing the image in the top left corner of every page.
Saving and Using the Profile
Save your profile using the Save button in the upper left when your changes are complete. Now when you print documents to the printer using this profile, you will see your watermark(s) appear on your pages.
When adding watermarks, consider the intended context and purpose. Always use a watermark that is legible but not intrusive so as to not interfere with readability and the user’s viewing experience. Although watermarks provide a degree of protection, they are not foolproof. Resourceful individuals may still find ways to remove or bypass them.
If you plan to use these settings regularly, you may wish to make this personal profile the default profile so that it is always used when printing.
