
Add Title, Producer, and Author Information
PDF documents and TIFF images can include descriptive information in the output file. Search engines will use this information to describe the document when presenting search results.
Quick Links
What Document Information Can I Add?
A PDF document can contain fields for the following information: Title, Author, Subject, Keywords, Application, and Software Producer.
A TIFF image stores less. It only includes the Title, Author, and Software Producer information.
The table in the Document Information tab has a row for each document property you can fill in. Select the row to expand the details and enter your information for each property into the table. This information is not auto-populated from document content.
All files created with this profile will have the same information.
- Title – This is the document’s Title in a PDF file and the Title and Subject properties of a TIFF image.
- Author – The document’s author; this can be a person or sometimes a company.
- Subject – Only for PDF files; this is the subject of the PDF file.
- Keywords – Only for PDF files; these are keywords you want to use for search terms. The keywords should reflect the content in the PDF file.
- Application – Only for PDF files; this is the application name of the product that created the files. Leave this empty to use the Image Printer name (Raster Image Printer 12 or PDF Image Printer 12) as the application name.
- Software Producer – This is a PDF document’s PDF Producer information and a TIFF image’s Program Name. Like the Application field, this field is filled in with the name of the Image Printer (TIFF Image Printer 12, Raster Image Printer 12, or PDF Image Printer 12) when left blank.
How Do I See the Document Information in the File?
Most PDF viewers can view this information through the document properties. For Adobe Reader and Foxit PDF Reader, you can view the document properties by going to the File menu and choosing Properties.
For a TIFF image, any embedded document information can be seen in Windows Explorer by right-clicking the TIFF image, selecting Properties from the context menu, then the Details tab.
Creating a New Profile
Launch the TIFF Image Printer Dashboard from the desktop shortcut.

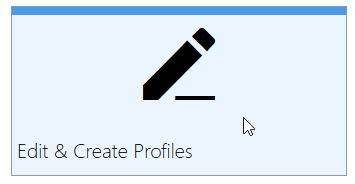
The Dashboard is your access to creating, copying, and editing profiles. It also gives quick access to product licensing, printer management, and help resources.
Select the Edit & Create Profiles tile to open the Profile Manager to create a new profile.
The Profile Manager lists all of your printer profiles. Click the Add a profile button to create a new profile, or start with a copy of an existing one. Name the profile, add a description, and click Save.

Add Document Information to Your Profile
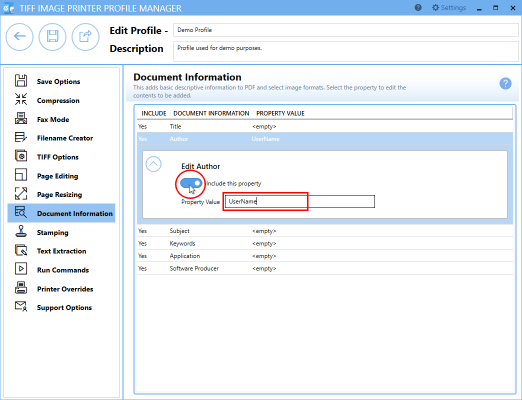
To edit the document information for a conversion profile, go to the Document Information tab and select the row for the document information you want to add.
Selecting the row will expand the view for that information. First, check the Include this property toggle is on. When off, we do not include the information in the output file. Then, enter your desired text in the Property Value field.
Repeat this for all fields you want to include in your PDF or TIFF images.

Saving and Using Your New Profile
Save your new profile using the Save button in the upper left corner.
You can make this personal profile the default profile used by your image printer for conversion by changing the default profile for the printer in the Printer Management utility. See Changing the Default Printer Profile to learn more about configuring profiles for your printer and other printer management features.
