
Ways to Reduce PDF File Size
Reduce your PDF file size for effortless sharing, downloading, emailing, and mobile viewing. Smaller PDF files will download faster and more readily meet limits for email attachments and mobile device capabilities.
If you are creating non-searchable PDF files where each page is an image instead, jump over to Reduce Non-Searchable PDF File Size for information on reducing raster PDF file size.
Most PDF files are vector PDF files and consist of a mix of text, lines, shapes, and images. When reducing the size of a PDF file images in the file and the fonts embedded to display the text both factor into the size of the file.
To reduce PDF file size we can adjust settings for image compression, downsampling, and font embedding.
Reduce PDF File Size Using Compression
When trying to reduce PDF file size, the first step is to see if the file contains images. High-resolution and large images can increase the file size considerably. Customizing the compression settings for the types of images in your document can have a huge effect.
For color images, use lossless compression methods such as LZW (Lempel-Ziv-Welch) and ZIP (Deflate). A lossless compression algorithm will compress the image with no loss of quality. LZW works best with images with large areas of solid color and repeating patterns. ZIP works well with gradients and varying colors.
JPEG is another popular compression method for color images. A lossy compression algorithm, JPEG creates smaller images by throwing away unneeded color in the image. This creates a smaller image with a trade-off in image quality and works best with photographs.
Black and white, or monochrome, images in a PDF file will use CCITT Group 4, CCITT Group 3, or Modified Huffman compression. These are all lossless compression algorithms, with CCITT Group 4 generally giving a higher compression rate.
Downsample Images to Reduce PDF File Size
Image downsampling reduces the number of pixels in the image, effectively reducing the image size and also reducing the PDF file size. Images are essentially a grid of pixels, or squares, that create the picture. Downsampling takes every few squares in the image and replaces it with a single larger square by combining the colors. This reduces the amount of information needed to store the image but also reduces the image clarity.
Font Embedding and How It Can Reduce PDF Size
Lastly, the fonts used in your document affect the PDF file size. Font embedding includes the font data for the text is the PDF so that it displays correctly on any device, even when the font is not installed on that system.
When using unique and unconventional fonts, embedding them becomes necessary. However, this can result in larger file sizes due to the size of the font file. A common technique to minimize this is to embed a subset of the font data that only includes the characters used in the text.
If your document uses common fonts that are available on most devices, you can save space by not embedding font information.
Adjusting Settings for PDF File Size in PDF and Raster Image Printer
In our image printers, a printer profile controls the type of file to create, the name of the file, and where to save it. A profile also includes advanced options for compression, downsampling, and font embedding. You can create multiple printer profiles for quick access to creating different flavors of PDF files.
To change compression, downsampling, and font embedding settings, you need to edit a personal profile you already have or create a brand new one.
Open the Dashboard using the desktop shortcut for the printer you have installed. We are using PDF Image Printer here, the steps are the same for Raster Image Printer.
A central hub, the Dashboard provides access to everything for your printer. From here you can see your license information, access help resources, and create and edit printers and printer profiles. Select the Edit & Create Profiles tile to open the Profile Manager editor.
Creating a Profile to Reduce PDF File Size
The Profile Manager is where you create new and edit existing profiles. Several system profiles are provided as part of the printer installation. Create a new, personal profile with the Add new profile button, or create a copy of an existing profile with the copy icon on the profile tile.
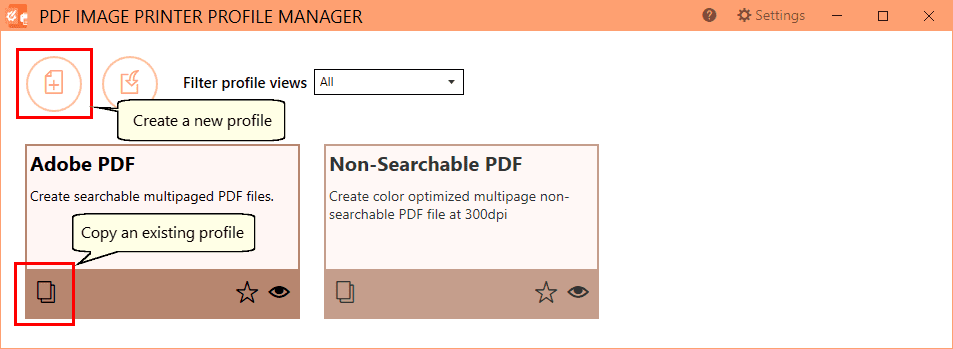
Create a new, personal profile with the Add new profile button, or create a copy of an existing profile with the copy icon on the profile tile. This will open the new profile in editing mode.
Once in edit mode, give your profile a memorable name and description in the edit fields at the top of the editor.
The left-hand side of the editor sorts the profile options into categories. Select a category to view its options on the right-hand side.
Changing PDF Compression
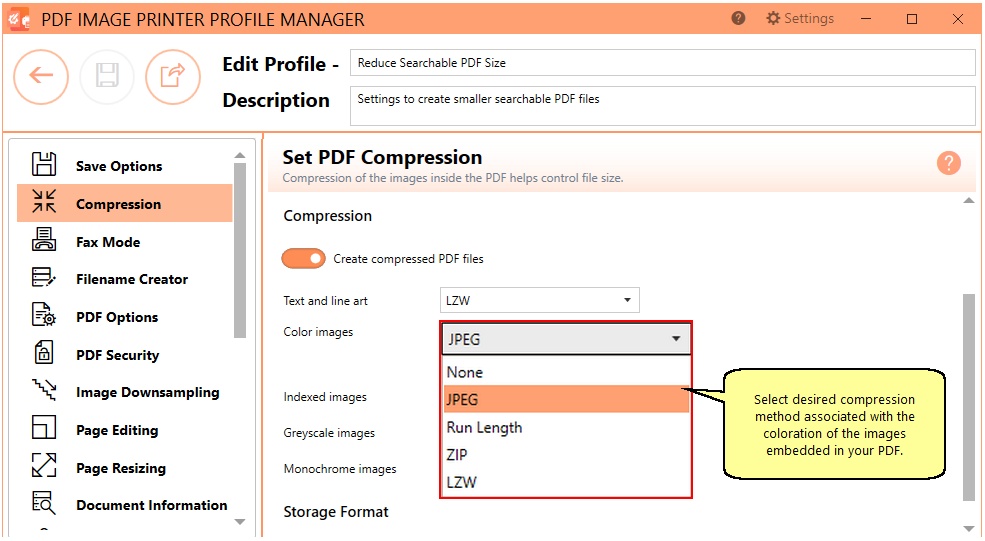
To change compression, select the Compression category on the left. Different options for Text and line art and Color, Indexed, Greyscale, and Monochrome images are available on the right, You can also disable PDF compression but this is normally not recommended.
The original compression settings for images in PDF files favor image quality over size but still provide a good balance between file size and image quality. You can, however, change the compression methods to reflect the type of images in your PDF file to see if you can reduce the PDF file size further.
ZIP works well with gradients of color and LZW with blocks of solid color. JPEG works best for photograph-style images but is often chosen for its high compression rate. For images that contain text, such as charts and graphs, higher levels of JPEG compression can cause a halo effect that will reduce the overall image quality.
Using Downsampling to Reduce Image Resolution
Downsampling reduces the number of pixels in an image, effectively lowering the image resolution, or dots per inch (DPI). Fewer pixels mean a smaller image and file size. This is a lossy process and it discards some of the image’s details to create a smaller file.
You have the option to set various downsampling levels for color, indexed, greyscale, and monochrome images. Downsampling occurs only when the DPI of the image is higher than the requested DPI.

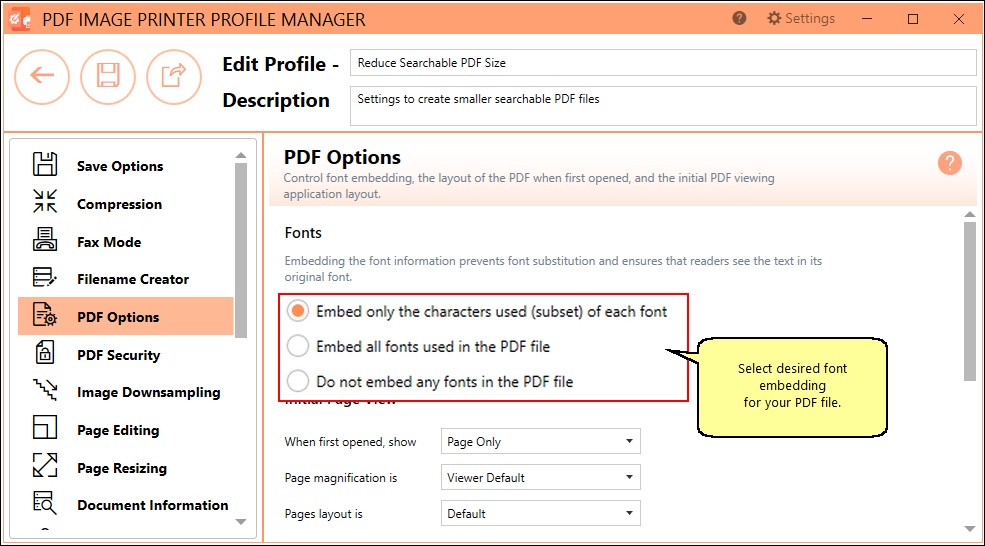
To Embed, or Not to Embed?
To ensure a PDF displays consistently you need to embed the font data for all the fonts used in the PDF. When font information is missing a PDF viewer will attempt to substitute with the closest font available. As a result, this can cause unpredictable results when viewing the file.
As some fonts can be very large, this can contribute to file size. The default setting of Embed only the characters used (subset) of each font will include only the font information for the characters used in the document. This balances file size with the need to be able to always display the file correctly.
For smaller PDF file sizes, experiment with not embedding font information if using standard fonts like Arial, Times New Roman, and Verdana.
Saving and Using the Profile
When you are done editing the profile, the last step is to save it using the Save button in the upper left corner. To see how much your changes reduce the PDF file size, print your file using this new profile. If you keep the profile open in the editor, you can easily make adjustments and save them while testing to find the best options for your documents.
If you plan to use these settings regularly, you may wish to make this personal profile the default profile used by your printer.
It is important to realize that sometimes the images being placed in the PDF cannot be made any smaller. Adjusting compression options can result in larger file sizes. Downsampling can create a smaller file but has the side effect of a reduction in image quality.
Balance is key, and the size of your PDF file largely depends on the input documents you are converting. Reach out to our support team here at PEERNET and they will be happy to assist you.

