
One Click PDF Conversion
Create PDF files with a single click!
Convert to PDF gives you easy PDF conversion from any file format that you can print. With many extra features not found in other PDF creation software products, Convert To PDF is an affordable solution for converting to Adobe PDF from any Windows application that supports printing.
Why Create PDF with Convert To PDF?
- Convert Word, Excel, Photoshop and other files to PDF documents just by printing
- Add predefined or custom text watermark
- Run program or command after PDF conversion completed
One Click PDF Conversion
The first step is to configure your PDF creation settings to create the type of PDF file you want and to save it where you want the file to be saved. This is done through the Options tab in the Convert to PDF application.
To access the Options tab, you need to first print to Convert to PDF so that the printer will launch the Convert to PDF application. Pick any document or even open your web browser and print a web page – you won’t be creating a PDF from this file so the actual file used does not matter. The PDF creation options set here are saved in the registry when the application is closed and will be used the next time the application is opened.
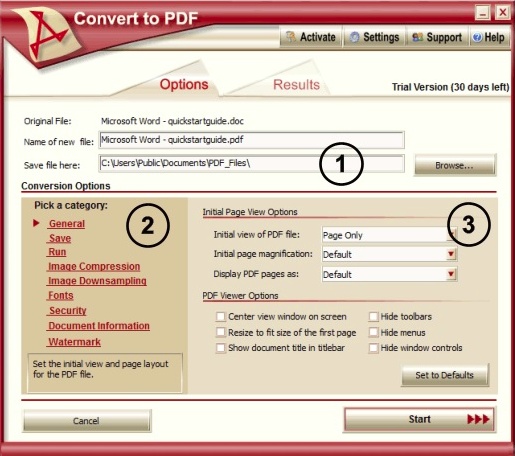
- Choose the location of your PDF files (Section 1) . The Browse… button can be used to find and select the folder, or location, of your PDF file.
- Use the category list (Section 2) on the left hand side to select the settings you want to configure.
- On the right hand side of each category, find and change any options (Section 3) that you need to modify.
- If you want the PDF to automatically open in your PDF viewer when it is created, make sure you enable the View my PDF button in the Save category.
- To minimize prompting set your File Naming Options to Overwrite or Create a Copy in the Save category.
- Leave the Convert to PDF application open.
The second step is to configure Convert to PDF to automatically start the PDF creation process and to hide the user interface. This is done through the printing preferences for the Convert to PDF 4.0 printer component. The Convert to Printer Settings… can be accessed from the Settings caption button in the upper right corner of the Convert to PDF application.
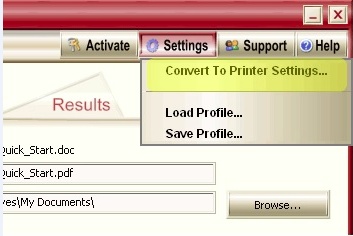
- Enable the “Automatically start converting” checkbox in the User Interface section.

- Turn off the display of the Options tab by selecting “Hide application and auto-close when done”.

- Select OK to apply the changes to the Convert to PDF printer and close the Printing Preferences dialog.
- Select Cancel on the Convert to PDF application; it is not necessary to create a PDF at this point. The PDF creation settings are saved to the registry when the application closed. The next time you print to the Convert to PDF 4.0 printer, those settings will be used to create the PDF document.


You can test the steps outlined above. Open any document and print it to the Convert to PDF 4.0 printer. The PDF document will be converted in the location you chose, with the settings you want, all without the user interface ever displaying.
