
Create Serialized TIFF Images
When you create serialized TIFF images you are creating a single TIFF image file for each page in the document. This differs from multi-paged TIFF images where all of the pages for each document are in one multi-page TIFF file.
Create Serialized TIFF Using the ‘Serialized Color Optimized TIFF’ Profile
Both TIFF Image Printer and Raster Image Printer use printer profiles to determine the output image created when you print to the printer. Each printer comes with several pre-installed profiles, or collection of settings, to create common file formats supported by that printer. Both printers include the Serialized Color Optimized TIFF profile that creates serialized, or single page, TIFF images.
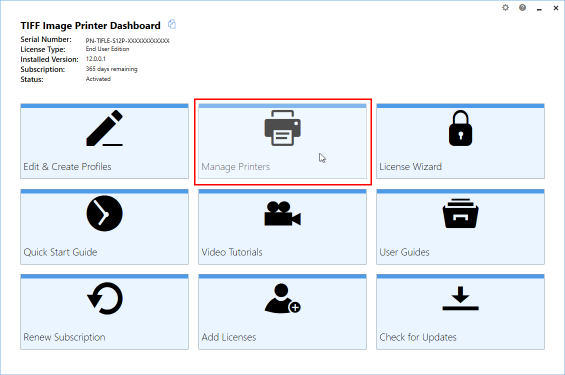
After installing either printer you will see a Dashboard icon on the desktop. The dashboard provides access to creating your own printer profiles and configuring which profile the printer uses. Convenient access to your license information and help resources are also available from the Dashboard.
Setting the Printer Profile
After installing either printer you will see a Dashboard icon on the desktop. The dashboard provides access to creating your own printer profiles and configuring which profile the printer uses.
To start, open the Dashboard by double-clicking on the desktop shortcut for your printer.

The Dashboard provides convenient access to your license information with tiles that link to help resources and other tools. From here select “Manage Printers” to open the Printer Management screen.
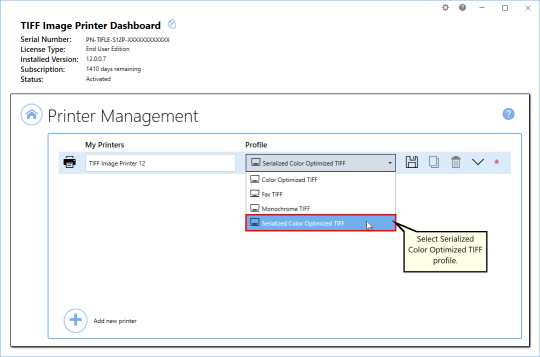
Print Management lists all copies of your TIFF or Raster Image Printers. You start with just one, either TIFF Image Printer 12 or Raster Image Printer 12. From here you can add, copy and delete printers.
We want to set the printer profile to create single page TIFF images. To do so, use the drop box beside the printer name to select the ‘Serialized Color Optimized TIFF’ profile. This profile creates single page TIFF images at 300 DPI with each page’s colors optimized. Optimizing the colors reduces the colors stored for each page to only what that page uses. This optimization can help keep your TIFF file size smaller.
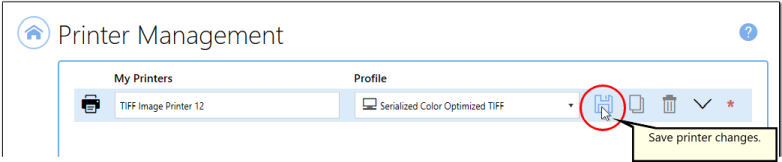
After selecting the profile, click the Save icon beside the profiles drop box to save the changes on the printer.
Now close both Printer Management and the Dashboard. The printer is set to create the type of TIFF image we want.
Print to Create Serialized TIFF Images
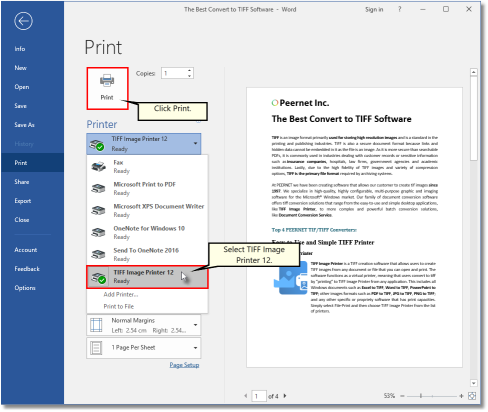
With the printer configured, we now need to print our original document that we want to create single page TIFF images from. For example, if this is a PDF document, you would open and print from Adobe Reader or another PDF viewer. In our example we are printing a Word document.
Go to File-Print to open the printing options. Choose TIFF Image Printer 12 (or Raster Image Printer 12) from the list of printers. Click the Print button to send the document to the printer.
Choosing the Name and Location of the Serialized TIFF Images
The Save File prompt appears after printing. From here, choose where to save your new serialized TIFF images. The default location is your My Documents folder.
Enter a name for your TIFF Image in the Filename field. A new file name is automatically shown based on the original document name; change this as you need to.
The Save as type drop box will already show that the printer is using the ‘Serialized Color Optimized TIFF’ profile, as previously set in Print Management above.
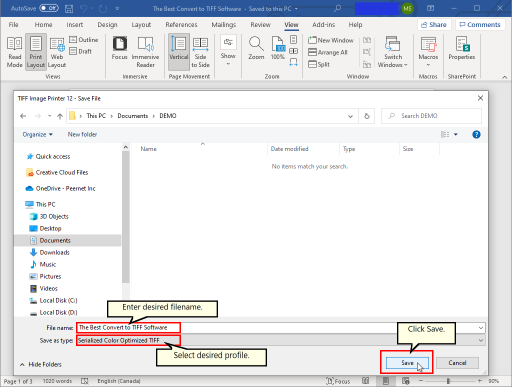
After you have chosen the name and location of your new serialized TIFF images, click Save to create them.

