
Adding Custom Paper Sizes for the Virtual Printers
Below are the necessary steps to add custom paper sizes that can be used by the PEERNET image printers, such as the TIFF Image Printer, PDF Image Printer, and Raster Image Printer.
Why Adjust Custom Paper Sizes?
When you need to create image files in the form of PDF, JPG, TIFF via the above Image Printers, you first need to configure the ‘paper settings’ for your printer so that the software ‘prints’ (converts) to your desired image size. This is especially needed if you are creating high resolution TIFF images for publication from an applications that uses a custom paper size or if you are printing architectural drawings that user large paper sizes.
IMPORTANT: Please close all applications before making these changes.
Windows 8 and Windows 2012
- Click the Windows logo key
 +I.
+I.
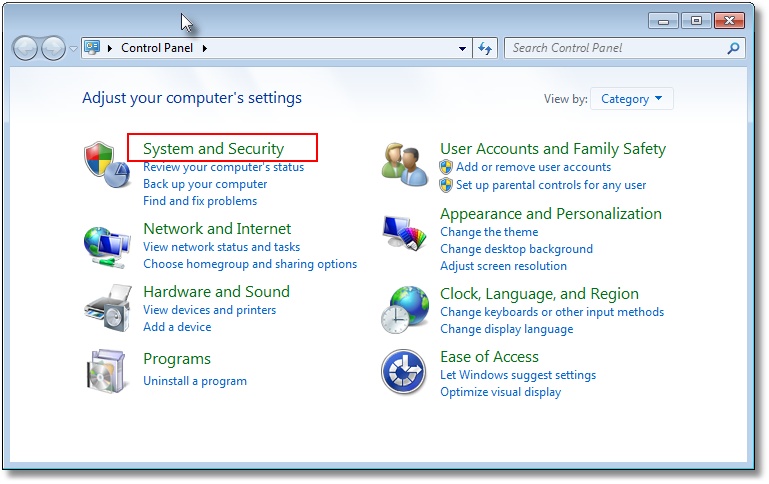
- Go to your Control Panel then to the System and Security options.
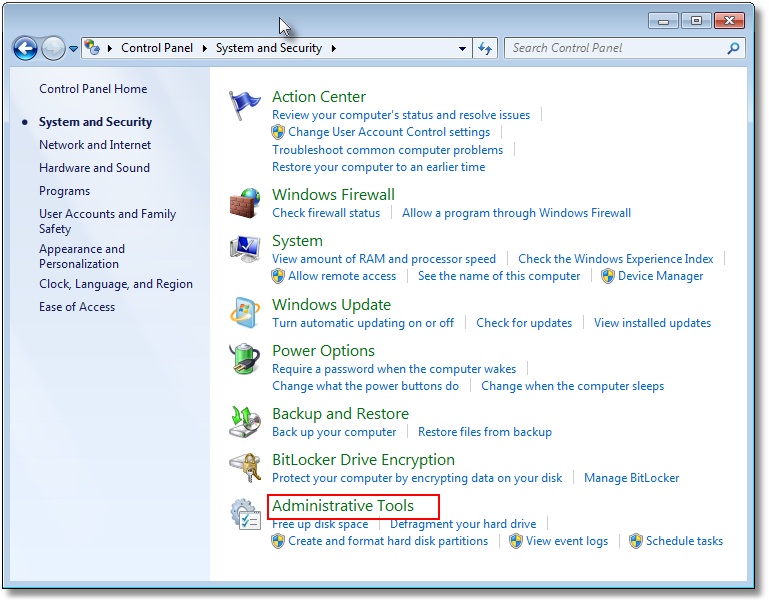
- Click Administrative Tools.
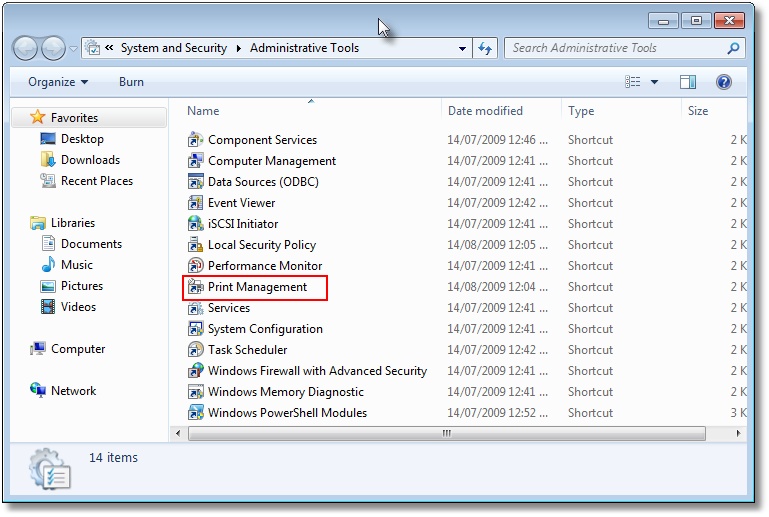
- Double click Print Management.
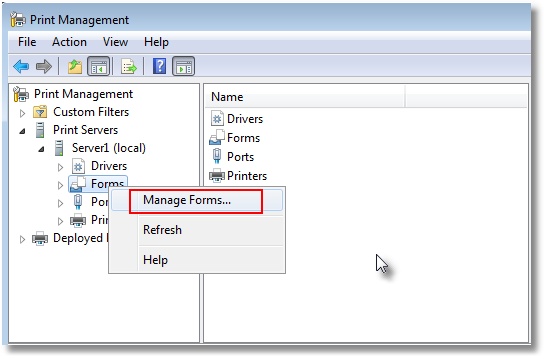
- Select Print Servers and then select the name of your computer (ie Server1).
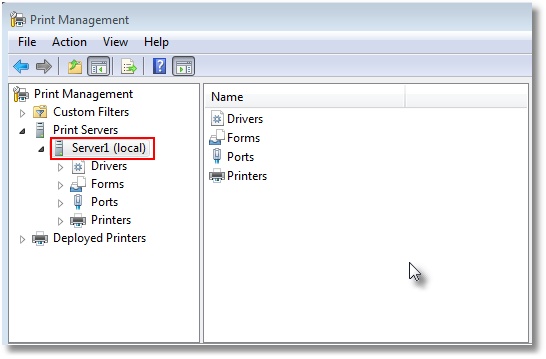
- Right click the Forms item listed under your computer and select Manage Forms.
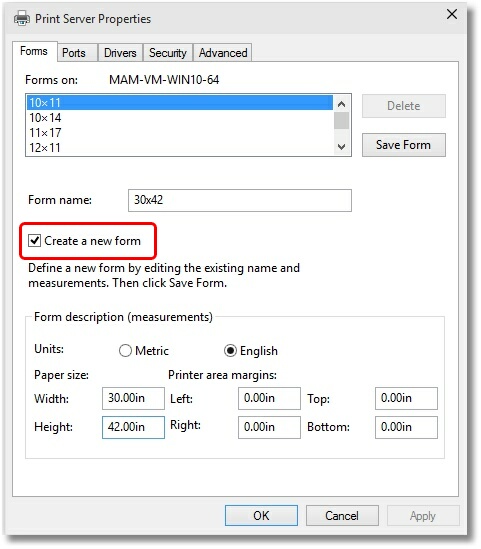
- Check “Create a new form“.

- Enter a descriptive name in the “Form name:” field (e.g. “30 x 42” or “36 x 48”).
- Set the Measurement units to “English” or “Metric“.
- Enter the desired Width and Height for your paper size. NOTE: Always make the Width less than the Height (e.g. Width 30, Height 42) as you can always choose Landscape orientation later.
- Click “Save Form“.
- Repeat steps 8-11 for each new paper size you want to create.
- Click Close when you are done. The new paper size is now ready to use.
On Windows 7 and Windows 2008 R2
- Go to Start – Control Panel then to the System and Security options.
- Click Administrative Tools.
- Double click Print Management.
- Select Print Servers and then select the name of your computer (ie Server1).
- Right click the Forms item listed under your computer name and select Manage Forms.
- Check “Create a new form“.
- Enter a descriptive name in the “Form Description for:” field (e.g. “30 x 42” or “36 x 48”).
- Set the Measurement units to “English” or “Metric“.
- Enter in the desired Width and Height for your paper size. NOTE: Always make the Width less than the Height (e.g. Width 30, Height 42) as you can always choose Landscape orientation later.
- Click “Save Form“.
- Repeat steps 6-10 for each new paper size you want to create.
- Click Close when you are done. The new paper size is now ready to use.
On Windows Vista and Windows 2008
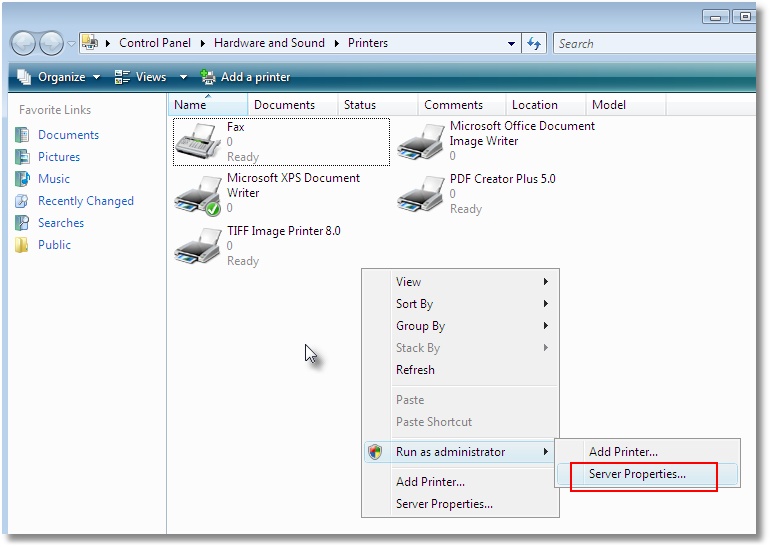
- Open the Printers folder from the Start – Control Panel – Hardware and Sound – Printers.

- Right click in the window and select Run as Administrator – Server Properties.
- On the Print Server Properties dialog, click the Forms tab, then check “Create a new form“.
- Enter a descriptive name in the “Form name:” field (e.g. “30 x 42” or “36 x 48”).
- Set the Measurement units to “English” or “Metric“.
- Enter the desired Width and Height for your paper size. NOTE: Always make the Width less than the Height (e.g. Width 30, Height 42) as you can always choose Landscape orientation later.
- Click “Save Form“.
- Repeat steps 3-7 for each new paper size you want to create.
- Click Close when you are done. The new paper size is now ready to use.

On Windows XP, Windows 2003 and Windows 2000
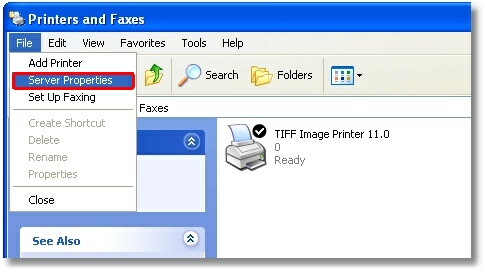
- Open the Printers folder from Start – Settings – Printers and Faxes.
- In the Printers folder window menu, select File – Server Properties.

- In the Server Properties dialog, on the Forms tab, check “Create a New Form.“
- Enter a descriptive name in the “Form name:” field (e.g. “30 x 42” or “36 x 48”).
- Set the Measurement units to “English” or “Metric“.
- Enter the desired Width and Height for your paper size. NOTE: Always make the Width less than the Height (e.g. Width 30, Height 42) as you can always choose Landscape orientation later.
- Click “Save Form“.
- Repeat steps 3-7 for each new paper size you want to create.
- Click Close when you are done. The new paper size is now ready to use.
Remember, the PEERNET software products are great solutions for all your document conversion needs. For PDF to TIFF converter software, virtual printers for converting to various image formats, or even enterprise-level batch document conversion software, the PEERNET product suite has the solution for you.

