TIFF file of Different Lengths
Question: How do I create a TIFF file that is a continuous page that could be of different lengths?
Answer: Set up custom paper size and trimming in TIFF Image Printer 10.0. This is a technique that is used by many of our clients that need to print well logs that can be of variable length.
How to configure:
- Open Devices and Printers (or Printers & Faxes on older operating systems).
- Right-click on the TIFF Image Printer, then click the Printer Properties item from the context menu.
- On the Advanced tab, click the Printing Defaults button in the lower left corner.
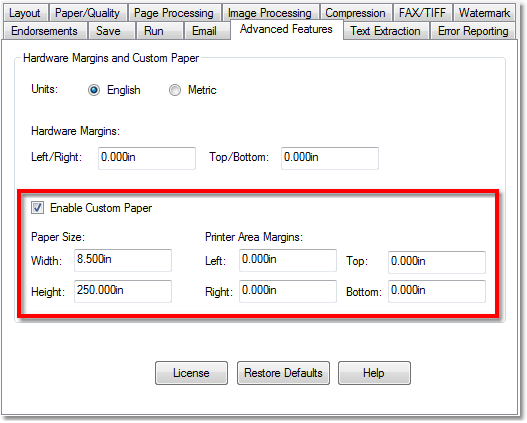
- In the Printing Defaults dialog, click on the Advanced Features tab, then click “Enable Custom Paper“.
- Enter the Width and the maximum Height of the page you may need. For example, if the longest page to be printed is 250 inches you enter “250in” for the Height.
- Click the Page Processing tab.
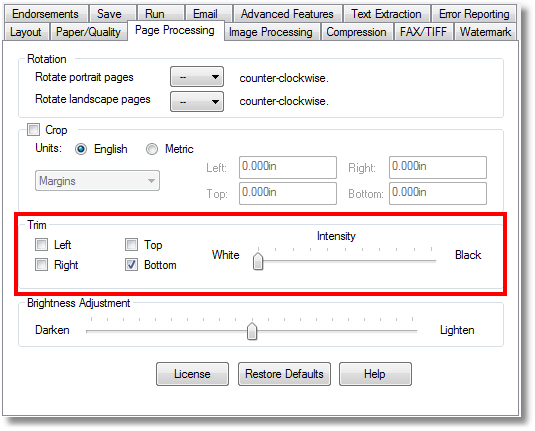
- In the Trim section, check Bottom for the trimming options. This will trim all the white space off the end of the page.
- Click OK.
- Back on the Printer Properties dialog, click the General tab.
- Click the Printing Preferences button in the lower left corner.
- Click on the Advanced Features tab, then click “Enable Custom Paper“.
- Enter the Width and the maximum Height of the page you may need. For example, if the longest page to be printed is 250 inches you enter “250in” for the Height.
- Click the Page Processing tab.
- In the Trim section, check Bottom for the trimming options. This will trim all the white space off the end of the page.
- Click OK.
Now the TIFF file will be a continuous page that is only as long as the amount of data you are printing. For example, if the maximum paper height is set to 250 inches and the printed text only requires 100 inches, the white space on the end, or bottom, of the page will be trimmed off, leaving a TIFF file that is 100 inches long.


