
Print Automation Using Script File
The script file is a text-based file that can be used to control the printer settings in an automated process while using TIFF Image Printer, Raster Image Printer and PDF Image Printer. This INI-style file is used to override and/or dynamically change the settings that are in the selected profile for the printer. A sample script file containing all the settings that can be changed is included in the Image Printer install. When using the script file, it only needs to contain the settings that you are changing in between print jobs.
Some typical scenarios for using a script file are :
- Use the Script File to Set the Conversion Profile
- Change the Output Folder and Filename on Each Print
How does it work?
When a file has been printed, the Image Printer first reads its initial settings from the profile selected in the printer’s Printing Preferences dialog. It then looks for a registry key in the Windows registry to see if a path to a script file, or a script file name has been set there. If no registry key is found, or if the path is empty or incorrect, then the folder specified by the current TEMP environment variable is used to search for a script file.
If a script file can be located and opened, any settings in this file override the initial settings read from the profile selected in the Printing Preferences dialog.
Setting the Script File in the Registry
Information about each printer is stored in the Windows registry, by printer name, in the following location:
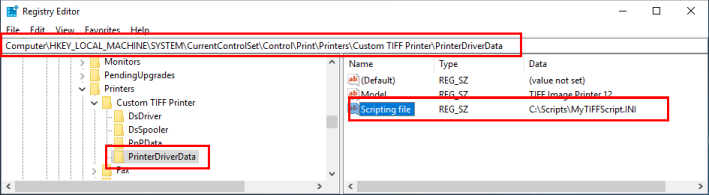
HKEY_LOCAL_MACHINE\SYSTEM\CurrentControlSet\Control\Print\Printers\Under this key, your Image Printer, as well as any custom-named copies you have made, will each have their own subkey listed here by printer name. Under each printer subkey is another subkey called PrinterDriverData and it is under this key that the Image printer will look for a registry key named Scripting file and use its value to locate the script file.
For the TIFF Image Printer the default script file name is pntif12s.ini, for the Raster Image Printer it is pnras12s.ini and for the PDF Image Printer it is pnpdf12s.ini, but when using the Scripting file key in the registry you can supply a full path to a script file with the script file name of your choosing. Simply copy the sample script file from the installation folder, make any changes to the settings contained in the script file and rename it in the desired location.
Using the Scripting file key is common when automating the printing process. As each printer has their own section, each printer can also have its own separate script file. This can be important when you have multiple processes automating printing at the same time and don’t want them to interfere with each other. The recommended approach is to create a custom named printer for your process. In this example below we have created a printer named Custom TIFF Printer which we want to have use the script file named MyTIFFScript.INI and is located at C:\Scripts\.
To add this value, use regedit.exe to open the Registry Editor and add do the following:
- Create a new string value, REG_SZ named Scripting file. This name is case sensitive and must be spelled correctly to be recognized.
- Set the date in the new string value to C:\Scripts\MyTIFFScriptFile.INI.
The results of this are shown below. This can also be done programmatically in your own programs, or as part of your own program installation.
The registry key can also be set to just the name of the script file, without the folder. In this case, the TEMP folder is searched for a script file of that name.
Using the TEMP folder
If a Scripting file key is not found, is empty or just contains the script file name, the folder set as the current TEMP environment variable for the printing application is used to locate the script file. If a name has not been supplied in the registry key, the default script file name will be used (pntif12s.ini, pnras12s.ini or pnpdf12s.ini).
NOTE: For 64-bit application, the TEMP folder for the printing application is used. When printing from a 32-bit application, the TEMP folder for the splwow64 process is used. Normally these are the same value, but if the automating process is altering the TEMP environment variable than you need to be aware of which location is the actual TEMP folder used in the printing process.
There are two TEMP folder environment variables, – a user account level variable and a system level variable. The user TEMP folder is normally set to a location under the user’s local application data folder while the system TEMP folder is normally under the Windows system folders. These values are defined in Environment Variables from the System Properties dialog. Printing applications will use the user TEMP folder of the account they are running under. Windows services and scheduled tasks running under SYSTEM would use the system TEMP folder.
User TEMP
TEMP=%USERPROFILE%\AppData\Local\Temp
System Temp
TEMP=%SystemRoot%\TEMP
Setting Script File Settings
The script file is an INI -style text file. In an INI file, settings are organized into uniquely named sections, with each section containing uniquely named key-value pairs of information. To read and write these files use the Microsoft Win32 methods ReadPrivateProfileString and WritePrivateProfileString. These methods can be P/Invoked in .NET or you can also use one of many .NET libraries for reading and writing INI files. Other scripting and programming languages may also have their own techniques of reading and writing INI files.
Using the Script File to Set the Conversion Profile
The script file can be used to change, or set which conversion profile is used when printing. This allows you to switch between different conversion profiles at the time of printing, instead of having to create two printers with different settings. When specifying the conversion profile in the script file, the full path to the file is required and it needs to be accessible by your printing automation process.
[Devmode settings]
Printer Profile=C:\PEERNETFiles\MyCustomProfile.pntifprofile
With this key set in the script file, the Image Printer first reads the conversion settings from the selected profile in the printing preferences then looks for and finds the script file. The key Printer Profile in the [Devmode settings] section is set so that profile is located, read and the settings in that profile are applied. Lastly, any other settings in other sections of the script file are read and applied to create the final set of conversion options to create the output file.
Change the Output Folder and File Name on Each Print
The script file can be used to customize the output folder and file name on-the-fly before printing each document. In this scenario all settings that are not modified in between print jobs should be set in the selected profile on the printer, or set in the script file using a profile referenced by Printer Profile in the [Devmode settings]. The output folder and filename are set in the [Save] section in the Output directory and Output filename keys.
[Devmode settings]
Printer Profile=C:\PEERNETFiles\MyCustomProfile.pntifprofile

[Save]
Output directory=C:\PEERNET\OutputFiles
Output filename=CustomFilename
Changing the Script File When Printing
When printing from an automated process, any changes to the script file need to be synchronized in between printing documents. This is accomplished using the CommandsProcessed event to signal when the printer has read the settings in the script file for the currently printing document, and that it is now safe to change the values in the script file for the next document.
If the script file is only being used to set values that do not change from document to document, you do not need to wait on this event.
To signal an event, set the name of the event in the script file. This can be any name of your choosing, up to MAX_PATH characters, and is case sensitive. We recommend using the “Global\” prefix to explicitly create the event in the global namespace to allow processes on multiple client sessions to see the event
[EventNames]
CommandsProcessed=Global\PNTIFCommandsProcessed
DocumentSpooled=
DocumentCancelled=
In your automated process you will need to create this event, and then block on it after printing a document before making changes to the script file for the next document.
string commandsProcessedEventName = @"Global\PNTIFCommandsProcessed"
EventWaitHandle commandsProcessedEvent = new EventWaitHandle(false, EventResetMode.AutoReset, commandsProcessedEventName);

foreach	( var file in FileList)
{
    // Set filename in script file, use your favorite INI class here
    string fileGUID = Guid.NewGuid().ToString("N");
    scriptINI["Save"]["Output filename"].StringValue = fileGUID;

    // Print the file
    // TODO: Insert your code here to print the file

    // wait for script file signal, max 10 seconds
    bool bGotCommandsProcessed = false;
    int maxTimeout = 10000, currentTimeout = 0, timeoutInterval = 1000;
    while (!bGotCommandsProcessed && currentTimeout < maxTimeout)
    {
	bGotCommandsProcessed = commandsProcessedEvent.WaitOne(timeoutInterval);
	currentTimeout += timeoutInterval;
    }

    if (!bGotCommandsProcessed)
    {
    	// handle error
    }

    // ready to loop for next file
}
The other two events that can be used are DocumentSpooled and DocumentCanceled. DocumentSpooled is signaled by the printer when the document has been spooled, or sent, to the printer. This event does not mean that the conversion process is completed, only that the document was printed and the Image Printer has started the conversion process. DocumentCanceled is signaled if the document does not finish spooling or is cancelled.
Addition Information
For additional information, see the following links for each Image Printer:
