
Batch Photo Resizing with File Conversion Center
Emailing photos to family and friends or uploading them to social websites is something we all do to stay in touch and share those special moments caught on camera. Digital cameras that produce high quality photos at 10 MP (megapixels) and even higher are reasonably priced and getting more affordable over time. The downside to the high-quality images created by these cameras is the physical size of the actual photo. Depending on the settings of your camera some photos can be as large as 4 megabytes each, making them time-consuming to upload to websites and too large to email.
Using PEERNET’s File Conversion Center‘s batch image conversion you can quickly resize a single image or an entire folder of images to create smaller images suitable for emailing, uploading to the web or for use in other documents.
 |  |  |  |
Step-by-Step
Quick Image Resizing
Customized Image Resizing
Quick Image Resizing
File Conversion Center comes with a set of predefined conversion profiles for the most common conversion tasks, including creating resized JPG images from JPG and other images as well as Microsoft® Office documents and Adobe® PDF files.
The following steps will use the predefined conversion setting Browser(JPEG) to resize a single JPG image from a digital camera into a smaller image suitable for emailing or uploading to the internet. The new JPG image is created in the same location as the original, leaving the original untouched.
If you need to resize many images, or an entire folder of images see the instructions below for Customized Image Resizing.
- Locate the JPG image on your computer. Pictures are often stored in the Pictures folder on Windows® 7 and Windows Vista™and in the My Pictures folder on Windows® XP.

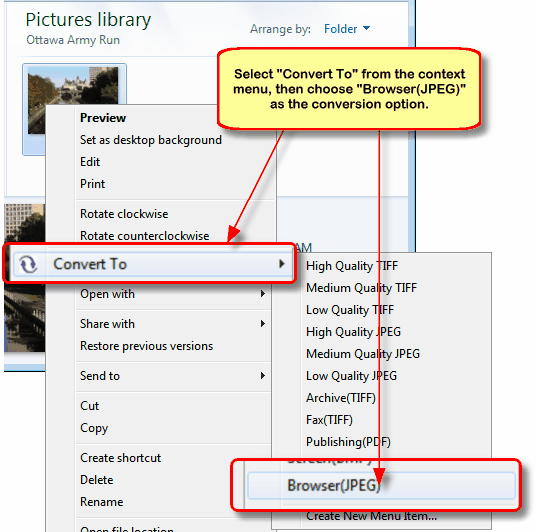
- Select the desired JPG image (only one image is pictured here, you may have more) with the mouse and right-click on the image to access the context menu.
- From the context menu, select the Convert To menu item.
- Another menu will appear displaying conversion options; select Browser(JPEG) from this menu.

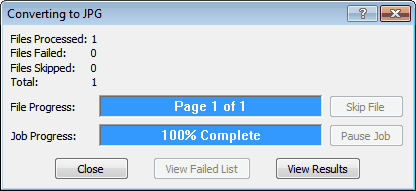
- A progress dialog box Converting to JPG will be displayed while the new JPG is being created. The new file is created in the same location as the original image. Click the Close button to dismiss the progress dialog.

- The new JPG image is created in the same location as the original file and at only 119KB, is also significantly smaller.


Customized Image Resizing
The steps above show you how to resize a single image but you can also right-click on a folder of images and use the same context menu command to resize an entire folder of images, including all subfolders, in a single step.
When you are resizing an entire folder of images, it is easier to store the new images in a separate folder to make it easier to find them. This is easily done by creating a custom conversion profile for File Conversion Center. Once created, the new conversion profile can be selected from any folder of images on your computer, or even when resizing JPG image files one at a time.
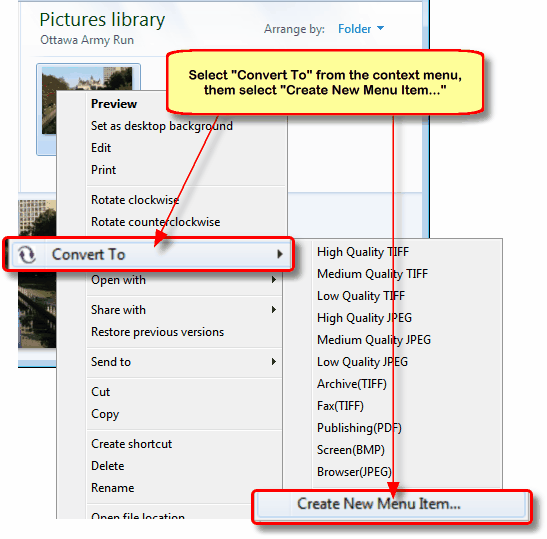
- The first step is to create the new profile. Select any image or folder with the mouse, then right-click on that image or folder to access the context menu. From the context menu, select the Convert To menu item.
- Another menu will appear displaying conversion options; select New Menu Item… from the menu.

- The Create a ‘Convert To’ Menu Item wizard will appear.
- Type in a Name and Comment for your profile. The comment is optional.

- Type in a Name and Comment for your profile. The comment is optional.
- Enable the Include subfolders when converting folders checkbox to also resize any images in any subfolders.
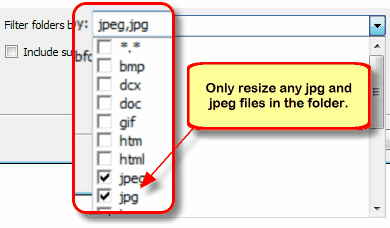
- By default File Conversion Center will resize all of the supported file types (*.*) it can. To only resize certain files, such as only the jpg or jpeg images in the folder, use the Filter folders by list select the file types. All other file types will be left alone. Click the Next button to move to the following screen.

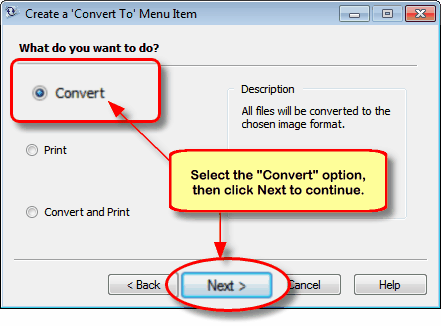
- Select the Convert option to set conversion options. Click the Next button to move to the following screen.

- Select the Custom Use option. This option allows you to customize all properties, including the Color and Resolution options. Some options, such as Archiving, or Faxing have predefined settings and limit what settings are shown to be modified. Click the Next button to move to the following screen.

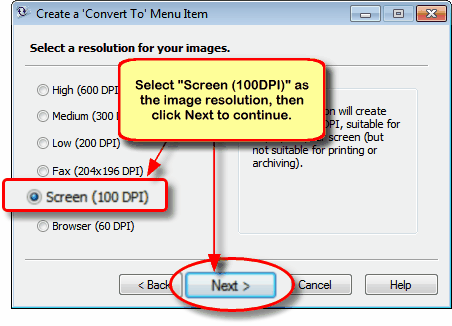
- Select a Resolution for your resized images. The higher the resolution, the larger the image size. For sharing images and viewing them on the internet a resolution of 100 DPI is sufficient to create a small sized file and still be viewable. Click the Next button to move to the following screen.

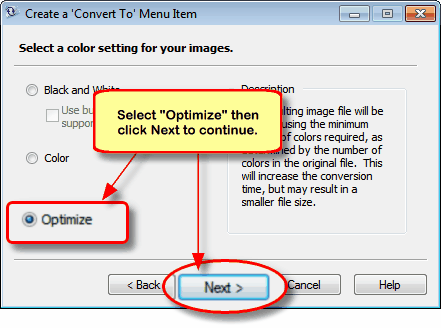
- Select Optimize to create the resized image with the minimum number of colors needed. Click the Next button to move to the following screen.
- Click One image file per page of the file processed. This causes the next screen to display only serialized output formats, of which JPG is one. Click the Next button to move to the following screen.

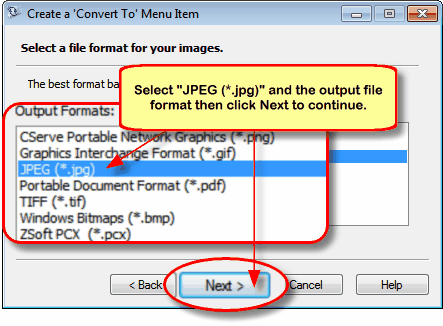
- Choose JPEG (*.jpg) from the list of output formats. Click the Next button to move to the following screen.

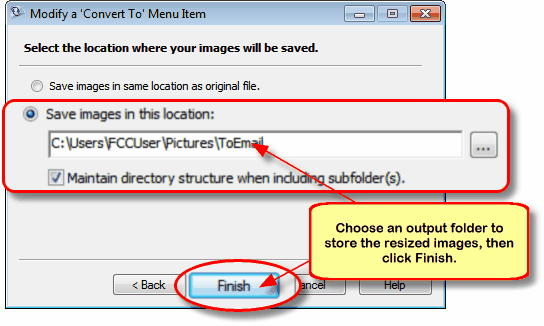
- Choose a folder in which to store the resized images. If you are also resizing any images found in any subfolders under the source folder, enabling the Maintain directory structure when including subfolder(s) option will cause the same subfolders to be created under the new output folder.
- You can type in the name of an existing folder or use the Browse button (
 ) to select a folder on your computer.

- If the output folder does not exist, you will be prompted to confirm that you want to create the folder. Click Yes to create the folder.

- You can type in the name of an existing folder or use the Browse button (
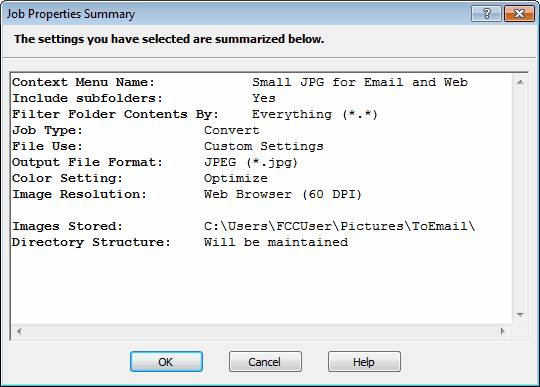
- A summary of the settings for this Convert To menu item is shown. Click OK to create the new profile, or Cancel to return to the wizard and make changes.

- Now that the new profile is created, it can be used to resize an entire folder of images and store the new images in their own folder. Select the folder of images you want to convert, then right-click on that folder to access the context menu.
- From the context menu, select the Convert To menu item.
- Another menu will appear, displaying conversion options, including the one just created. Select Small JPG for Email and Web from the menu.

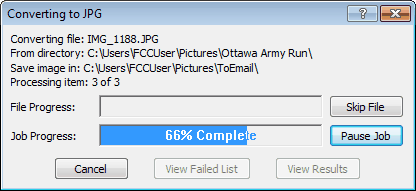
- A progress dialog is shown while the files in the folder, and any files in any subfolders are resized.
- When complete, click the Close button.


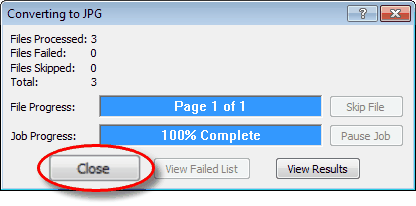
All of the images that were in the original folder have now been resized and stored in the new ToEmail folder.

