File Conversion Center
Batch Convert Office and PDF files to PDF, JPEG, TIFF and other image formats.
File Conversion Center – FAQs
These are frequently asked questions about File Conversion Center.
Do I Need FCC Standard or Professional Edition?
File Conversion Center 6.0 is now available as either a Standard or a Professional edition.
File Conversion Center Standard maintains all of the original features of the previous versions except for the command line options for silent conversion. These options are now only available in File Conversion Center Professional.
The upgrade path for earlier versions of File Conversion Center is File Conversion Center 6.0 Standard. If you have been using one of the following File Conversion Center’s command line options for silent (no user interface) conversion you will need to purchase File Conversion Center 6.0 Professional.
Command line options only available in the Professional version are:
- /Q – Run a conversion job silently with no graphical interface.
- /X – Can only be used with the /R option; automatically closes the progress dialog when the conversion process is complete.
- /N – Suppresses all error message dialogs, errors are logged into the event viewer instead.
If you need to convert large volumes of documents on a continuous basis then we recommend looking at our Document Conversion Service product before upgrading File Conversion Center. Document Conversion Service is a scalable solution that can run 24/7 to convert large volumes of documents in an unattended fashion.
What is the latest release and how can I obtain it?
For the current release number of File Conversion Center, please read the release notes.
All Software Downloads for your purchased software products are located in your secure PEERNET online account to the right of the applicable serial number.
For registered owners of File Conversion Center with an active On-Going Licensing and Support subscription, your latest update is available in your online account.
If you currently own File Conversion Center 6.0 with no On-Going Licensing and Support subscription, please go to your online account and Purchase On-Going Licensing and Support for your product. When your order has been completed, the Software Download available in your account will be updated automatically. An On-Going Licensing and Support subscription is valid for one year; you will have access to all updates/upgrades for the entire year.
NOTE: If you have modified any of the sample job profiles that File Conversion Center installs by default, or if you have added your own, you should back up the contents of this folder before upgrading.
- Browse to C:Documents and Settings[USERNAME]Application DataPEERNETFCCJobProfiles5 (for Windows XP and Windows 2003) or
C:Users[USERNAME]AppDataRoamingPEERNETFCCJobProfiles5 (for all other Windows platforms). Change [USERNAME] to the account name that FCC runs under. - All files in this folder are job profiles. Copy all of the profiles from here and save this in a safe location.
- After installing the new upgrade or update, open the profiles folder again and copy your modified and new job profiles back into this location.
For owners of earlier versions of File Conversion Center you can upgrade directly via your online account at a discount.
The upgrade path for File Conversion Center 5.0 and File Conversion Center 4.0 is File Conversion Center 6.0 Standard Edition. If you have been using File Conversion Center’s command line options for silent (no user interface) conversion you will need to upgrade to File Conversion Center 6.0 Professional Edition.
If you need to convert large volumes of documents on a continuous basis then we recommend looking at our Document Conversion Service product before upgrading File Conversion Center. Document Conversion Service is a scalable solution that can run 24/7 to convert large volumes of documents in an unattended fashion.
To upgrade File Conversion Center please go to your PEERNET online account and select Purchase Upgrade. When the order has been completed, your online account will be populated with the File Conversion Center 6.0 software download and applicable serial number.
Do I need to uninstall FCC before installing an upgrade or update?
Major releases (upgrades i.e. 5.0 to 6.0) of this product can both be installed (co-exist) on the same computer. For the prior version, the licensing and the settings will remain unchanged. The new version will have to be licensed and the settings set up to match the prior version.
Minor releases (updates or patches i.e. 6.0.001 to 6.0.002) will install over an existing installation. The licensing will remain unchanged.
If you have modified any of the sample job profiles that File Conversion Center installs by default, or if you have added your own, you should back up the contents of this folder before upgrading.
- Browse to C:Documents and Settings[USERNAME]Application DataPEERNETFCCJobProfiles5 (for Windows XP and Windows 2003) or
C:Users[USERNAME]AppDataRoamingPEERNETFCCJobProfiles5 (for all other Windows platforms). Change [USERNAME] to the account name that FCC runs under. - All files in this folder are job profiles. Copy all of the profiles from here and save this in a safe location.
- After installing the new upgrade or update, open the profiles folder again and copy your modified and new job profiles back into this location.
What version of the product is installed on my system?
Windows 10 and Windows Server 2016
- Right click the Windows icon
on the start bar.
- Click Control Panel.
- Click Programs and Features.
- Check the Version column for the version you have installed.
![]()
Windows 8 and Windows 2012
- Click the Windows logo key
+I.
- Click Control Panel.
- Under Programs, click Uninstall a program.
- Check the Version column for the version you have installed.
![]()
Windows 7 and Windows 2008 R2
- From the Start Menu click on Control Panel.
- Under Programs. click Uninstall a program.
- Check the Version column for the version you have installed.
![]()
Windows Vista and Windows 2008
- From the Start Menu click on Control Panel.
- Under Programs, click Uninstall a program
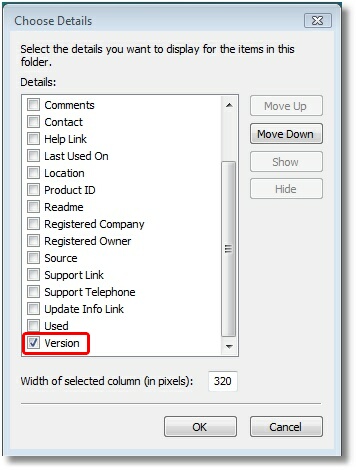
- If the Version column is not showing, right click the Name column title and click More. Then scroll down and click Version, then click OK to add the column.
- Check the Version column for the version you have installed.
![]()
Windows XP and Windows 2003
- From the Start Menu click on Control Panel.
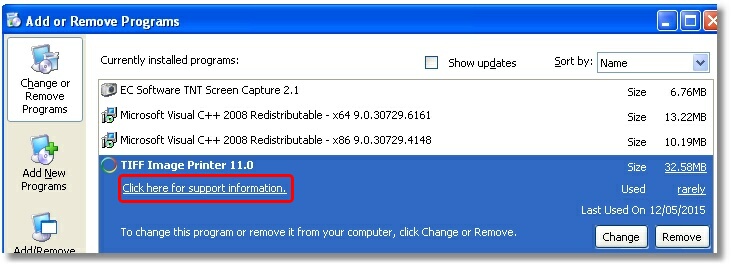
- In the Control Panel click Add/Remove Programs.
- Scroll and highlight the product name
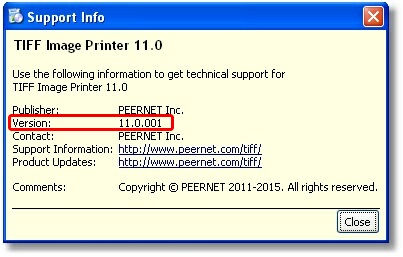
- Click on the text “Click here for support information”.
- The version number is listed with the support information.
How do I find my serial number?
If you have yet to activate your product please sign into your PEERNET online account to obtain your serial number. Your online account contains a complete list of your purchased products with their applicable serial number and software download link.
Alternatively, if your product has been activated you can view your activation information, including your serial number, as follows:
-
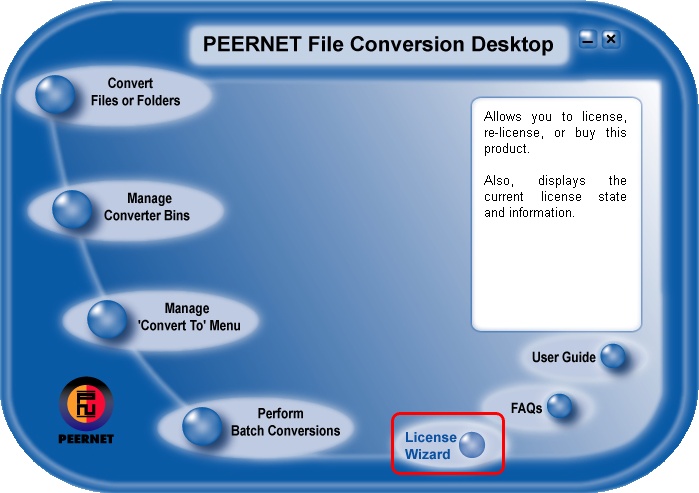
- Click Start – Programs – PEERNET File Conversion Center 6.0 – PEERNET File Conversion Center 6.0
- Click License Wizard.
How do I license my software?
All PEERNET software is licensed by entering your serial number into our license wizard which activates and authenticates your license by communicating with the PEERNET License Server via the internet. If the computer you are licensing does not have an internet connection, we do offer a manually licensing process where you email a PROD ID file to [email protected] and we return a PROD AU file.
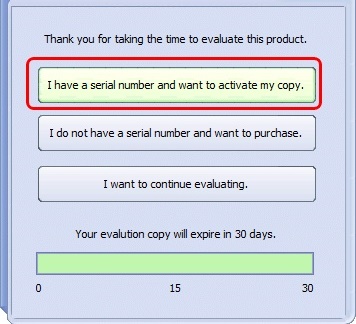
For detailed instructions on how to license File Conversion Center, please see the video below:
In addition, detailed instructions on activating your software can also be found in the File Conversion Center User Guide.
How do I license my software if my computer is not connected to the Internet?
If you are not connected to the Internet, you will have to send us a manual license file that we will authorize and return.
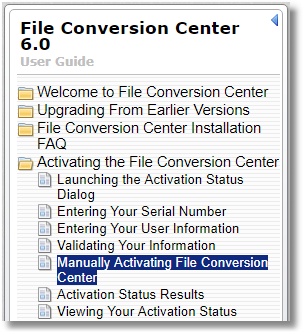
Please refer to the instructions in the chapter Activating – Manually Activating in the product’s User Guide.
Why is the licensed software now in Trial mode?
If the software was previously licensed and has now reverted back to Trial mode, this means something on the computer has changed so the product believes it is no longer licensed.
Examples of items that effect the license validity are:
- change of domain or workgroup
- change in the network
- change in the computer name
- reformatting and reloading the computer
- system has virus
In this situation you will need to re-license the computer using your existing serial number.
If you are re-licensing and the computer is identical, then the “license authentication server” will re-license without the need for you to request a license adjustment. A license adjustment request is required when the software is being moved from one computer to another computer or computer identity has changed.
A license adjustment is when PEERNET adjusts your serial number to un-license your existing computer, which then allows you to license your new computer using the same serial number.
Customers with active On-Going Licensing and Support subscription have the authority to request license adjustments. To do so please, email [email protected] with your Serial Number, name of the computer and the reason for the license adjustment so the reset can be authorized and completed.
PEERNET will reply when this is completed and then you can proceed in licensing the software. NOTE: The software download associated to your serial number can be obtained from your PEERNET online account.
If you do not have an active On-Going Licensing and Support subscription PEERNET cannot authorize your request. In order to remedy this, you will have to do one of the following:
- Add an On-Going Licensing and Support Subscription, if you are running the current version.
- Purchase an additional license that can be used for your new computer, if you are running the current version.
- Purchase Upgrade to the latest version, if you are running a non-current version.
Please go to your PEERNET online account and select either Purchase On-Going Licensing and Support, Purchase Additional Activations or Purchase Upgrade.
How do I re-license the software?
If you are re-licensing and the computer is identical, then “license authentication server” will re-license without the need for you to request a license adjustment. A license adjustment request is required when the software is being moved from one computer to another computer or computer identity has changed.
A license adjustment is when PEERNET adjusts your serial number to un-license your existing computer, which then allows you to re-license your computer using the same serial number.
Customers with active On-Going Licensing and Support Subscription are entitled to request license adjustments. To do so please, email [email protected] with your serial number, the name of your old computer, and the reason for the license adjustment so the reset can be authorized and completed.
PEERNET will reply when the adjustment is complete and then you can proceed with re-licensing the software. NOTE: The software download associated to your serial number can be obtained from your PEERNET online account.
If you have let your On-Going Licensing and Support Subscription expire, PEERNET cannot carry out a license adjustment on your serial number. In order to remedy this, you will have to do one of the following:
- Add an On-Going Licensing and Support Subscription, if it is within one year of your initial purchase or within one year of the expiry date of a previously valid On-Going Licensing and Support Subscription.
- Purchase a new serial number of the software with a valid On-Going Licensing and Support Subscription so you do not encounter this issue again.
- Purchase an additional license, if you are running the current version.
- Purchase an upgrade to the latest version, if you are running a non-current version.
How do I move my license from one computer to another?
A license adjustment request is required when the software is being moved from one computer to another computer.
A license adjustment is when PEERNET adjusts your serial number to un-license your existing computer, which then allows you to license your new computer using the same serial number.
Customers with active On-Going Licensing and Support Subscription are entitled to request license adjustments. To do so please, email [email protected] with your serial number, the name of your old computer, and the reason for the license adjustment so the reset can be authorized and completed.
PEERNET will reply when the adjustment is complete and then you can proceed with licensing the software. NOTE: The software download associated to your serial number can be obtained from your PEERNET online account.
If you have let your On-Going Licensing and Support Subscription expire, PEERNET cannot carry out a license adjustment on your serial number. In order to remedy this, you will have to do one of the following:
- Add an On-Going Licensing and Support Subscription, if it is within one year of your initial purchase or within one year of the expiry date of a previously valid On-Going Licensing and Support Subscription.
- Purchase a new serial number of the software that can be used for your new computer, with a valid On-Going Licensing and Support Subscription so you do not encounter this issue again.
- Purchase an additional license that can be used for your new computer, if you are running the current version.
- Purchase an upgrade to the latest version, if you are running a non-current version.
How do I license my computer if I had to re-format it?
In this situation you will need to re-license the software on your reformated computer. A license adjustment request is required when the software is being installed on a computer whose identity has changed.
A license adjustment is when PEERNET adjusts your serial number to un-license your existing computer, which then allows you to re-license your computer using the same serial number.
Customers with active On-Going Licensing and Support Subscription are entitled to request license adjustments. To do so please, email [email protected] with your serial number, the name of your old computer, and the reason for the license adjustment so the reset can be authorized and completed.
PEERNET will reply when the adjustment is complete and then you can proceed with re-licensing the software. NOTE: The software download associated to your serial number can be obtained from your PEERNET online account.
If you have let your On-Going Licensing and Support Subscription expire, PEERNET cannot carry out a license adjustment on your serial number. In order to remedy this, you will have to do one of the following:
- Add an On-Going Licensing and Support Subscription, if it is within one year of your initial purchase or within one year of the expiry date of a previously valid On-Going Licensing and Support Subscription.
- Purchase a new serial number of the software with a valid On-Going Licensing and Support Subscription so you do not encounter this issue again.
- Purchase an additional license, if you are running the current version.
- Purchase an upgrade to the latest version, if you are running a non-current version.
What products create Adobe PDF/A compliant documents?
The following PEERNET products can be configured to create Adobe PDF documents that are PDF/A compliant:
How can I obtain the FCC results Log file?
From within File Conversion Center , running your conversion will open the status screen and once the conversion has completed, do the following actions to obtain the log file:
- Click the View Results button in the bottom right corner.
- In the View Results window, from the menu click the Operations – View Log Details menu item to open the View Log window.
- To save the log file to disk, from the menu click Log – Save As and then enter the location where you wish to save the log file.
If you are using the Command Line Utility, please add “/L=C:loglogfile.log,a” to your command line arguments and run it again. This will create the log file at C:loglogfile.log.
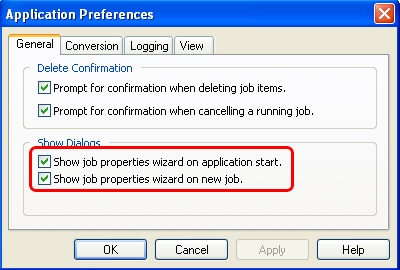
How do I turn back on the job properties wizard in FCC?
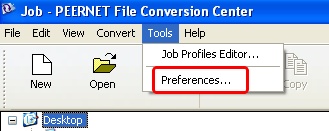
You can set this and other application preferences by clicking Tools – Preferences in the application menu.
How do I change or remove headers/footers in HTML files using FCC?
Internet Explorer will print a header and footer on all pages by default. You can customize these headers and footers or even remove them completely as follows:
- Open Internet Explorer
- From the File menu, select Page Setup
- Clear the Header and/or Footer fields or change them to the desired values
- Press OK
After making these changes, HTML files converted with File Conversion Center will have your new header and footer settings.
How do I enable missing applications dialog box in FCC?
You can set this and other application preferences by clicking Tools – Preferences in the application menu.
Why do I get file type unsupported in the FCC log file?
File Conversion Center uses the file’s extension association information stored in Windows to determine the application defined to perform the Shell Print or Shell PrintTo verb action. If the application associated with this action is not one supported by File Conversion Center or the file’s extension is not associated with any application for this action, File Conversion Center will report file type unsupported in the log file.
If the file is an HTML document that would normally be handled by Internet Explorer, it may be the case that now another browser (FireFox, Safari, Chrome) is now the default internet browser. You can change this by opening Internet Explorer and when asked to make it the default browser, respond yes.
For other file types, you may need to change the default program that is associated with that extension. The steps to modify the file association is documented below for each supported Windows operating system. Follow the appropriate steps for your version of Windows.
Windows 10 and Windows Server 2016
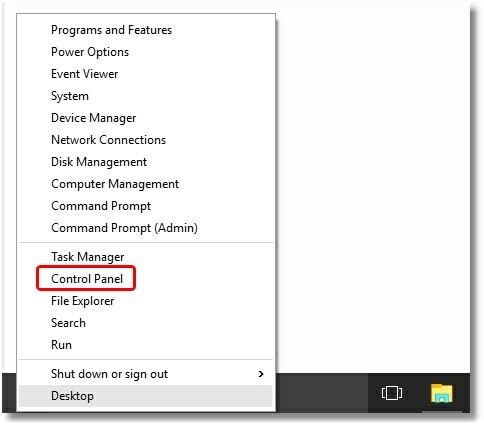
- Right click the Windows logo key
to bring the Settings charm.
- Click Control Panel.
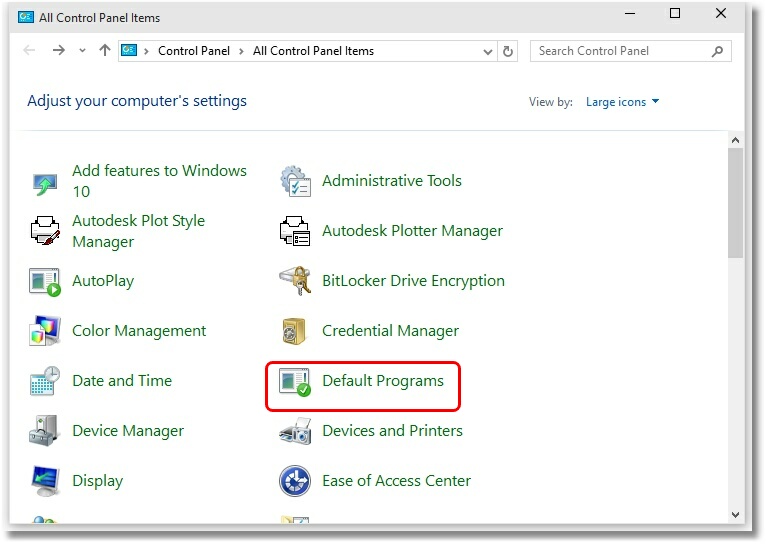
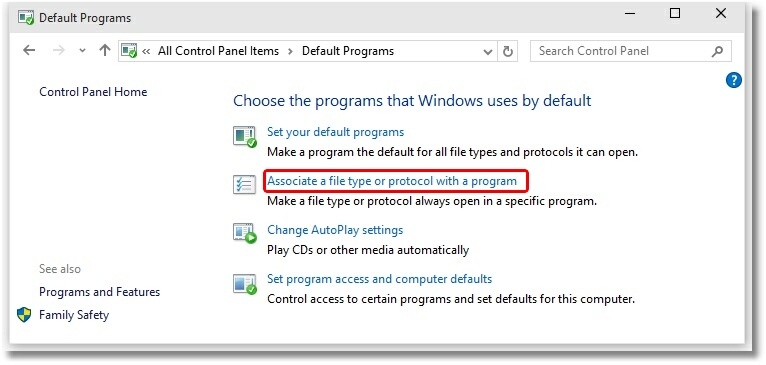
- Click Default Programs.
- Click “Associate a file type or protocol with a program”.
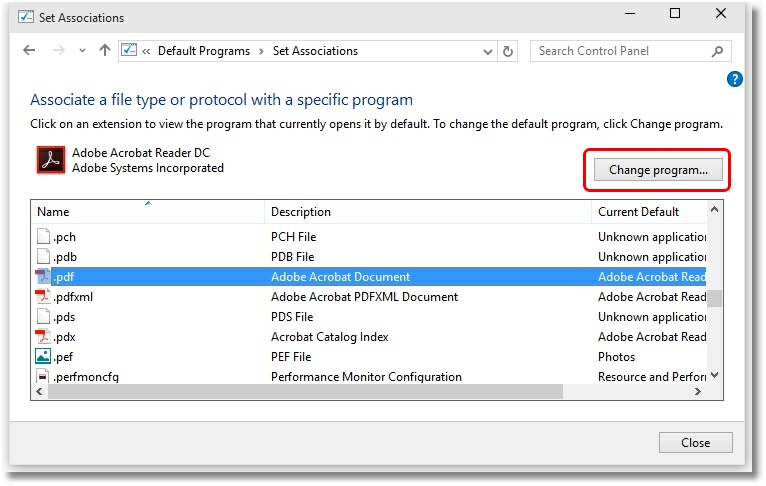
- Scroll to the file extension in question.
- Use the Change program button to associate the file to an application supported by File Conversion Center.
Windows 8 and Windows 2012
- Press the Windows logo key
+I to bring the Settings charm.
- Click Control Panel.
- Click Programs.
- Click Default Programs.
- Click “Associate a file type or protocol with a program”.
- Scroll to the file extension in question.
- Use the Change program button to associate the file to an application supported by File Conversion Center.
Windows 7, Windows 2008 and Windows 2008 R2
- Open the Control Panel, then click Programs.
- Click Default Programs.
- Click “Associate a file type or protocol with a program”.
- Scroll to the file extension in question.
- Use the Change program button to associate the file to an application supported by File Conversion Center.
Windows Vista
- Click Start menu – Default Programs.
- Click “Associate a file type or protocol with a program”.
- Scroll to the file extension in question.
- Use the Change program button to associate the file to an application supported by File Conversion Center.
Windows XP
- Open My Documents or My Computer from the Start menu.
- Click on the Tools menu.
- Click on the Folder Options item. A dialog box with tabs will appear.
- Click on the File Types tab. Let Windows fill the information box.
- Scroll to the file extension in question.
- Use the Change button to check what application is associated and select an application supported by File Conversion Center.
Text faint or wrapped wrong for text (.txt) files in FCC?
File Conversion Center uses Microsoft Word to convert text files. When displaying text files Microsoft Word automatically uses the built-in style of Plain Text. Older versions of Office use Courier New, point size 10 for this style, while versions after 2007 use Consolas, point size 10.
These are very thin-stroked fonts that can lose clarity when imaged. This change in the font can also cause the text to wrap differently from how the text file was originally designed.
Solution: By modifying the font that Word uses to display text files you can get clearer text in your output file. This solution can be applied to all versions of WORD, but it does change the Normal.dot template.
In Word 2007 and higher:
- Open a text file (.TXT) in Word.
- Press Ctrl+Alt+Shift+S to open the Styles window.
- Right click the style labeled Plain Text and select Modify from the menu.
- Select the desired font and font size you wish to use.
- Select “New documents based on this template”.
- Click OK to close the Modify Style dialog and apply your style changes.
- Click File – Options
- Click Advanced tab in left column.
- On right, scroll to bottom to the General section.
- Click the Web Options button.
- Click Fonts tab.
- Change the font for Fixed-width Font you wish to use.
- Click OK.
- Close Word.
In Word 2003:
- From the Format menu, select Styles and Formatting….
- From the Styles and Formatting pane, highlight Plain Text in the list of styles. If this style is not listed, make sure the option to show All styles is selected in the combo box at the bottom of the pane.
- Click the down arrow on the right of the highlighted Plain Text style and select Modify… from the menu.
- Select the desired font and font size you wish to use.
- In the Modify Style dialog box, check the Add to template checkbox.
- Select OK to close the Modify Style dialog and apply your style changes.
- Click File – Options
- Click Advanced tab in left column.
- On right, scroll to bottom to the General section.
- Click the Web Options button.
- Click Fonts tab.
- Change the font for Fixed-width Font you wish to use.
- Click OK.
- Close Word.
Now when you convert a text file with File Conversion Center it will use the the font and font size chosen above.
Why do I get the message "No job or items found to run."?
This message appears for two reasons.
1. It can appear when you do not have the necessary supporting applications installed. Check the list below:
Microsoft Office 2003 – 2013
- Word Documents (*.doc, *.docx)
- Excel Spreadsheets (*.xls, *.xlsx)
- PowerPoint Slideshows (*.ppt, *.pptx)
- Rich Text Documents (*.rtf)
- Generic Text-based Documents (*.txt)
Internet Explorer 6.0 – 11.0
- HTML Files (*.htm, *.html)
- Secure HTML (*.shtm, *.shtml)
- Active Server Pages (*.asp, *.aspx)
Adobe Reader 6.0 – DC
- PDF Documents (*.pdf)
Ghostscript 7.04 – 9.16
- Postscript and Encapsulated Postscript files (*.ps, *.eps)
- PDF Documents (*.pdf)
Built-in (no additional applications required)
- JPEG image files (*.jpg)
- TIFF image files (*.tif)
- Windows Bitmap image files (*.bmp)
- ZSoft PCX image files (*.pcx)
- ZSoft DCX image files (*.dcx)
- CServe Portable Network Graphics image files (*.png)
- Graphics Interchange Format image files (*.gif)
2. It can also appear when the file dragged onto the converter bins is a shortcut, or a link to the actual file, and not the file itself. A shortcut has a small arrow in the lower left corner.
Why can I not see my AutoCAD paper sizes or why is the paper size incorrect?
When AutoCAD is installed it adds a collection of new paper sizes, the most commonly used being ARCH C, D and E. To use these new paper sizes you need to manually add these paper sizes, or forms, to the list of all paper sizes available on your computer.
Below are the necessary steps to add the AutoCAD paper sizes so they are visible when using a PEERNET printer.
IMPORTANT: Please close all applications before making these changes.
Windows 10 and Windows Server 2016
- Right click the Windows icon
on the start bar.
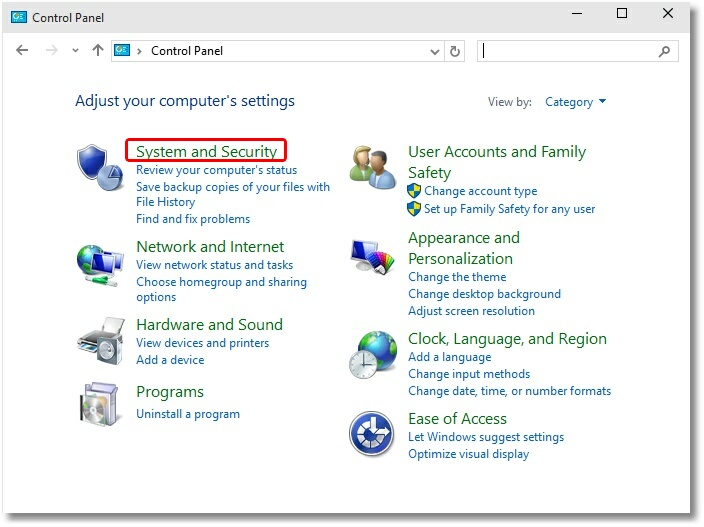
- Click Control Panel.
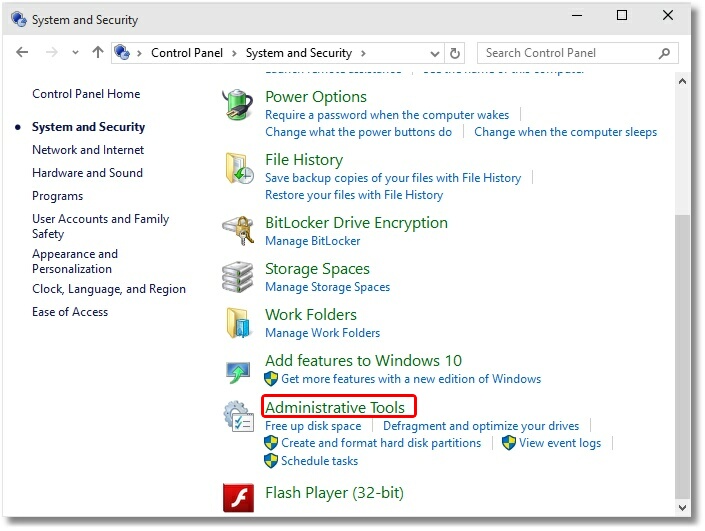
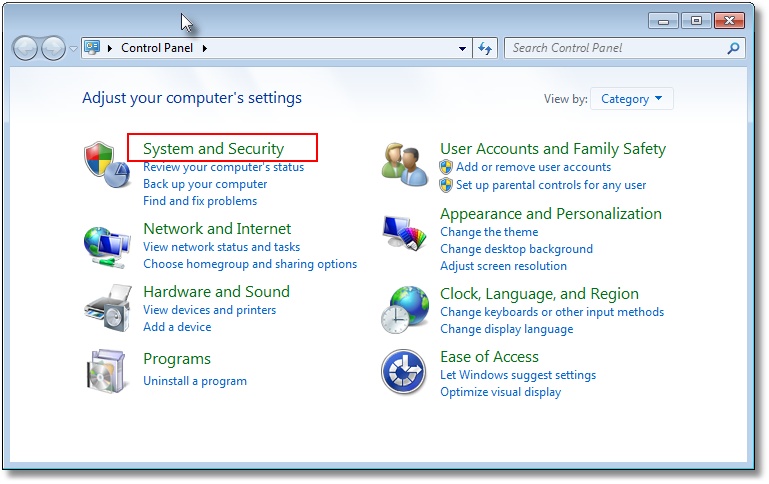
- Click System and Security.
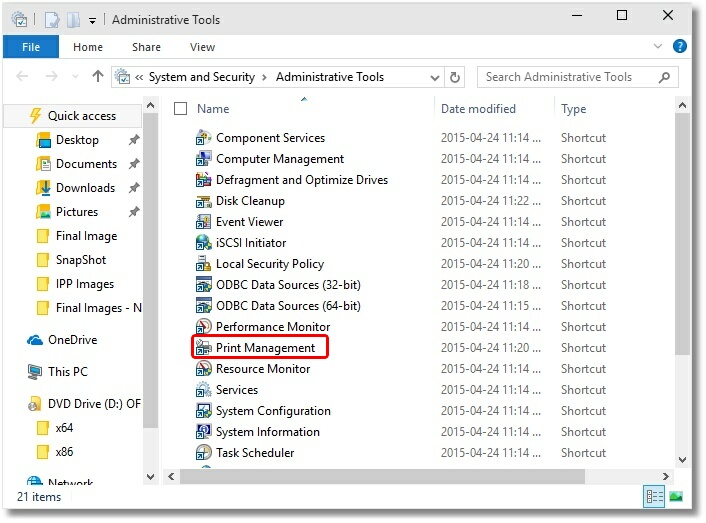
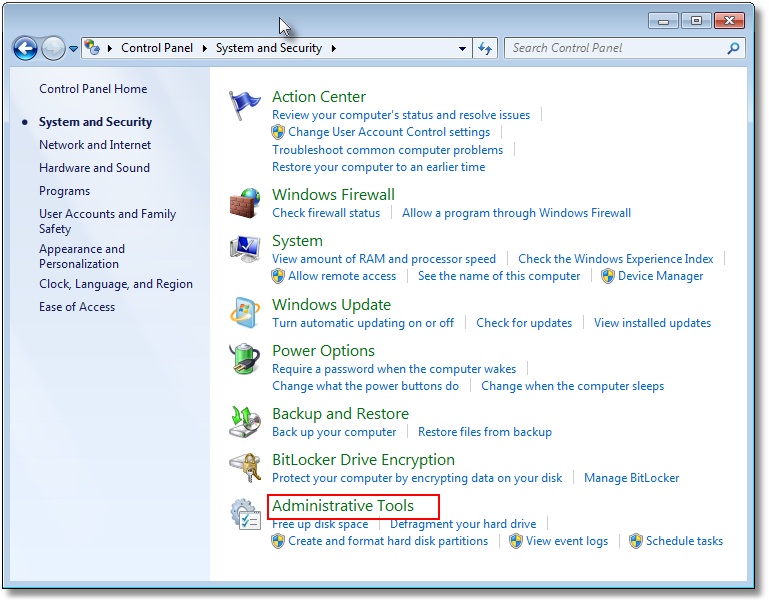
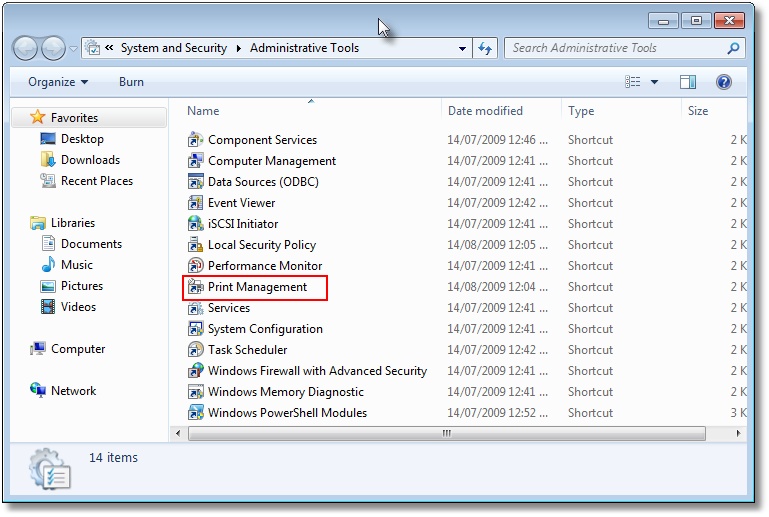
- Click Administrative Tools.
- Double click Print Management.
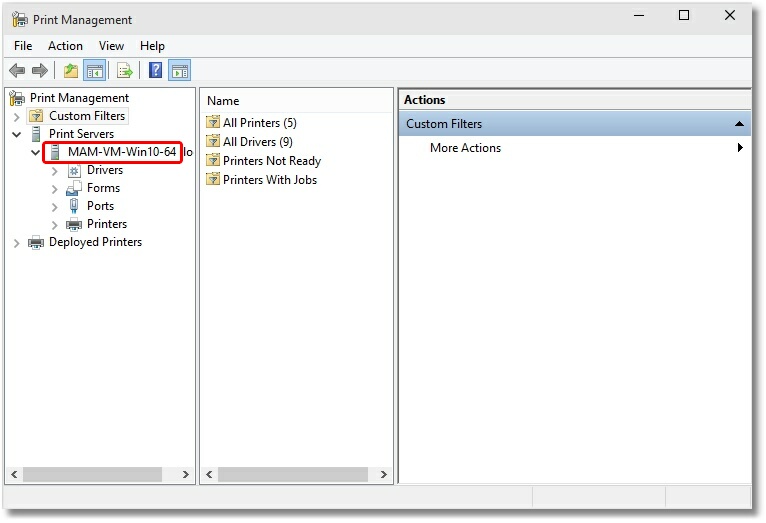
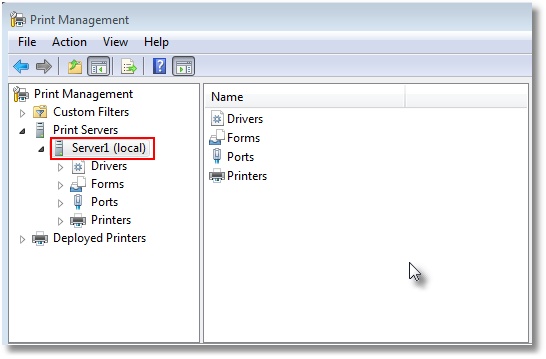
- Select Print Servers and then select the name of your computer (ie Server1).
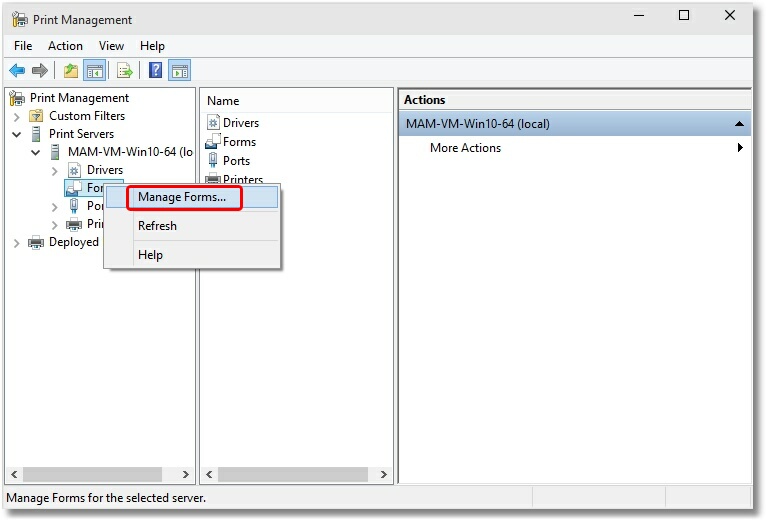
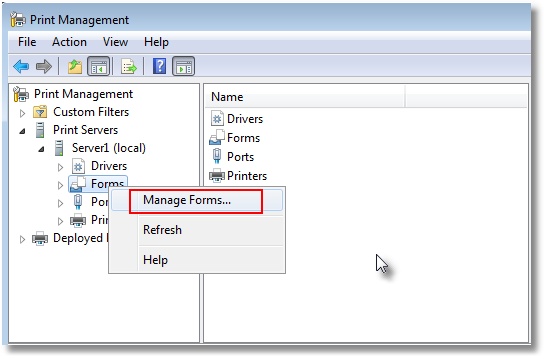
- Right click Forms item and select Manage Forms.
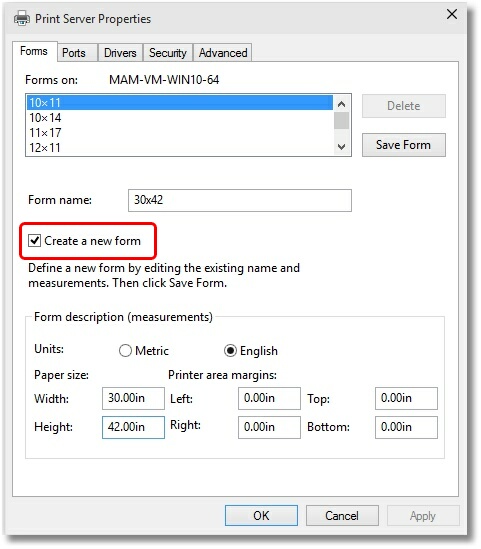
- Check “Create a new form”.
- Enter a descriptive name in the “Form name:” field (e.g. “30 x 42” or “36 x 48”).
- Set the Measurement units to “English” or “Metric”.
- Enter the desired Width and Height for your paper size. NOTE: Always make the Width less than the Height (e.g. Width 30, Height 42) as you can always choose Landscape orientation later.
- Click “Save Form”.
- Repeat steps 8-12 for each new paper size you want to create.
- Click Close when you are done.
- Open your drawing in AutoCAD. Select File – Plot, and in the Plot dialog, set the Plot device to the applicable PEERNET printer.
- On the Plot Settings tab, select the desired paper size, orientation (Landscape), and scale (Scale to fit), and click OK.
Windows 8 and Windows 2012
- Click the Windows logo key
+I.
- Click Control Panel.
- Click System and Security.
- Click Administrative Tools.
- Double click Print Management.
- Select Print Servers and then select the name of your computer (ie Server1).
- Right click Forms item and select Manage Forms.
- Check “Create a new form”.
- Enter a descriptive name in the “Form name:” field (e.g. “30 x 42” or “36 x 48”).
- Set the Measurement units to “English” or “Metric”.
- Enter the desired Width and Height for your paper size. NOTE: Always make the Width less than the Height (e.g. Width 30, Height 42) as you can always choose Landscape orientation later.
- Click “Save Form”.
- Repeat steps 8-12 for each new paper size you want to create.
- Click Close when you are done.
- Open your drawing in AutoCAD. Select File – Plot, and in the Plot dialog, set the Plot device to the applicable PEERNET printer.
- On the Plot Settings tab, select the desired paper size, orientation (Landscape), and scale (Scale to fit), and click OK.
On Windows 7 and Windows 2008 R2
- Go to Start – Control Panel.
- Click System and Security.
- Click Administrative Tools.
- Double click Print Management.
- Select Print Servers and then select the name of your computer (ie Server1).
- Right click Forms item and select Manage Forms.
- Check “Create a new form”.
- Enter a descriptive name in the “Form Description for:” field (e.g. “30 x 42” or “36 x 48”).
- Set the Measurement units to “English” or “Metric”.
- Enter in the desired Width and Height for your paper size. NOTE: Always make the Width less than the Height (e.g. Width 30, Height 42) as you can always choose Landscape orientation later.
- Click “Save Form”.
- Repeat steps 7-11 for each new paper size you want to create.
- Click Close when you are done.
- Open your drawing in AutoCAD. Select File – Plot, and in the Plot dialog, set the Plot device to the applicable PEERNET printer.
- On the Plot Settings tab, select the desired paper size, orientation (Landscape), and scale (Scale to fit), and click OK.
On Windows Vista and Windows 2008
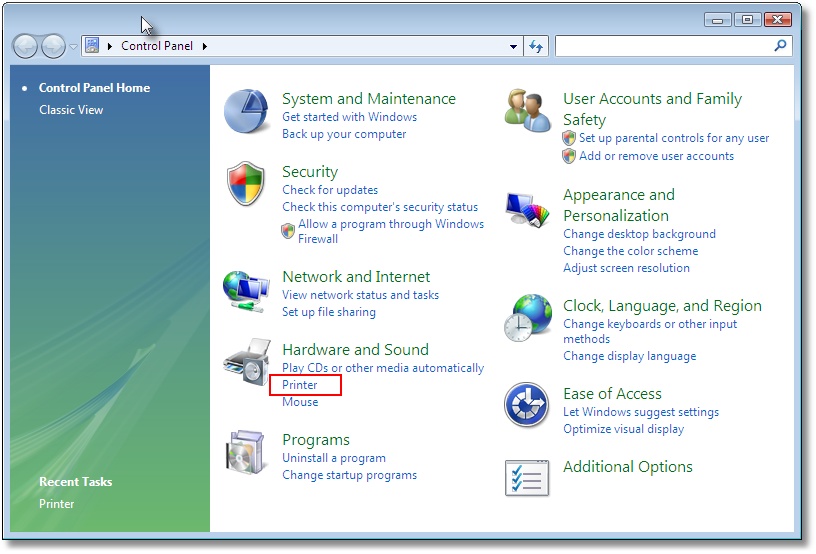
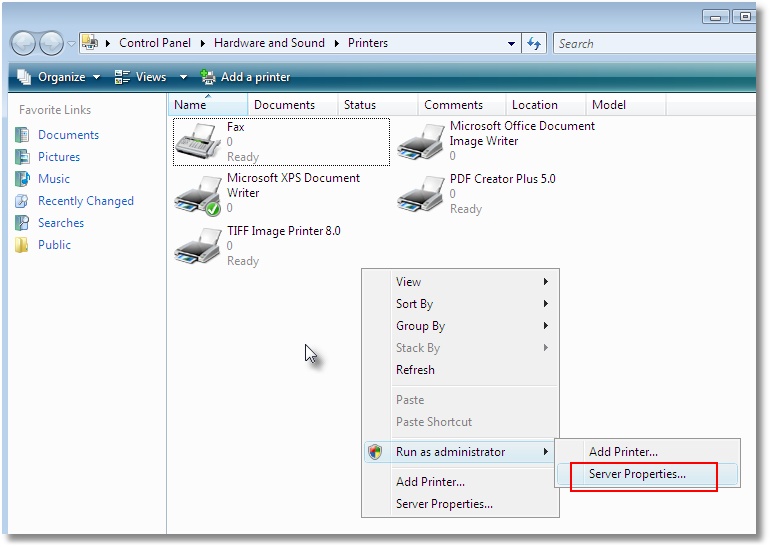
- Open the Printers folder from the Start – Control Panel – Hardware and Sound – Printers.
- Right click in the window and select Run as Administrator – Server Properties.
- On Print Server Properties, click the Forms tab.
- Check “Create a new form”.
- Enter a descriptive name in the “Form name:” field (e.g. “30 x 42” or “36 x 48”).
- Set the Measurement units to “English” or “Metric”.
- Enter the desired Width and Height for your paper size. NOTE: Always make the Width less than the Height (e.g. Width 30, Height 42) as you can always choose Landscape orientation later.
- Click “Save Form”.
- Repeat steps 4-8 for each new paper size you want to create.
- 10. Click Close when you are done.
- Open your drawing in AutoCAD. Select File – Plot, and in the Plot dialog, set the Plot device to the applicable PEERNET printer.
- On the Plot Settings tab, select the desired paper size, orientation (Landscape), and scale (Scale to fit), and click OK.
On Windows XP and Windows 2003
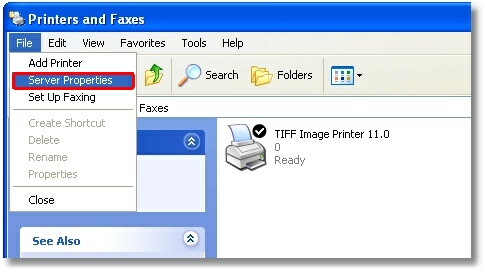
- Open the Printers folder from Start – Settings – Printers and Faxes.
- In the Printers folder window menu, select File – Server Properties.
- In the Server Properties dialog, on the Forms tab, check “Create a New Form”.
- Enter a descriptive name in the “Form name:” field (e.g. “30 x 42” or “36 x 48”).
- Set the Measurement units to “English” or “Metric”.
- Enter the desired Width and Height for your paper size. NOTE: Always make the Width less than the Height (e.g. Width 30, Height 42) as you can always choose Landscape orientation later.
- Click “Save Form”.
- Repeat steps 3-7 for each new paper size you want to create.
- Click OK when you are done.
- Open your drawing in AutoCAD. Select File – Plot, and in the Plot dialog, set the Plot device to the applicable PEERNET printer.
- On the Plot Settings tab, select the desired paper size, orientation (Landscape), and scale (Scale to fit), and click OK.
What folders should I exclude from my Anti-virus Scans?
If you have anti-virus software installed on your computer you should configure your antivirus software to exclude the print spool directory and certain key driver files from the real-time scan. These files are accessed many times during each print cycle and scanning them repeatedly can impact greatly on your printing performance, as well as potentially causing the trigger to expired mode.
You should consider excluding the following driver files & folders:
– %SystemRoot%System32spool
– C:Documents and SettingsAll UsersApplication DataPEERNET (for Windows XP and Windows 2003)
– C:ProgramDataPEERNET (for Windows Vista, Windows 7, Windows 2008, Windows 8, Windows 2012, Windows 10 and Windows Server 2016)
– any printer script file (if you have created or are using one)
User requires Manage Printer access on File Conversion Center printer.
- Log onto the computer under an account with Administrative rights.
- Open the Printers folder (Start | Programs | Printers & Faxes).
- Right-click on the PEERNET File Conversion Center printer and select Properties from the context menu. (Printer Properties on Windows 7 and up)
- Select the Security tab.
- Select Add… to show the dialog listing all users. Add the required user account to the users list for the printer.
- Highlight the user in the list and change their Manage Printer permissions to Allow by checking the checkbox.
INTERESTING LINKS
Below are some interesting links for you! Enjoy your stay :)
OUR PRODUCTS
LATEST NEWS
- ARM64 Support For PEERNET ProductsJuly 23, 2024 - 11:24 am
- PDF, Text and Cadd Converters, OCR Support, and a Dashboard for DCSJune 13, 2024 - 2:00 pm
- Batch OCR PDF – Make PDF SearchableJune 13, 2024 - 1:30 pm
- Batch Convert Text to PDF with Page Size FormattingJune 13, 2024 - 1:00 pm
BUSINESS INFORMATION
Toll Free: 1-800-883-7980 North America
Tel: 1-613-224-6894Our office hours are Monday to Friday, from 0900 hrs to 1700 hrs, Eastern Standard Time.
Email Address: [email protected]
