Document Conversion Service – FAQs
These are frequently asked questions about Document Conversion Service.
What is the latest release and how can I obtain it?
For the current release number of Document Conversion Service, please see the release notes.
All Software Downloads for your purchased software products are located in your secure PEERNET online account to the right of the applicable serial number.
For registered owners of Document Conversion Service with an active subscription license, your latest update is available in your online account.
Do I need to uninstall DCS before installing an upgrade or update?
Major releases (i.e. upgrading from version 2.0 to 3.0) of Document Conversion Service do require that the prior version be uninstalled. The new release will have to be licensed with a new serial number and any application settings will have been set back to the defaults.
Minor releases (i.e. updates from version 3.0.001 to 3.0.002) will install over an existing installation. The licensing will remain the same but any application settings will have been set back to the defaults.
If you have made any changes to the settings they will need to be reapplied.
This includes changes to the following:
- The Document Conversion Service configuration file
- The Watch Folder Service configuration file
- Changes you made to the default conversion profiles or any new conversion profiles you created. Conversion profiles are used by the command line tools, the PEERNET.ConvertUtility.dll, and the Convert File sample programs.
Beginning with Document Conversion Service 3.0.017, when upgrading a previous version, the install program includes options to create a backup zip file containing the Document Conversion Service configuration file, the Watch Folder configuration file, and the conversion profiles. At the end of the upgrade process, the contents of the backup zip file can be restored using the new DCS Backup and Restore utility.
If you are running a version before 3.0.017 you can request the Backup and Restore Tool from [email protected].
For steps to manually backup and restore the configuration files and profiles, scroll down to Manually Backup and Restore Files.
Creating Backup During Installation
During installation, you can create a backup zip file of the Document Conversion Service & Watch Folder Service configuration files and your conversion profiles. You can bypass this by unchecking all three boxes. Click Next when you are ready to proceed.

Restoring Backup After Installation
When upgrading to DCS 3.0.017 or higher, the installation provides an option to launch the DSC Backup and Restore utility at the end of the installation process. If you have created a backup zip file you can use this DCS Backup and Restore utility to restore your saved settings.
This option will be selected if you have created a backup zip file as part of an upgrade installation. If you are installing on a new machine, and have a backup zip file from an earlier install or another computer, check this option to run the utility at the end of the installation.

The first window, Restoring this backup, will show the loaded backup file and what files can be restored based on which files were saved in the zip file. Load a saved backup file if one is not already loaded from the install. Click Next.

Select which files you wish to restore from the backup, then click Next.

Starting with version 3.0.031, new built-in converters for Adobe PDF files, text documents, and image files are available. These converters do not require any third-party applications to be installed. Leave unchecked if you want to continue using the original converters.

Once you have confirmed what you wish to restore, click the Start Restore button.

The tool will then merge the saved DCS configuration file with the latest DCS configuration file. If there are any syntax errors, click the Edit button to go to the problem line so you can correct the error. If there are no errors, click Next.

The merged file opens for you to verify if it is configured correctly. When done, click Accept Changes.

The tool will then merge the saved Watch Folder configuration file with the latest Watch Folder configuration file. If there are any syntax errors, click the Edit button to go to the problem line so you can correct the error. If there are no errors, click Next. The merged file opens for you to verify if it is configured correctly. When done, click Accept Changes.

Then the tool will copy your newly merged files and merge any saved profile files. Click Exit to close tool.

Manually Backup and Restore Files
Save DCS and Watch Folder Service Logon Account Information
- Click Start – Control Panel – Administrative Tools – Services.
- Scroll down to PEERNET Document Conversion Service Monitor 1.0 and check the account used under the Log On As column. You will need to know the username and password for this account.
- Scroll down to PEERNET Watch Folder Service and check the account shown under the Log On As column. If this differs from the Document Conversion Service account, you will need to know the username and password for this account too.
The DCS Configuration File
Backing up the File
- Open the DCS configuration file by going to the DCS Dashboard, clicking the DCS Settings tile then the Edit DCS Configuration tile. You can also open it by going to Start – All Programs – Document Conversion Service 3.0 – Edit DCS Configuration File.
- This will open the configuration file in the DCS Editor. Once open, click the Save As button to save a copy of the file in a safe location. Older versions will open this file in Notepad instead. In Notepad, go to File – Save As… to save a copy of the file.
Restoring the File
After updating or upgrading DCS, always check the new configuration file for any changes and additional settings that may have been introduced with the update or upgrade.
If no new settings have been added to the configuration file, copy your saved DCS configuration file to C:/Program Files/PEERNET Document Conversion Service 3.0/Core.
If you wish to have access to the new settings, then please do the following :
- Go to the DCS Dashboard, click the DCS Settings tile then the Merge DCS Configuration tile.
- Load the new configuration file that was just installed as the configuration file to update.
- Load your saved configuration file as the configuration file to copy from.
- Click Start Merge to merge the files.
- Review the merged changes and click Saved Merged File to save the updated file to C:/Program Files/PEERNET Document Conversion Service 3.0/Core.
The Watch Folder Configuration File
Backing up the File
- Open the Watch Folder configuration file by going to the DCS Dashboard, clicking the Watch Folder Settings tile then the Edit Configuration tile. You can also open it by going to Start – All Programs – Document Conversion Service 3.0 – Configure Watch Folder Settings.
- This will open the configuration file in the DCS Editor. Once open, click the Save As button to save a copy of the file in a safe location. Older versions will open this file in Notepad instead. In Notepad, go to File – Save As… to save a copy of the file.
Restoring the File
After updating or upgrading DCS, always check the new Watch Folder configuration file for any changes and additional settings that may have been introduced into the Watch Folders with the update or upgrade.
If no new settings have been added to the configuration file, copy your saved Watch Folder configuration file to C:/Program Files/PEERNET Document Conversion Service 3.0/Tools/Watch Folder Service.
If you wish to have access to the new settings, then please do the following :
- Go to the DCS Dashboard, click the DCS Settings tile then the Merge DCS Configuration tile.
- Load the new watch folder configuration file that was just installed as the configuration file to update.
- Load your saved watch folder configuration file as the configuration file to copy from.
- Click Start Merge to merge the files.
- Review the merged changes and click Saved Merged File to save the updated file to C:/Program Files/PEERNET Document Conversion Service 3.0/Tools/Watch Folder Service.
The Conversion Profiles
The conversion profiles are used by the sample programs, the command line utilities, and by the PEERNET.ConvertUtility.dll .NET assembly.
If you have modified any of the sample profiles that DCS installs by default, or if you have added your own, you should back up the contents of this folder before upgrading.
- Open the profiles folder by going to the DCS Dashboard, click the Desktop Conversion tile then the Open Profiles Folder tile. Or go to Start – All Programs – Document Conversion Service 3.0 – Samples – Open Conversion Profiles Folder.
- All files in this folder are conversion profiles. Copy all the profiles from here and save them in a safe location.
- After installing the new upgrade or update, open the profiles folder and copy your modified and new profiles back into this location.
Programming With PEERNET.ConvertUtility
After you update or upgrade the Document Conversion Service, any custom programs you have written that use the PEERNET.ConvertUtility.dll must be rebuilt against the updated DLLs.
Copy the updated DLL files from the C:/Program Files/PEERNET Document Conversion Service 3.0/Redist folder to your application’s folder. If you are referencing them in your project from the DCS install folder, they should update when you rebuild your program. Remember to copy all updated files to your projects Release or Deployment folder.
Beginning with DCS 3.0.013 the utility library is now built against .NET Framework 4.5; client applications and programs using the utility library may need to update their targeted framework to match.
How to Use the Backup and Restore Tool
Beginning with Document Conversion Service 3.0.017, a Backup and Restore utility is now available for backing up and restoring your DCS configuration file, Watch Folder configuration file, and conversion profiles when you are upgrading DCS, installing on a new computer or re-installing on a re-imaged computer.
If you are running a version prior to 3.0.017, then you can request the Backup and Restore Tool from [email protected].
To run the tool click the executable sent to you by email or go to the DCS Dashboard, click the DCS Settings tile, then the Backup and Restore tile. Or go to Start – Document Conversion Service 3.0 – DCS Backup and Restore.

Backing Up Configurations and Profiles
Select “Backup my DCS configurations and profiles” and click Next.

Select which configuration files and profiles you wish to backup and click Next.

You can change where to save the backup file and use a custom filename or use the default one.

Once you have confirmed what you wish to backup, click the Start Backup button to create the backup zip file.

Restoring Backup File
Select “Restore my DCS configuration from saved files” and click Next.

Browse or enter the path and filename of the backup file. The Restore window will then show which files can be restored based on which files were saved in the zip file. Click Next.
Select which files you wish to restore from the backup file and click Next.
Starting with version 3.0.031, new built-in converters for Adobe PDF files, text documents, and image files are available. These converters do not require any third-party applications to be installed. Leave unchecked if you want to continue using the original converters.
Once you have confirmed what you wish to restore, click the Start Restore button.
The tool will then merge the saved DCS configuration file with the latest DCS configuration file. If there are any syntax errors, click the Edit button to go to the problem line so you can correct the error. If there are no errors, click Next.
The merged file opens for you to verify if it is configured correctly. When done, click Accept Changes.
The tool will then merge the saved Watch Folder configuration file with the latest Watch Folder configuration file. If there are any syntax errors, click the Edit button to go to the problem line so you can correct the error. If there are no errors, click Next.
The merged file opens for you to verify if it is configured correctly. When done, click Accept Changes.
The last step is to copy your newly merged files and merge any saved profile files. Click Exit to close the tool.
What version of the product is installed on my system?
Beginning with version 3.0.031, Document Conversion Service now includes a DCS Dashboard that displays information about which version you have installed and your current license status.
Open the DCS Dashboard from the desktop shortcut, the Windows Start menu tile, or through the Windows menu, Start – Document Conversion Service 3.0 – DCS Dashboard. The product version is shown in the upper left.

For versions of DCS prior to 3.0.031, you will not have the dashboard. You can find the installed version listed the installed Apps, or Programs and Features list. The steps to access this list for different versions of Windows are shown below.
Windows 10/11 and Windows Server 2016/2019/2022
-
- Right-click the Windows icon
 on the start bar.
 - Click the gear icon
 to open the Settings app.
 - For Windows 10/11, click the Apps tile, then select Apps & features on the left. On Windows Server 2016/2019/2022, click System, then Apps & features on the left.
- Scroll down your list of installed programs to find Document Conversion Service. 3.0 and select it. The installed version number is shown below the product name when it is selected in the list.
- Right-click the Windows icon

Windows 8 and Windows 2012
-
- Click the Windows logo key +I.
- Click Control Panel.
- Under Programs, click Uninstall a program.
- Check the Version column for the version you have installed.
- Click the Windows logo key
![]()
Windows 7 and Windows 2008 R2
-
- From the Start Menu click on Control Panel.
- Under Programs. click Uninstall a program.
- Check the Version column for the version you have installed.
![]()
How do I find my serial number?
If you have yet to activate your product please sign into your PEERNET online account to obtain your serial number. Your online account contains a complete list of your purchased products with the applicable serial number and software download link.
If you have installed and activated Document Conversion Service 3.31 or later, you can view your serial number in the upper left corner of the DCS Dashboard.

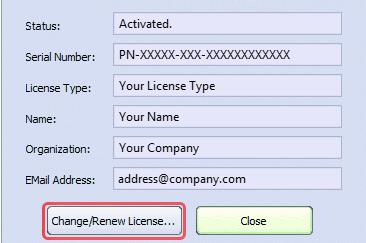
For previous versions, if your product has been activated, you can view your activation information, including your serial number, by clicking Start – All Programs – PEERNET Document Conversion Service – License…
How do I license my software?
All PEERNET software is licensed by entering your serial number into our license wizard, which activates and authenticates your license by communicating with the PEERNET License Server via the Internet.
If the computer you are licensing does not have an internet connection, we offer a manual licensing process where you email a PROD ID (PNPRodID.txt) file to [email protected]. We authenticate this file and return a PROD AU (PNProdAU.txt) file to you to import and complete the licensing step.
Starting with Document Conversion Service 3.0.31, software licensing is performed through the Activate Product tile in the DCS Dashboard.
If your software is already licensed, this tile is labeled License Wizard instead, and from here you can modify or renew your subscription. Detailed instructions on activating your software can also be found in the how-to article Document Conversion Service Tutorial: Activate Your License.

Before version 3.0.31, you do not have a Dashboard. Use the license wizard from Start – Document Conversion Service 3.0 – License... to activate your software.
For detailed instructions on how to license Document Conversion Service for versions before 3.0.31, please see the video below:
In addition, detailed instructions on activating your software can also be found in the Document Conversion Service User Guide.
How do I license my software if my server is not connected to the Internet?
If the computer you are on does not have access to the Internet, you must send us a manual license file that we authorize and return to you to complete your activation.
For complete manual licensing steps, see the section on activating without internet access in the article Document Conversion Service Tutorial: Activate Your License.
Why is the licensed software now in Trial mode?
If your previously licensed software is now in Trial mode, something on the computer changed to make the software believe it is no longer activated.
Examples of actions that can affect the license validity are:
- change of domain or workgroup
- change in the network
- change in the computer name
- reformatting and reloading the computer
- system has virus
In this situation, you must re-license the computer using your existing serial number.
If you are re-licensing and the computer is identical, re-licensing using the License Wizard will automatically update the license without requiring a license adjustment.
When moving the software to another computer or if your computer identity has changed, you must request a license adjustment. A license adjustment is when PEERNET adjusts your serial number to un-license your existing computer to allow you to license your new computer using the same serial number.
Customers with active subscription licenses have the authority to request license adjustments. To do so, email [email protected] with your Serial Number, the name of your computer, and the reason for the license adjustment so the reset can be authorized and completed. PEERNET will reply when your license is adjusted, and you can proceed to license the software.
NOTE: The latest software download and serial number are available in your PEERNET online account.
If you do not have an active subscription license, PEERNET cannot authorize your request. You will need to do one of the following to re-license your computer:
- If you are running the current version:
- Add a subscription license, or
- Purchase an additional license to be used on your new computer
- if you are running a non-current version you need to Purchase an Upgrade to the latest version,
Please go to your PEERNET online account and select either Purchase Subscription, Add License, or Purchase Upgrade.
How do I re-license the software?
If you are re-licensing and the computer is identical, re-licensing through the License Wizard will automatically update the license without requiring a license adjustment.
When moving the software to another computer or if your computer identity has changed, you must request a license adjustment. A license adjustment is when PEERNET adjusts your serial number to un-license your existing computer to allow you to license your new computer using the same serial number.
To do so, email [email protected] with your serial number, the name of your old server, and the reason for the license adjustment so the reset can be authorized and completed.
PEERNET will reply when your license is adjusted, and you can proceed to license the software. The PEERNET team will work with you to accommodate migration processes when you need an overlap period where both your old and new servers are licensed to accommodate migration processes.
NOTE: The latest software download and serial number are available in your PEERNET online account.
How do I move my license from one server to another?
When moving the software to another computer, you must request a license adjustment.
A license adjustment is when PEERNET adjusts your serial number to un-license your existing computer to allow you to license your new computer using the same serial number.
To do so, email [email protected] with your serial number, the name of your old server, and the reason for the license adjustment so the reset can be authorized and completed.
PEERNET will reply when your license is adjusted, and you can proceed to license the software on the new computer. The PEERNET team will work with you to accommodate migration processes where you may need an overlap period where both your old and new servers are licensed to accommodate migration processes.
NOTE: The latest software download and serial number are available in your PEERNET online account.
How do I license my server if I had to re-format it?
In this situation, you must re-license the software on your reformated server. A license adjustment request is required when re-installing the software on a server whose identity has changed.
A license adjustment is when PEERNET adjusts your serial number to un-license your existing computer to allow you to license your new computer using the same serial number.
To do so, email [email protected] with your serial number, the name of your old server, and the reason for the license adjustment so the reset can be authorized and completed.
PEERNET will reply when your license is adjusted, and you can proceed to license the software. The PEERNET team will work with you to accommodate migration processes where you may need an overlap period where both your old and new servers are licensed to accommodate migration processes.
NOTE: The latest software download and serial number are available in your PEERNET online account.
What do I need to do to start DCS back up if my subscription has expired?
If your subscription has expired, you must log in to your PEERNET online account and renew your subscription for your Document Conversion Service (DCS) serial number.
If your server has Internet access, restarting DCS after renewing your subscription will automatically update the license with your new subscription and allow DCS to start.
If your server does not have Internet access, you must update the license using our manual licensing steps. For Document Conversion Service 3.0.031 and later versions, see the manual licensing steps for Renewing Your Annual Subscription.
If you are running a previous version of DCS (3.0.30 or earlier) and the computer does not have an internet connection, do the following steps.
- Click Start – Programs – Document Conversion Service – License… to open the License Wizard.
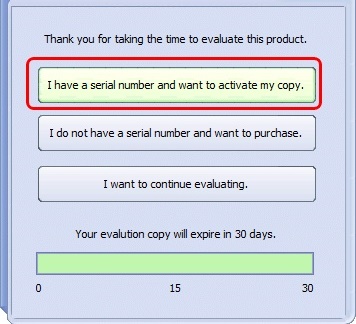
- Click the “Change/Renew License” button.

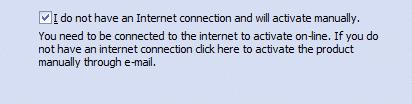
- Click “I do not have an Internet connection and will activate manually.”, then click Next.

- Click Next.
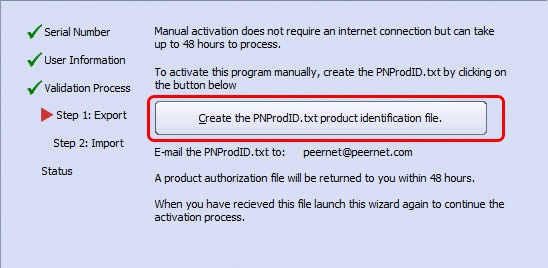
- Click “Create the PNProdID.txt product identification file” to generate a PNProdID.txt file.

- You can click Finish to close the License Wizard window.
- Email the PNProdID.txt file to [email protected].
- We will complete the authorization process and email you the PNProdAU.txt file you need to import to update your subscription. PNProdID files will be received and authorized during our business hours, 9:00 AM to 5:00 PM EST.
- Copy the authorized PNProdAU.txt file to your server.
- Click Start – Programs – Document Conversion Service – License….
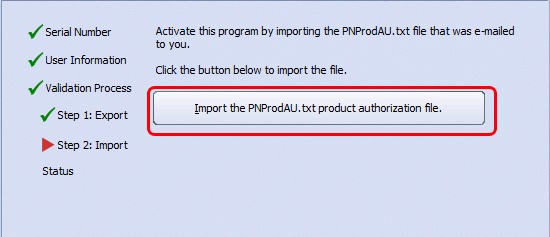
- Click “Import the PNProdAU.txt product authorization file.” to import the PNProdAU.txt file.

- Follow the prompts to import the file and update your subscription dates.
- Once updated, you can then restart DCS.
How do I update my DCS license on my servers after an OGS renewal?
After you renew your subscription for another year, the license file on each server needs to be updated to recognize the new renewal period. If your server has Internet access, this will happen automatically.
Document Conversion Service – Versions 3.0.031 and Later
If you have Document Conversion Service 3.0.031 or later, launching the DCS Dashboard will update the license automatically. If it does not, such as when your subscription has expired, follow the steps for Changing Your Activation Status.
If your server does not have Internet access or is limited by a firewall, you must update the license using our manual licensing steps. See our manual licensing steps for Renewing Your Annual Subscription.
Document Conversion Service – Versions Before 3.0.031
If you are running a previous version of DCS (3.0.30 or earlier) and your computer does not have an internet connection or is limited by a firewall, please see the next FAQ “What do I do to update the renewal date on my DCS server if my server has no internet connection?”
If you have an internet connection and you’d prefer to initiate the license update immediately, then you will need to do the following steps:
- Click Start – Programs – Document Conversion Service – License.
- Click the Change/Renew License button.
- Click NEXT on the prompt screens and then FINISH on the last screen to update the renewal period.
- Now your renewal date has been updated for Document Conversion Service on your server.
How do I update the renewal date on my DCS server if my server has no internet connection?
You will need to do the following before the expiry date for your subscription license, or else the Document Conversion Service will stop running.
First, you must log into your PEERNET online account and renew your subscription for your Document Conversion Service (DCS) serial number.
Next, on each server, stop your application or the Watch Folder Service, depending on how you pass files to DCS to convert. When that has stopped, stop the Document Conversion Service.
After renewing your subscription for another year and stopping all running DCS services, the next step is to update the license file on each server to recognize the new renewal period. Since the server does not have Internet access, you must update the license using our manual licensing steps.
Renewing License Subscription Dates for DCS 3.0.031 and Later:
For complete manual licensing steps, see the user guide section on renewing without an internet connection.
After updating your license file with the new subscription dates, restart Document Conversion Service first, then Watch Folder Service or your custom program for converting files.
Renewing License Subscription Dates for DCS 3.0.030 and earlier:
If you are running DCS 3.0.030 or earlier, follow the steps below to renew your subscription for another year.
- Click Start – Programs – Document Conversion Service – License.
- Click the “Change/Renew License” button.
- Click “I do not have an Internet connection and will activate manually.” and click Next.
- Click Next.
- Click “Create the PNProdID.txt product identification file” to generate a PNProdID.txt file.
- You can click Finish to close the License Wizard window.
- Email the PNProdID.txt file to [email protected].
- We will complete the authorization process and email you back a PNProdAU.txt file to import back onto your computer. PNProdID files are authorized during business hours, which are Monday to Friday 9:00AM to 5:00PM EST.
- Click Start – Programs – Document Conversion Service – License.
- Click “Import the PNProdAU.txt product authorization file.” to import the PNProdAU.txt file.
- Now your renewal date has been updated for Document Conversion Service on your server.
After updating your license file with the new subscription dates, restart Document Conversion Service first, then Watch Folder Service or your custom program for converting files.
What products create Adobe PDF/A compliant documents?
The following PEERNET products can be configured to create Adobe PDF documents that are PDF/A compliant:
How do I monitor the server from a different computer?
To monitor the Document Conversion Service from another computer, do the following:
On the server where Document Conversion Service is running:
- Open the file C:/Program Files/PEERNET Document Conversion Service 3.0/Core/silogconfig.txt.
- Change “connections = … , tcp(host=”localhost“, port=”49600″, …” to “connections = … , tcp(host=””, port=”49600″, …”
On the computer where you will be monitoring the running conversion service:
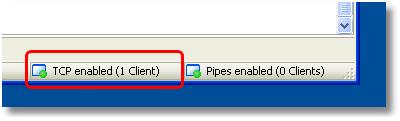
- Copy the Smart Inspect Redistributable Console files from From the computer where Document Conversion Service is installed. These files are located in the folder C:/Program Files/PEERNET Document Conversion Service 3.0/Gurock Smart Inspect.
- Run SmartInspectConsole.exe.
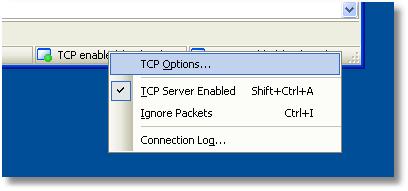
- Right click “TCP enabled” in bottom right of screen.

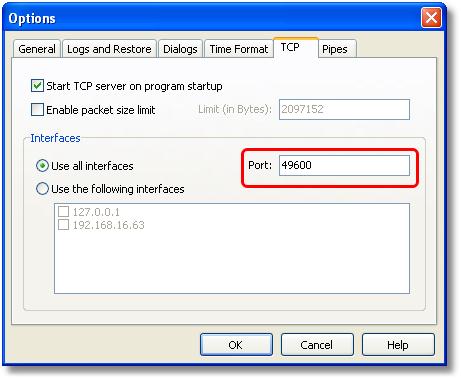
- Click “TCP Options…”.

- Enter “49600” in the port field.

- Click OK.
When running, the Smart Inspect Redistributable Console will display the information from the server when Document Conversion Service is running.
How can you identify when DCS is ready?
Document Conversion Service creates an event named “GlobalPNDocConv_Running” and sets this event when it is ready to start receiving files.
You can open this event and test if it has been signaled (set) and this tells you that Document Conversion Service is ready to process files.
Why can I not see my AutoCAD paper sizes or why is the paper size incorrect?
When AutoCAD is installed it adds a collection of new paper sizes, the most commonly used being ARCH C, D and E. To use these new paper sizes you need to manually add these paper sizes, or forms, to the list of all paper sizes available on your computer.
Below are the necessary steps to add the AutoCAD paper sizes so they are visible when using a PEERNET printer.
IMPORTANT: Please close all applications before making these changes.
Windows 10 and Windows Server 2016
- Right click the Windows icon on the start bar.
- Click Control Panel.
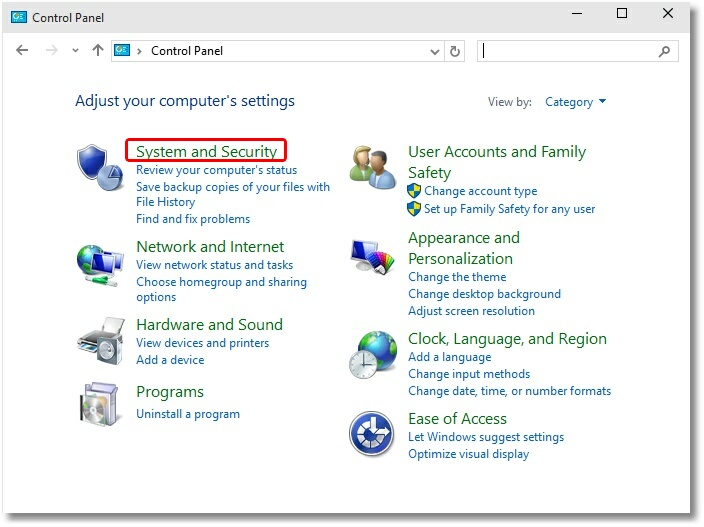
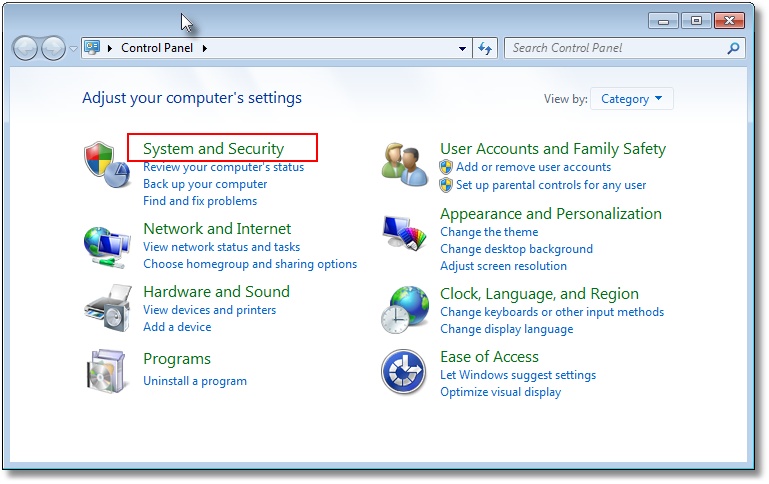
- Click System and Security.
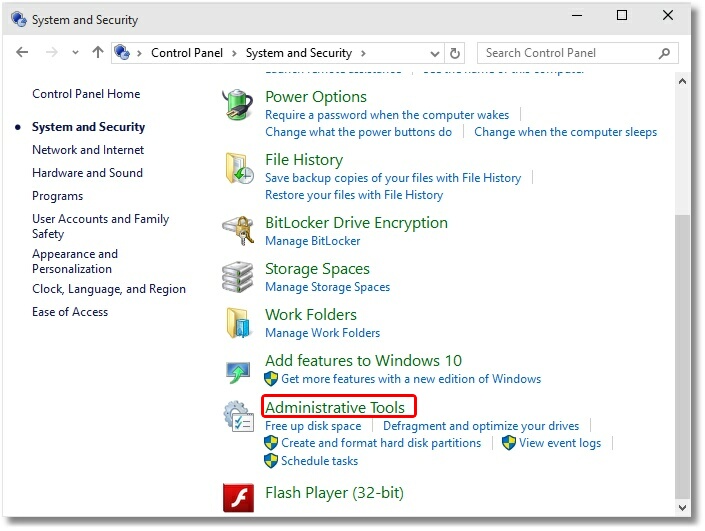
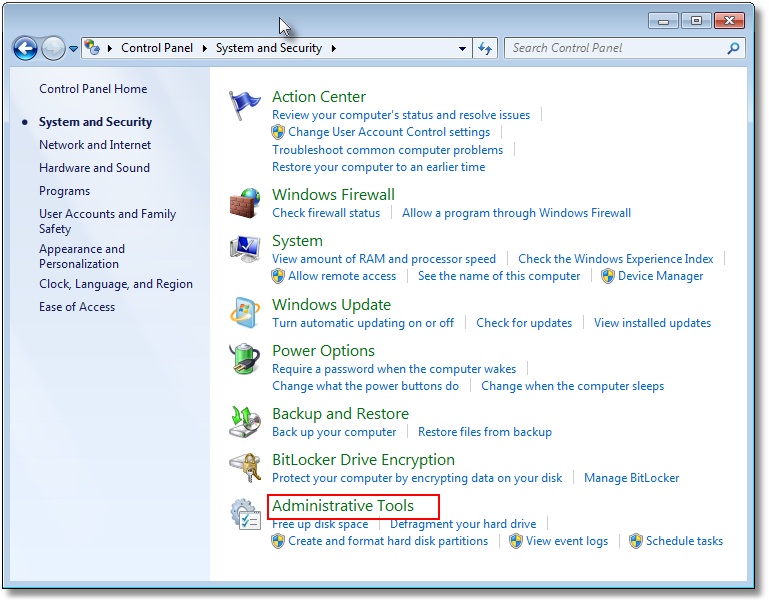
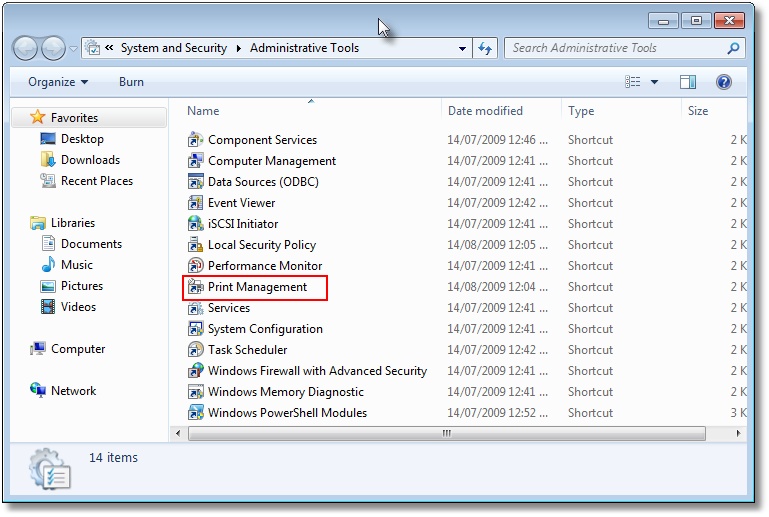
- Click Administrative Tools.
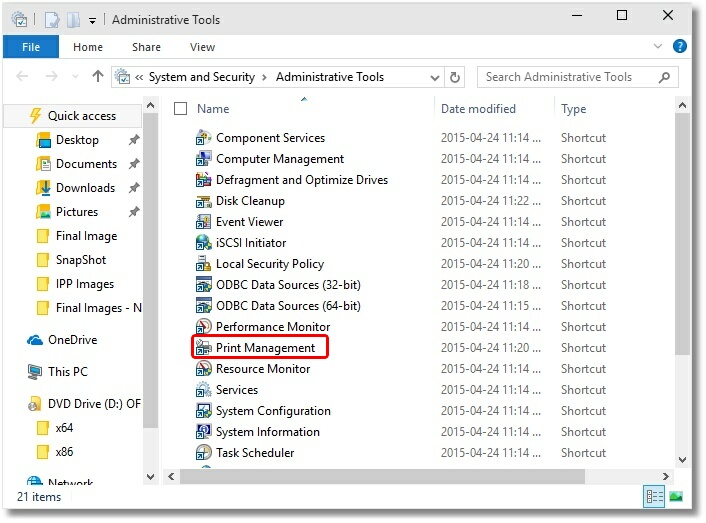
- Double click Print Management.
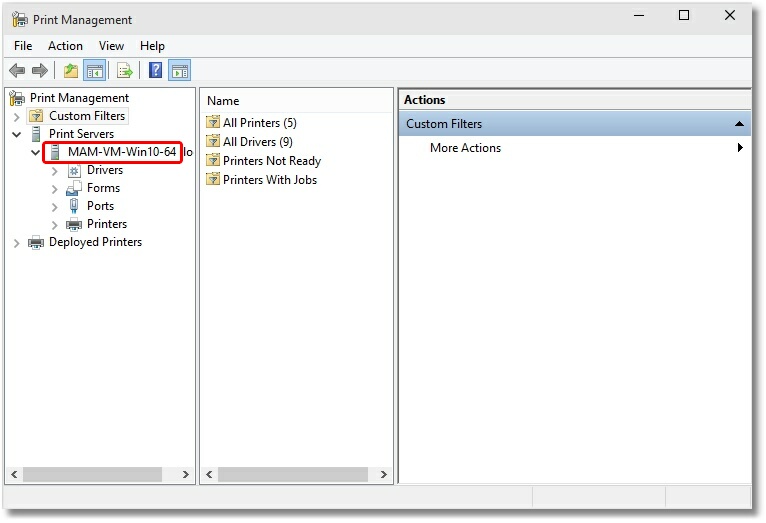
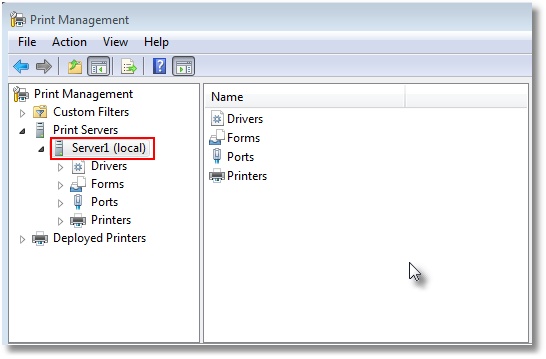
- Select Print Servers and then select the name of your computer (ie Server1).
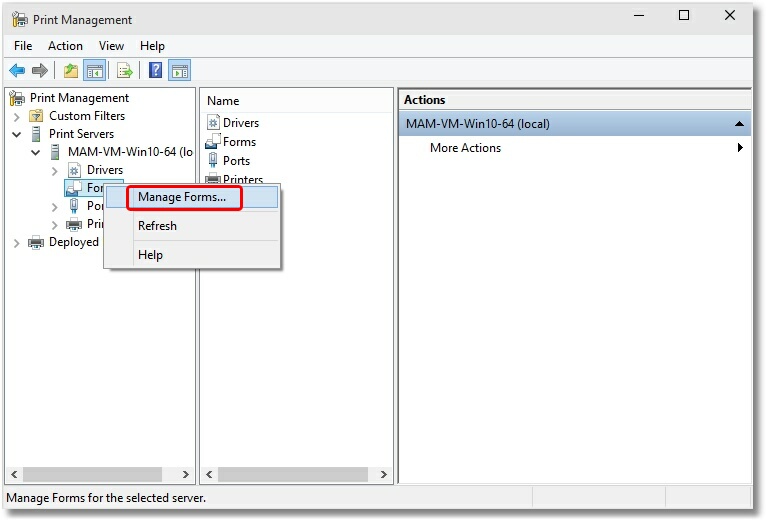
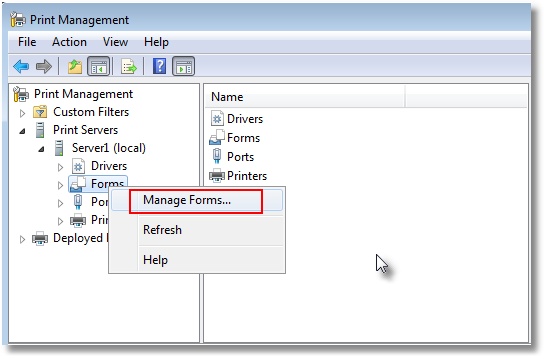
- Right click Forms item and select Manage Forms.
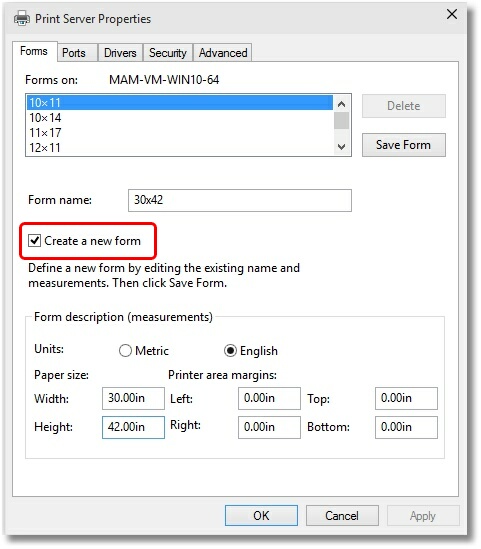
- Check “Create a new form”.
- Enter a descriptive name in the “Form name:” field (e.g. “30 x 42” or “36 x 48”).
- Set the Measurement units to “English” or “Metric”.
- Enter the desired Width and Height for your paper size. NOTE: Always make the Width less than the Height (e.g. Width 30, Height 42) as you can always choose Landscape orientation later.
- Click “Save Form”.
- Repeat steps 8-12 for each new paper size you want to create.
- Click Close when you are done.
- Open your drawing in AutoCAD. Select File – Plot, and in the Plot dialog, set the Plot device to the applicable PEERNET printer.
- On the Plot Settings tab, select the desired paper size, orientation (Landscape), and scale (Scale to fit), and click OK.
Windows 8 and Windows 2012
- Click the Windows logo key +I.
- Click Control Panel.
- Click System and Security.
- Click Administrative Tools.
- Double click Print Management.
- Select Print Servers and then select the name of your computer (ie Server1).
- Right click Forms item and select Manage Forms.
- Check “Create a new form”.
- Enter a descriptive name in the “Form name:” field (e.g. “30 x 42” or “36 x 48”).
- Set the Measurement units to “English” or “Metric”.
- Enter the desired Width and Height for your paper size. NOTE: Always make the Width less than the Height (e.g. Width 30, Height 42) as you can always choose Landscape orientation later.
- Click “Save Form”.
- Repeat steps 8-12 for each new paper size you want to create.
- Click Close when you are done.
- Open your drawing in AutoCAD. Select File – Plot, and in the Plot dialog, set the Plot device to the applicable PEERNET printer.
- On the Plot Settings tab, select the desired paper size, orientation (Landscape), and scale (Scale to fit), and click OK.
On Windows 7 and Windows 2008 R2
- Go to Start – Control Panel.
- Click System and Security.
- Click Administrative Tools.
- Double click Print Management.
- Select Print Servers and then select the name of your computer (ie Server1).
- Right click Forms item and select Manage Forms.
- Check “Create a new form”.
- Enter a descriptive name in the “Form Description for:” field (e.g. “30 x 42” or “36 x 48”).
- Set the Measurement units to “English” or “Metric”.
- Enter in the desired Width and Height for your paper size. NOTE: Always make the Width less than the Height (e.g. Width 30, Height 42) as you can always choose Landscape orientation later.
- Click “Save Form”.
- Repeat steps 7-11 for each new paper size you want to create.
- Click Close when you are done.
- Open your drawing in AutoCAD. Select File – Plot, and in the Plot dialog, set the Plot device to the applicable PEERNET printer.
- On the Plot Settings tab, select the desired paper size, orientation (Landscape), and scale (Scale to fit), and click OK.
On Windows Vista and Windows 2008
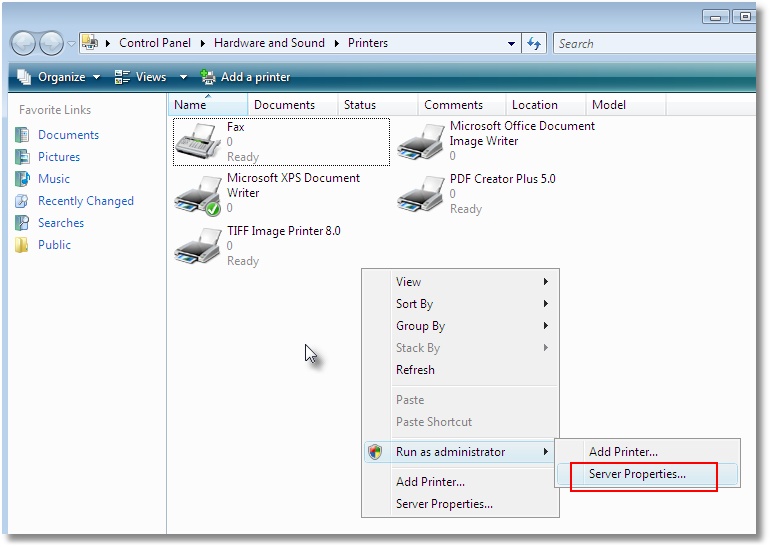
- Open the Printers folder from the Start – Control Panel – Hardware and Sound – Printers.
- Right click in the window and select Run as Administrator – Server Properties.
- On Print Server Properties, click the Forms tab.
- Check “Create a new form”.
- Enter a descriptive name in the “Form name:” field (e.g. “30 x 42” or “36 x 48”).
- Set the Measurement units to “English” or “Metric”.
- Enter the desired Width and Height for your paper size. NOTE: Always make the Width less than the Height (e.g. Width 30, Height 42) as you can always choose Landscape orientation later.
- Click “Save Form”.
- Repeat steps 4-8 for each new paper size you want to create.
- 10. Click Close when you are done.
- Open your drawing in AutoCAD. Select File – Plot, and in the Plot dialog, set the Plot device to the applicable PEERNET printer.
- On the Plot Settings tab, select the desired paper size, orientation (Landscape), and scale (Scale to fit), and click OK.

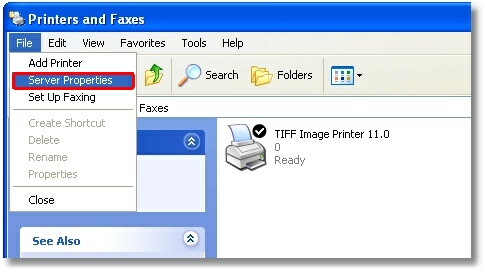
On Windows XP and Windows 2003
- Open the Printers folder from Start – Settings – Printers and Faxes.
- In the Printers folder window menu, select File – Server Properties.
- In the Server Properties dialog, on the Forms tab, check “Create a New Form”.
- Enter a descriptive name in the “Form name:” field (e.g. “30 x 42” or “36 x 48”).
- Set the Measurement units to “English” or “Metric”.
- Enter the desired Width and Height for your paper size. NOTE: Always make the Width less than the Height (e.g. Width 30, Height 42) as you can always choose Landscape orientation later.
- Click “Save Form”.
- Repeat steps 3-7 for each new paper size you want to create.
- Click OK when you are done.
- Open your drawing in AutoCAD. Select File – Plot, and in the Plot dialog, set the Plot device to the applicable PEERNET printer.
- On the Plot Settings tab, select the desired paper size, orientation (Landscape), and scale (Scale to fit), and click OK.
What folders should I exclude from my Anti-virus Scans?
If you have anti-virus software installed on your computer you should configure your antivirus software to exclude the print spool directory and certain key driver files from the real-time scan. These files are accessed many times during each print cycle and scanning them repeatedly can impact greatly on your printing performance, as well as potentially causing the trigger to expired mode.
You should consider excluding the following driver files & folders:
– %SystemRoot%System32spool
– C:/ProgramData/PEERNET
– any printer script file (if you have created or are using one)
Text faint or wrapped wrong for text (.txt) files in DCS?
A built-in text-to-PDF and text-to-image converter was added to the Document Conversion Service in version 3.0.031.
This new converter replaces the old method of using Microsoft Word to convert files that could result in faint and wrapped text. The new converter offers automatic page size and character encoding, plus customization features for setting the font, font size, and page size.
If you want to continue using Microsoft Word to convert text files, read on to see why the text is so faint, and how to handle faint text and incorrectly wrapped lines.
When Microsoft Word opens a text file, it automatically displays the text using the built-in style of Plain Text. Older versions of Office use Courier New, point size 10 for this style, while versions after 2007 use Consolas, point size 10.
Both of these are very thin-stroked fonts that can lose clarity when imaged. This change in the font can also cause the text to wrap differently from its original format.
Solution: By modifying the font that Word uses to display text files you can get clearer text in your output file. This solution can be applied to all versions of WORD, but it does change the Normal.dot template.
In Word 2007 and higher:
- Open a text file (.TXT) in Word.
- Press Ctrl+Alt+Shift+S to open the Styles window.
- Right click the style labeled Plain Text and select Modify from the menu.
- Select the desired font and font size you wish to use.
- Select “New documents based on this template”.
- Click OK to close the Modify Style dialog and apply your style changes.
- Click File – Options
- Click Advanced tab in left column.
- On right, scroll to bottom to the General section.
- Click the Web Options button.
- Click Fonts tab.
- Change the font for Fixed-width Font you wish to use.
- Click OK.
- Close Word.
In Word 2003:
- From the Format menu, select Styles and Formatting….
- From the Styles and Formatting pane, highlight Plain Text in the list of styles. If this style is not listed, make sure the option to show All styles is selected in the combo box at the bottom of the pane.
- Click the down arrow on the right of the highlighted Plain Text style and select Modify… from the menu.
- Select the desired font and font size you wish to use.
- In the Modify Style dialog box, check the Add to template checkbox.
- Select OK to close the Modify Style dialog and apply your style changes.
- Click File – Options
- Click Advanced tab in left column.
- On right, scroll to bottom to the General section.
- Click the Web Options button.
- Click Fonts tab.
- Change the font for Fixed-width Font you wish to use.
- Click OK.
- Close Word.
Now when you convert a text file with Document Conversion Service it will use the the font and font size chosen above.
Does DCS have OCR (Optical Character Recognition) Functionality?
Document Conversion Service can create searchable PDF files when the original file is searchable, like Word, Excel, a text file, etc.
Beginning with version 3.0.031, Document Conversion Service can convert scanned PDF files and images to searchable PDF files. See our blog article, Batch OCR PDF – Make PDF Searchable, for details.
Document Conversion Service versions before 30.031 could not convert scanned PDF files and images to a searchable PDF.
LATEST NEWS
 PNSrv11Lib to PNSrv12Lib: Migration Made EasyMarch 14, 2025 - 2:10 pm
- Migrating to Version 12: Compatibility Mode Quick Start GuideMarch 14, 2025 - 2:09 pm
- Well Logs: Stitch PDF Pages into a Continuous TIFF ImageMarch 14, 2025 - 2:08 pm
- Dynamic Stamp ContentNovember 4, 2024 - 4:47 pm