The Save Options tab holds all of the most frequently used settings. On this tab you can choose output type, color settings and file location.
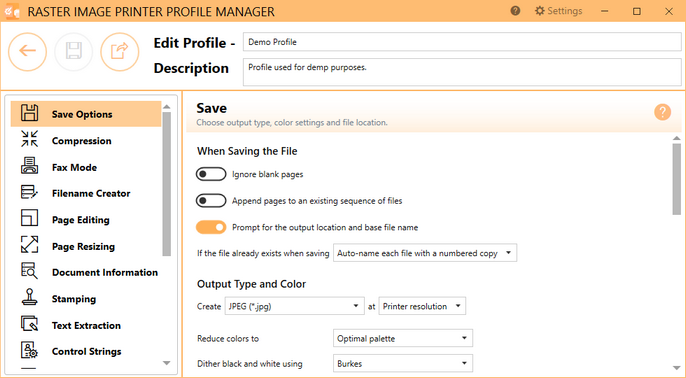
When Saving the File
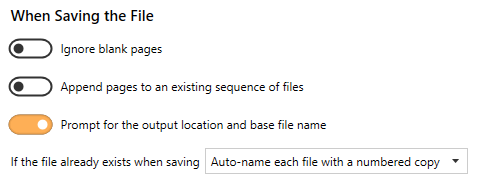
Ignore blank pages
By default this setting is disabled. Enabling this setting means that blank pages will be omitted from the output file.
Append pages to an existing file / Appending pages to an existing sequence of files
By default this setting is disabled. Enabling this setting means new files, of the same base file name and saved to the same output folder, will be appended to an existing file or existing sequence. Appending pages to an existing file applies to multipaged file formats where you are merging multiple documents into a single file. Appending pages to an existing sequence of files applied to serialized file formats where you want to create a single file for each page of your document.
See Also: Appending Multiple Files Into a Single File
Prompt for the output location and base file name
By default this setting is enabled. Disabling this setting means that you will not be prompted with the Save As dialog to choose where you want save the output file after each print. When disabling prompting, it is important to consider how to handle overwrite situations.
Raster Image Printer offers three options for "If the file already exists when saving":
1.Auto-name each file with a numbered copy (default)
2.Show prompt to let me choose my action
3.Always overwrite the existing file (Warning! This option means that if a file of the same name already exists, it will be replaced by the new file and no warning dialog will be shown).
4.Show error message if file exists
See Also: Save Files Without Prompting
Output Type and Color
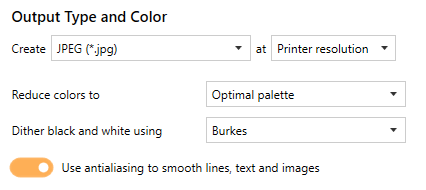
Output Type
Raster Image Printer can create a range of output types:
•TIFF Multipaged (*.tif)
•TIFF Serialized (*.tif)
•Adobe PDF Multipaged (*.pdf)
•Adobe PDF Serialized (*.pdf)
•JPEG (*.jpg)
•CompuServe GIF (*.gif)
•CompuServe PNG (*.png)
•Windows BMP (*.bmp)
•Targa (*.tga)
•Adobe Photoshop 3.0 (*.psd)
•ZSoft PCX (*.pcx)
•ZSoft DCX (*.dcx)
•CALS Type 1 (*.cal)
See Also: Change Output Type
Resolution
This setting specifies the print resolution, or DPI (Dots Per Inch) of the output file. By default, resolution is set to Printer Resolution. This means that the print resolution of your output file will match the printing resolution used when your printing application renders your information and sends it to Raster Image Printer. The default printing resolution is 300 DPI. You can change the printing resolution of your printing application through either Printer Management or on the Printer Properties screen within your printing application. If you need to change the resolution of your output file, we recommend changing the resolution used when your printing application renders your information, rather than changing the resolution through the profile.
Higher resolutions produce graphic images that are sharper and show finer detail, but are also very large if they are not compressed. Low-resolution images are not of as high a quality, but they take up less disk space. In general, Raster Image Printer will perform a readable text conversion at any resolution. If your document contains graphics, you may want to use one of the higher resolution settings. Resolution is only applicable to image file formats and is therefore unavailable when creating searchable Adobe PDF files.
Color Reduction
By default, color reduction is set to reduce colors to optimal palette. Several color reduction options are available for reducing the number of colors in the output files. In general, the fewer the colors in an image, the smaller the file size. If the output file type chosen does not support that color mode, the closest match is found.
•Optimal palette - Reduces each page down to the smallest number of colors needed to represent the page. Each page is counted separately, meaning the end result can be a file containing a mix of black and white, greyscale and color pages. If your pages are mixed black and white with occasional color, this method will often result in the smallest size file.
•Black and white - All pages are reduced to monochrome, or black and white. This color reduction method uses the Dithering Method chosen to smooth the appearance of the text and information on the page.
•Greyscale - Pages are reduced to a greyscale image composed exclusively of shades of neutral gray.
•256 color palette - Reduce each page down to 256 colors.
•16 color palette - Reduce each page down to 16 colors.
•Optimal palette, maximum 256 colors - Reduces each page down to the smallest number of colors needed to represent the page. Any color pages that result in more than 256 colors are reduced to 256 colors.
•Optimal palette, maximum16 colors - Reduces each page down to the smallest number of colors needed to represent the page. Any color pages that result in more than 16 colors are reduced to 16 colors.
•Optimal palette, using 32-bit color - Reduces each page down to the smallest number of colors. Uses a 32-bit palette to improve the appearance of single color gradients in final images when applying color reduction.
•None - No color reduction is done.
Dithering Method
By default, dithering method is set to Burkes. Dithering greatly enhances the appearance of color images that have been reduced to black and white. Because the same dithering method may produce different results in different situations, it is best to experiment when trying to determine the best dithering method for a given source image.
 Original image |
 Floyd-Steinberg |
 Burkes |
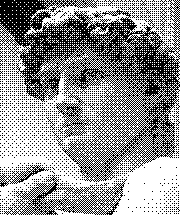 Bayer |
 Halftone |
Use antialiasing to smooth lines, text and images
Antialiasing makes text, lines and images smoother and more legible. By default this setting is enabled. It is not used when creating vector PDF, when reducing the image to black and white, or when fax mode is enabled for black and white fax images.
See Also:
Reduce Searchable PDF File Size
Reduce Non-Searchable PDF File Size
Output Location

Output folder
This is the default directory for saving your output files.
When prompting is enabled, and this field blank, Raster Image Printer will default to the last used folder, if this is set in the printer options. If there is no last used folder, the My Documents folder is used. When prompting is disabled, the My Documents folder is always used.
Select the folder icon to browse to your desired folder location or enter in the absolute path (for example, C:\My Files) of the directory to be used. If the path entered does not exist, an error message will appear giving you the option to create the new folder now or wait to create the new folder during conversion.
For advanced users and programmers automating the printer, environment variables and registry keys can be used to specify all or part of the output folder, as explained in Using Environment Variables and Registry Keys.
See Also: Change Where the Files are Saved
Output File Name
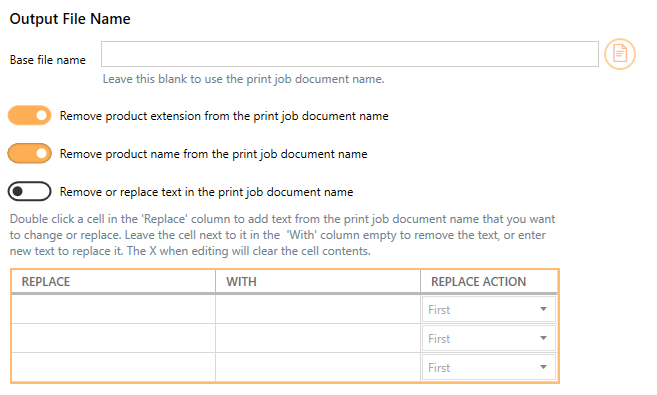
Base file name
This is the base filename for your output file. If this field is empty, the document name associated with the print job as submitted to the print queue will be used as the filename.

The base filename excludes any directory path and file extension. If you want your files to always use the same filename, enter that name here. Select the folder icon to browse to an existing filename on your computer.
Advanced file naming options are available on the Filename Creator tab.
For advanced users and programmers automating the printer, environment variables and registry keys can be used to specify all or part of the base filename, as explained in Using Environment Variables and Registry Keys.
Remove product extension from print job document name
By default this setting is enabled. Raster Image Printer automatically appends the appropriate file format extension of the new output file type in addition to any original extension that was part of the print job document name. When enabled, this setting removes any extension from the print job document name. Disabling this setting means that, in addition to the output file extension, the file extension from the original print job document name will also be maintained in the output filename.
Remove product name from print job document name
By default this setting is enabled. Some commonly used applications precede the print job document name with the name of their product and a hyphen (-). This option will remove the text up to the hyphen and a trailing space. It also looks for and removes the trailing text '- Notepad' from documents printed from Notepad. Disabling this setting means that the product name from the print job will be maintained in the output file name.
Remove or replace text in print job document name
By default this setting is disabled. When enabled, this setting allows you specify up to three pieces of custom text that can be removed or replaced in the print job document name.
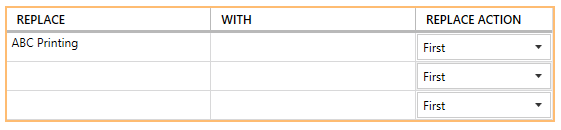
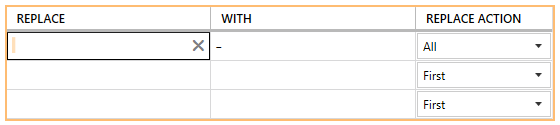
If any of the strings entered in the Replace column are found in the print job document name, they will be replaced with the corresponding text in the With column. When replacing text you can choose to replace only the First occurrence of the text, the Last occurrence of the text or All occurrences of the text in the print job document name.
Leave the With column text empty to remove that string, or enter different text to replace it. The string match is case sensitive, which means it must be an exact match of upper case and lowercase letters. The Replace text cannot be an empty string when there is corresponding With text, but you can enter a single space or other special characters.
The example below will remove the first occurrence of the string 'ABC Printing' from the print job document name.
This example shows how to replace all instances of a space character in the file name with an underscore '_' character. The space in the Replace column is shown selected for visibility below. Multiple blanks in a row will be replaced with the same amount of underscore characters.
File Splitting
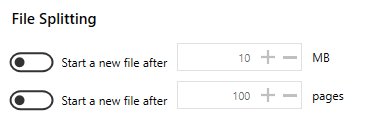
File splitting is only available for multipaged file formats (ex. TIFF Multipaged, PDF Multipaged, ZSoft DCX)
Split after size
By default this setting is disabled. Enabling this setting means your file will be split into a new file based on a size threshold. The file will be split when the size exceeds the threshold. When file splitting is enabled, the file splitting naming scheme is always used to name each file in the sequence. File size and page count splitting can be used together.
Split every N pages
By default this setting is disabled. Enabling this setting means your file will be split into a new file based on the page count. When file splitting is enabled, the file splitting naming scheme is always used to name each file in the sequence. File size and page count splitting can be used together.
See Also: Automatically Split Files