Note: The methods for reducing file size discussed in this topic only apply to searchable Adobe PDFs with embedded images. The resolution of images embedded in vector output can be reduced thereby creating an overall smaller file size.
The file size of your output Adobe PDF file can be reduced by adjusting the compression and image downsampling applied to any embedded images. Compression and Image Downsampling are controlled through the profile. The default compression and image downsampling options selected for the system profiles provided with Raster Image Printer will often give a good balance between file size and image quality.
Reducing the file size of your Adobe PDF file is largely dependent upon the input documents you are converting. If you require assistance reducing your file size, please contact PEERNET support.
Compression
Step by Step Instructions
1.Launch the Raster Image Printer Dashboard.

2.Select "Edit & Create Profiles" to open Profile Manager.
3.Select "Add a profile" to create a personal profile, or create a copy of one of our system profiles.
4.Name the profile, add a description, and click Save.
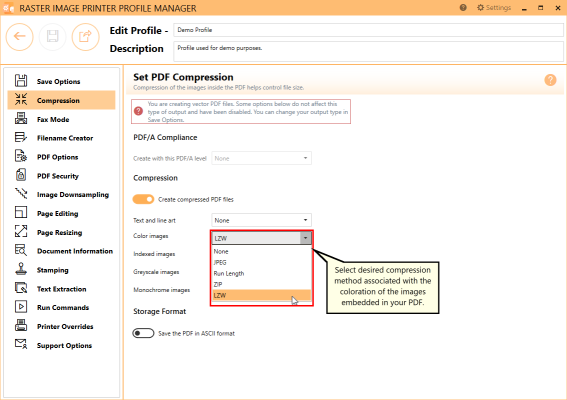
5.On the Compression tab, you can change the compression method applied to different images embedded in your Adobe PDF based on the coloration of the image. Typically you will only need to change the compression method if you have been instructed to do so by a publisher or archiving software. By default, PDF compression is enabled. Disabling PDF compression would increase your file size.

6.Click Save-Back, and close Profile Manager.
If you plan to use these settings regularly, you may wish to make this personal profile the default profile used by Raster Image Printer.
i.Select the printer you wish to edit and use the Profile drop box to select your desired default profile.
ii.Select "Manage Printers" to open Printer Management.
iii.Select the Save icon to save changes.
iv.Select the Home icon to return to the Dashboard.
7.Close the Dashboard. Now when you print your document to Raster Image Printer, the compression option you selected will be applied to the output Adobe PDF file.
Image Downsampling
Step by Step Instructions
1.Launch the Raster Image Printer Dashboard.

2.Select "Edit & Create Profiles" to open Profile Manager.
3.Select "Add a profile" to create a personal profile, or create a copy of one of our system profiles.
4.Name the profile, add a description, and click Save.
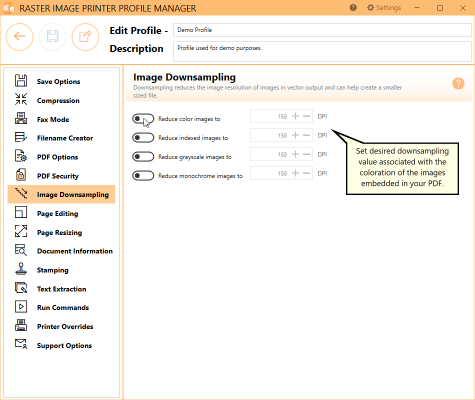
5.On the Image Downsampling tab, you can change the downsampling values applied to different images embedded in your Adobe PDF based on the coloration of the image. Downsampling can greatly reduce the amount of space it takes to store any images contained in your Adobe PDF file by reducing the resolution of the images. The side effect of reducing the resolution of the images is a reduction in the quality of the images.

6.Click Save-Back, and close Profile Manager.
If you plan to use these settings regularly, you may wish to make this personal profile the default profile used by Raster Image Printer.
i.Select the printer you wish to edit and use the Profile drop box to select your desired default profile.
ii.Select "Manage Printers" to open Printer Management.
iii.Select the Save icon to save changes.
iv.Select the Home icon to return to the Dashboard.
7.Close the Dashboard. Now when you print your document to Raster Image Printer, the image downsampling option you selected will be applied to the output Adobe PDF file.