The file size of your output JPEG images can be reduced by adjusting the color reduction and compression options. Color reduction and Compression are controlled through the profile. The default color reduction and compression options selected for the system profiles provided with Raster Image Printer will often give a good balance between file size and quality.
Reducing the file size of your JPEG images is largely dependent upon the input documents you are converting. An issue you may encounter is balancing file size with image quality. If you require assistance reducing your file size, please contact PEERNET support.

Color Reduction
Step by Step Instructions
1.Launch the Raster Image Printer Dashboard.
2.Select "Edit & Create Profiles" to open Profile Manager.
3.Select "Add a profile" to create a personal profile, or create a copy of one of our system profiles.
4.Name the profile, add a description, and click Save.
5.On the Save Options tab, under Output Type and Color, drop the box next to "Reduce colors to" and select your desired color reduction.
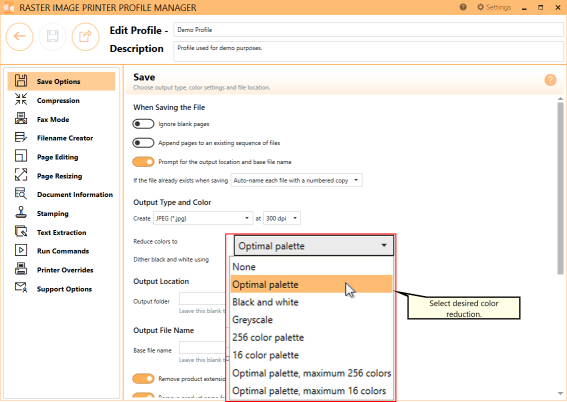
Color Reduction refers to the number of colors that are saved in the output JPEG image. The default setting is reduce colors to optimal palette which means that Raster Image Printer will reduce each page down to the smallest number of colors required to represent that page. Therefore all colors present in the original file will be maintained in the output JPEG image.
Other color reduction options include:
•Reduce to black and white
•Reduce to greyscale
•Reduce colors to 256 color palette
•Reduce colors to 16 color palette
•Reduce colors to Optimal color, maximum 256 colors
•Reduce colors to Optimal color, maximum 16 colors
•None
All of these other options will limit the number of colors saved in the output JPEG image to different degrees.
Reduce to greyscale will effectively reduce the file size of a picture file by converting the colored image to a greyscale image. Note that selecting reduce to black and white will just create a greyscale image because the JPEG file format does not support the creation of monochrome images.
6.Click Save-Back, and close Profile Manager.
If you plan to use these settings regularly, you may wish to make this personal profile the default profile used by Raster Image Printer.
i.Select the printer you wish to edit and use the Profile drop box to select your desired default profile.
ii.Select "Manage Printers" to open Printer Management.
iii.Select the Save icon to save changes.
iv.Select the Home icon to return to the Dashboard.
7.Close the Dashboard. Now when you print your document to Raster Image Printer, the color reduction option you selected will be applied to the output JPEG image.
Compression
Step by Step Instructions
1.Launch the Raster Image Printer Dashboard.
2.Select "Edit & Create Profiles" to open Profile Manager.
3.Select "Add a profile" to create a personal profile, or create a copy of one of our system profiles.
4.Name the profile, add a description, and click Save.
5.On the Compression tab, you will see two compression options based on the color reduction option selected on the Save Options tab. Be sure that you are changing the correct compression option in relation to the color reduction option selected. JPEG compression is determined by selecting the JPEG quality level. The higher the image quality selected, the larger the file size. By default, JPEG compression is set at Medium quality. You can experiment with lowering the image quality but this will degrade the output image quality.

6.Click Save-Back, and close Profile Manager.
If you plan to use these settings regularly, you may wish to make this personal profile the default profile used by Raster Image Printer.
i.Select the printer you wish to edit and use the Profile drop box to select your desired default profile.
ii.Select "Manage Printers" to open Printer Management.
iii.Select the Save icon to save changes.
iv.Select the Home icon to return to the Dashboard.
7.Close the Dashboard. Now when you print your document to Raster Image Printer, the compression option you selected will be applied to the output JPEG image.