|

Creating an Adobe® PDF File
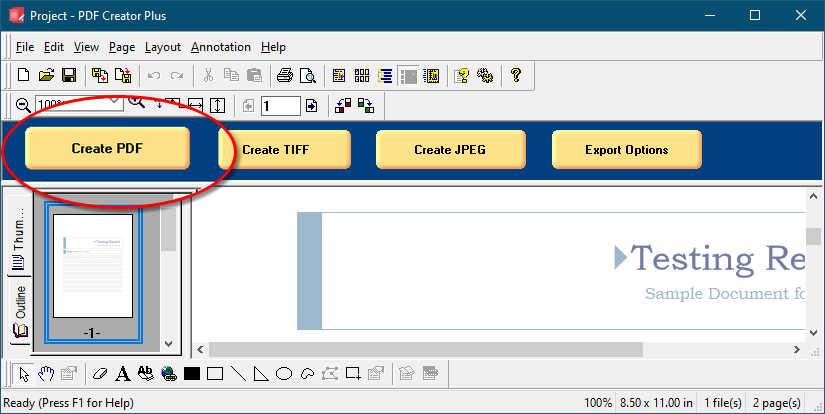
1.Open the file you want as a PDF and print it to the PDF Creator Plus 8 printer. This will send the pages to PDF Creator Plus's PDF builder application used to preview the pages, add new pages and annotate the pages. If the PDF Creator Plus builder application is not open, it will open automatically when you print. You can also open an existing PDF Creator Plus project ( .pnp file) you have previously saved.
2.Select the Create PDF button from the task window, or select File - Create PDF… from the menu.
3.The Create File dialog will appear.
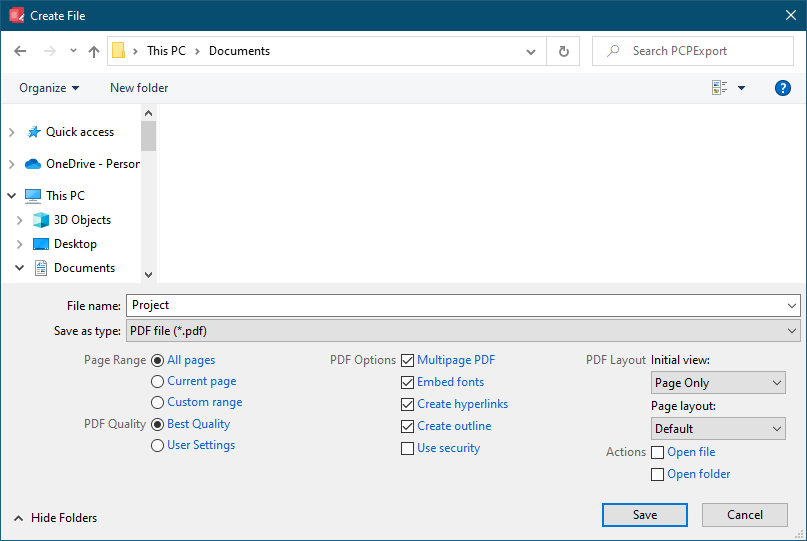
•Browse to the location where you wish to save the PDF document and enter the file name for your new PDF document.
•Make sure the Save as type is set to PDF file (*.pdf).
•The Page Range options allow you to select a subset of pages that would be converted to the PDF document.
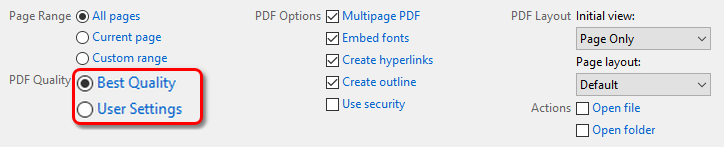
•In PDF Quality, leave set as Best Quality to create a PDF suitable for publishing and printing. To control the PDF size and image quality from the Export Options button, change to User Settings.
•In the PDF Options section, check the Multipage PDF checkbox to make a PDF document that contains all the pages in one (1) file.
•The Embed fonts, Create hyperlinks, Create outline, Use security options and the PDF Layout section are explained in more detail below.
•Use the Actions section to automatically open the created file or the folder where you are saving the file.
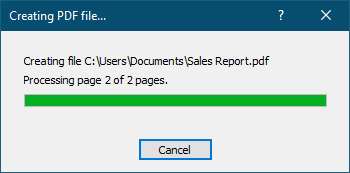
4.Press the Save button to create your PDF document. A progress dialog will appear as your document is being created.When the document is created, the progress dialog will close. The new PDF document can now be opened in Adobe® Reader.
PDF Quality
The default option is to create the PDF using our Best Quality setting. This setting gives a good balance between file size and the quality of any images in the PDF. It is well suited for publishing and printing. Switching to the User Settings option allows you to control the compression and downsampling used in images in the PDF file. This option can be used when you need to fine-tune how images in the PDF are stored to help control the PDF file size.
Embedding Fonts in Adobe® PDF Files
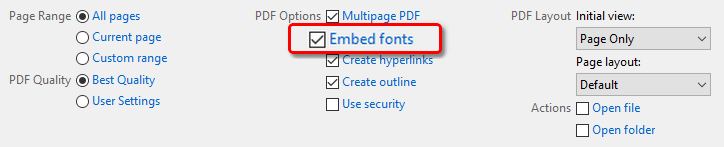
Checking the Embed fonts option will create a PDF file that contains all the font information needed to allow your file to display correctly on all target machines. This is especially important if you are using Asian fonts, which may not be installed on all machines. When the fonts are not embedded, Adobe® matches the fonts as close as it can. PDF files created without embedded fonts are smaller in size than those created with embedded fonts.
Creating Searchable Adobe® PDF Format with Security
Checking Use security will add PDF security to your document as shown below.

Now when you press the Save button, you will be prompted as shown below to select the level of PDF security you desire. See Setting PDF options preferences for more detailed information about the PDF security options.
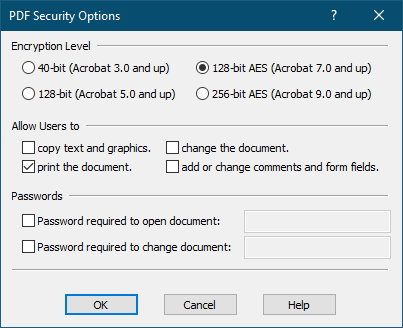
If you have enabled any password protection on your PDF document, you will be prompted to confirm the passwords you are using. You will be prompted once for the open document password, if you are using it, and once for the change document password, if you are using it.

Including Outline Information
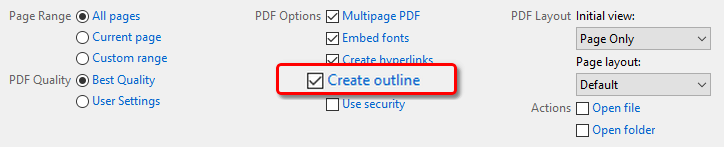
Any outline information in a PDF Creator Plus project is used to create bookmarks in the PDF file. This option is enabled by default. Normally created using the PEERNET Save as PDF Add-In from within Microsoft® Word, headings and bookmarks can also be created manually using the Outline annotation tool. See the section Creating Projects with Outlines for more information.
To include this information in your PDF document, leave the Create outline option checked. Uncheck this option If you do not wish to have bookmark information in your PDF document..
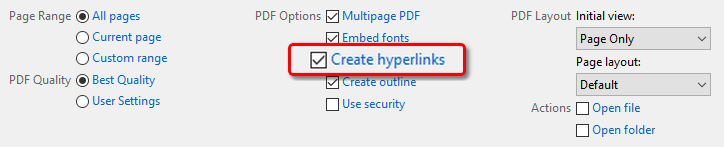
Including Hyperlink Information
Any hyperlink information in a PDF Creator Plus project is used to create hyperlinks in the PDF file as well. This option is enabled by default. Normally created using the PEERNET Save as PDF Add-In from within Microsoft® Word, all annotation objects available in PDF Creator Plus, with the exception of the Line object, can also be a Hyperlink.
There are three styles of hyperlinks available:
•link to a web address
•link to a file
•link to an internal bookmark.
See the section Adding hyperlink information for more details.
To include this information in your PDF document, leave the Create hyperlinks option checked. If you do not wish to have hyperlink information in your document, uncheck this option.
Setting Initial View and Page Layout
These options determine the Initial View and the Page Layout of the PDF file when opened in Adobe.
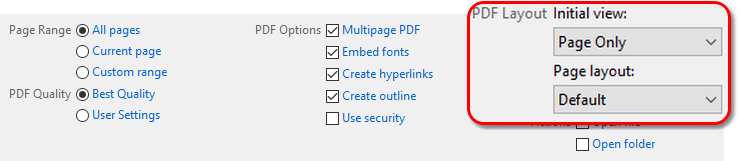
Initial View
The Initial View determined which panes and tabs are visible when the PDF document is viewed. There are three options available for the initial view.
Initial View |
Description |
Page Only |
Hides the navigation panel and its tabs and shows only the page in the document pane. |
Bookmarks Panel and Page |
Shows the navigation panel set to the Bookmarks tab and the page in the document pane. |
Pages Panel and Page |
Shows the navigation panel set to the Pages tab and the page in the document pane. |
Full Screen |
Shows the PDF in full screen mode. |
Full Screen with Bookmarks Panel |
Shows the PDF in full screen mode, exiting from full screen mode shows the pages with the Bookmark tab visible. |
Full Screen with Pages Panel |
Shows the PDF in full screen mode,exiting from full screen mode shows the pages with the Pages tab visible. |
Page Layout
The Page Layout determines the view of the pages in the document pane. There are five options available for the page layout:
Page Layout |
Description |
Default |
Uses the individual user’s preferences for page view. |
Single Page |
Shows a single page at a time. |
Continuous Page |
Shows all the pages in a single column |
Facing |
Facing shows the pages in two columns, two pages at a time, starting with the first page in the right-most column. |
Continuous Facing |
Shows all the pages in two columns. The first pages starts in the right-most column. |
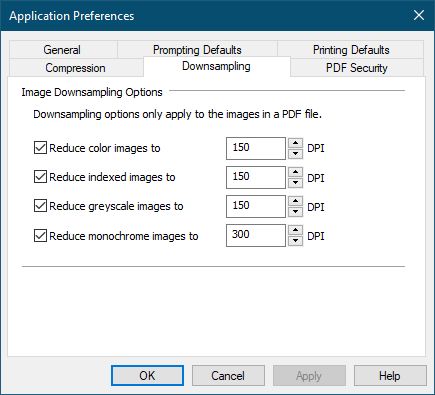
Controlling PDF Size with Downsampling
If there are a lot of images and high quality graphics (such as pictures, screenshots, company logos) in your PDF file, it can often become quite large. Downsampling is a common technique used to reduce the amount of information needed to store each image. This can reduce the overall size of the PDF.
All images are stored at a certain resolution, or dots-per-inch. The higher the resolution, the more space it takes to store the image. By reducing the resolution of the stored images, or downsampling the image, we can also reduce the size of the PDF. The side effect of reducing the resolution, especially from a very high resolution to a very small resolution, can be a loss in quality in the images. Often you will have to balance image quality with file size to find a happy medium between the two.
Downsampling options are controlled through the Downsampling tab on the Applications Preferences dialog. Open this dialog by clicking Edit – Application Preferences in the application menu or the Applications Preferences ( ) toolbar button. Any downsampling options set on this tab are used when a PDF file is created. An image will only be downsampled if its DPI is higher then the downsampling DPI chosen for that image color. If the DPI of the image is less than the downsampling DPI the image is not changed.
As an example, with the settings below, a color image at 300 DPI will be reduced to 150 DPI but a monochrome image at 200 DPI will not be downsampled as 200 DPI is already less than the chosen monochrome downsampling level of 300 DPI.
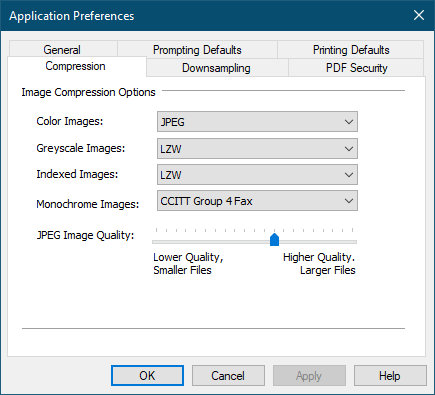
Compressing Images in the PDF File
Another way to control the overall size of your PDF file is by compressing the images (such as pictures, screenshots, company logos) in your file. Unlike downsampling, image compression, with the exception of JPG compressed images, will not affect the quality of the images. See Compression Preferences for more information.
Compression options are controlled through the Compression tab on the Applications Preferences dialog. Open this dialog by clicking Edit – Application Preferences in the application menu or the Applications Preferences () toolbar button. Any compression options set on this tab are used when a PDF file is created.