The steps below demonstrate how to use the Run Commands tab to automatically compress created files into a ZIP file.
You can also use the built-in ZIP action in the profile settings to compress the files into a ZIP file. This action was added to TIFF Image Printer in version 12.0.012. See theZIP the Created File topic to learn more. The built-in action has additional options for ZIP type, customizing the folder structure inside the ZIP file and splitting the ZIP file into multiple volumes based on size.
Using the Built-In Compression Utility
A compression utility, PNCompressToZip.exe, that creates a zip file has been provided in the RunCommands folder in your TIFF Image Printer install folder. This is usually C:\Program Files\TIFF Image Printer 12\RunCommands\.
PNCompressToZip.exe Command Line Arguments |
|
|---|---|
path:zip path |
Optional argument. Pass in the path in which to create the zip file; use quotes if there are spaces in the path. If the directory path doesn't exist, it is created. Do not enter a trailing backslash on the path name. If this argument is not provided, the zip file is created in the same location as the output files. |
name: zip name |
Optional argument. Pass in the base name to use for the zip file; use quotes if there are spaces in the name. If this argument is not provided, the zip file name will match the name of the first output file created. with the .zip extension added. |
create|add|update |
Optional arguments. When not used, the default is to create a new zip file, deleting any existing zip file of the same name. create - creates a new zip file, replaces any existing zip file add - adds files as new entries if the zip already exists, zip file can have duplicate entries with the same name update - adds files as new entries, matching entries, based on the file name, are replaced. |
clean |
Optional Deletes the files at the end if the zip file is successfully created or updated. |
<path to file list> |
Path to the list of files to add into the zip file. This must be the last argument on the command line. It is automatically passed as the last argument via the Run command. |
Sample Usage for Run Commands
Create a zip file in the same location as the output folder, using the base name of the created files, and then delete the files:
PNCompressToZip.exe clean |
Create a zip file in a different folder with the same name as the output files:
PNCompressToZip.exe "path:C:\Zipped Output" |
Create a zip file in a different folder with a custom name and keep adding files to the zip:
PNCompressToZip.exe "path:C:\Zipped Output" "name:ConvertedFiles.zip" add |
Using 7-Zip
Another option is the freeware utility, 7-Zip and its command line options. Any command line zip tool that can take a list of files as a text file to compress should work as well.
A batch file, 7ZipCompress.bat has been provided with basic settings. This batch file is located in the RunCommands folder in your TIFF Image Printer install folder.
The batch file is listed below showing the arguments and parameters used. When using the batch file, you only need to specify the full output path and file name (%1) for the zip file as a parameter. The list of files to compress (%2) is automatically appended as the last argument for all run commands.
Note that the list of files created by the printer driver is UTF-16LE encoded and this argument needs to be set for 7zip to read the file.
"%programfiles%\7-Zip\7z.exe" a -tzip "%1" -scsUTF-16LE @"%2" |
A second batch file, 7ZipCompressAutoName.bat, is also provided that will use the path and base name of the first file in the list of created files as basis for the zip file name and location. For this batch file you do not need to provide any arguments.
If your installed location for 7-Zip is different, you may need to edit the batch files accordingly.
Step by Step Instructions
1.Launch the TIFF Image Printer Dashboard.
2.Select "Edit & Create Profiles" to open Profile Manager.
3.Select "Add a profile" to create a personal profile, or create a copy of one of our system profiles.
4.Name the profile, add a description, and click Save.
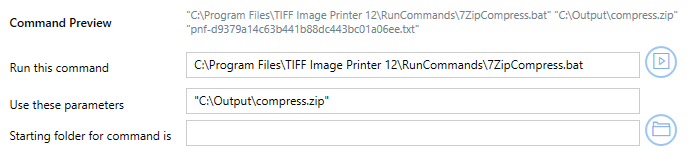
5.The command will be added already enabled and the details expanded. Beside Run this command, enter the full path and file name of the command. In this case we will use our provided utility, PNCompressToZip.exe. which is located in the RunCommands folder in your install folder. A complete parameter list is described above.

6.Alternatively, if you wish to use 7-Zip, you need to proved the full path and file name to the zip file as the parameter to the provided 7ZipCompress.bat utility. If you use the 7ZipCompressAutoName.bat instead, you do not need to provide any parameters. An explanation of these batch zip utilities is included above.
7.Click Save-Back, and close Profile Manager.
If you choose to enable run commands, you may also want to disable prompting by the Save As dialog each time you print.
i.To turn off prompting by the Save As dialog, disable Prompt for the output location and base file name.

If you plan to use these settings regularly, you may wish to make this personal profile the default profile used by TIFF Image Printer.
i.Select the printer you wish to edit and use the Profile drop box to select your desired default profile.
ii.Select "Manage Printers" to open Printer Management.
iii.Select the Save icon to save changes.
iv.Select the Home icon to return to the Dashboard.
8.Close the Dashboard. Now when you print your document to TIFF Image Printer, the output file will automatically be compressed into a ZIP file at the desired location.