Several batch files to handle common tasks such as file moving, extension renaming, renaming the file using a part of the original name, and deleting the files have been provided for your use. These batch files are located in the RunCommands folder in your TIFF Image Printer install folder. This is usually C:\Program Files\TIFF Image Printer 12\RunCommands\.
•Rename File Extensions When Completed
•Rename File Using Part of the File Name
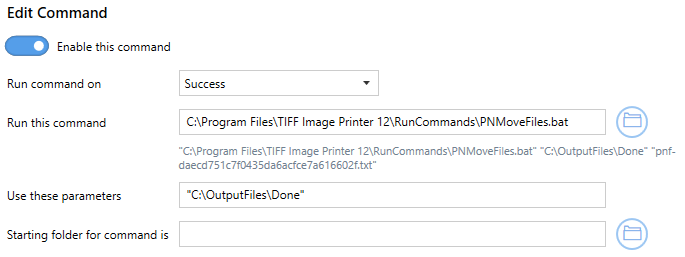
Move Files When Completed
The PNMoveFiles.bat tool moves the created output files into the folder of your choosing.
This tool is useful when another process is monitoring the output folder waiting to perform a task on the created files. Monitoring the initial output folder can cause premature pick-up while the file is still be created by TIFF Image Printer. This can be resolved by monitoring a second folder where the files are moved to when the whole file (or all files) have been created.
Another way to resolve this is to wait for exclusive access to the output file. The file is locked for writing while TIFF Image Printer is creating the file.
Command Line Arguments |
|
|---|---|
"destination folder" |
Required, pass in the full path to the destination folder. Use quotes if there are spaces in the path. If this folder does not exist, the batch file will try to create it. If that fails, no files are moved. |
"text file listing created files" |
This argument is automatically supplied by the run command as the last argument. |
Using PNMoveFiles in TIFF Image Printer would look like the following:
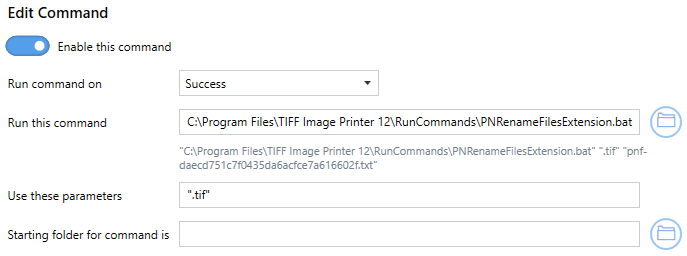
Rename File Extensions When Completed
The PNRenameFilesExtension.bat tool will rename the file extension of the created files.
This tool is useful when another process is monitoring the output folder for files with a particular file extension, in order to perform additional tasks on the completed files. Creating the file with the desired extension can cause premature pick-up while the file is still be created by TIFF Image Printer. This can be resolved by creating the file (or files) with a custom extension, then renaming them with the correct extension when the entire file (or all files) have been created.
Another way to resolve this is to wait for exclusive access to the output file. The file is locked for writing while TIFF Image Printer is creating the file.
Command Line Arguments |
|
|---|---|
".extension" |
Required. The file extension, in quotes, that you want, with the preceding dot (.) character(.), such as ".tif". |
"text file listing created files" |
This argument is automatically supplied by the run command as the last argument. |
Using PNRenameFilesExtension.bat in TIFF Image Printer would look like the following:
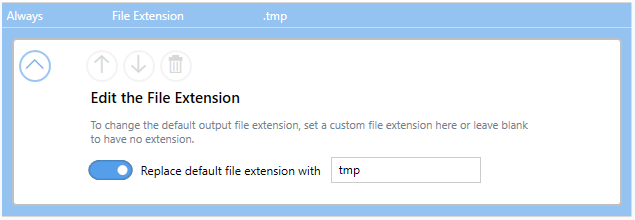
Setting a custom file extension instead of the default output type extension is set in the Filename Creator tab, on the File Extension file part:
Rename File Using Part of the File Name
The PNRenameFilesSubString.bat tool will rename the created file name by pulling a substring of the given or calculated length from the created file name. This allows stripping unwanted characters of a certain length from the beginning or end every file name, or using a section of characters from the middle of the file name.
This tool is useful when your printing application adds additional characters to the file name in the print queue that you want to remove. This can sometimes be handled using the Job Replacement Strings but in cases where the text after or before the part you want to keep is of varying length, this tool can keep a set number of starting or ending characters to create your file name.
The string to extract is specified using a starting index and an ending index. These indexes can be positive or negative numbers, and they start at 0. If the string indexes result in an empty string, no renaming takes place.
If a file of the same name already exists, it is deleted and replaced with the new file.
Sample Arguments - Using sample string ABCDEFG012345 |
|
|---|---|
"6" |
Result: G012345 Skips the first 6 characters. |
"0,6" |
Result: ABCDEF Starting at 0, the beginning, use the next 6 characters. |
"0,-6" |
Result: ABCDEFG Drop the last 6 characters, and keep the rest, starting at 0, the beginning, |
"-8,4" |
Result: FG01 Count back 8 characters from the end, then take the next 4 characters. |
"-3,4" |
Result: 345 Count back 3 characters from the end, then take the next 4 characters, or whatever is left. |
"-8,-3" |
Result: FG012 Count back 8 characters from the end, and take all characters until you reach 3 characters from the end. |
Command Line Arguments |
|
|---|---|
"startindex" "startindex,endindex" |
start_index - This is the starting point for the text in the file name you want to return. When a positive number is used, this is the number of characters skipped from the beginning of the file name. If this is a negative number, this counts backwards from the end of the file name. end_index - This is the end point for the sub-string returned from the file name. When this is positive it means the number of characters to return after the start index. If this is a negative number, this counts backwards from the end of the file name. |
"text file listing created files" |
This argument is automatically supplied by the run command as the last argument. |
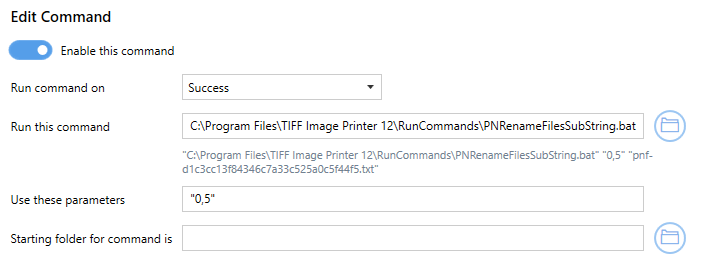
Using PNRenameFilesSubString.bat in TIFF Image Printer to use the first 5 characters of any file name would look like the following:
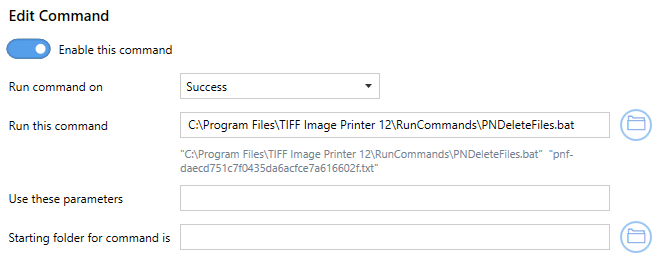
Delete Files in Failure
The PNDeleteFiles.bat tool deletes the files contained in the list of created files. This tool would commonly be used on Run Commands On Failure section, to clean up any created files.
Command Line Arguments |
|
|---|---|
"text file listing created files" |
This argument is automatically supplied by the run command as the last argument. |
Using PNDeleteFiles in TIFF Image Printer would look like the following: