The Stamping tab holds all settings related to adding a text, image, page numbering, or date/time watermark to your PDF Image Printer output files.
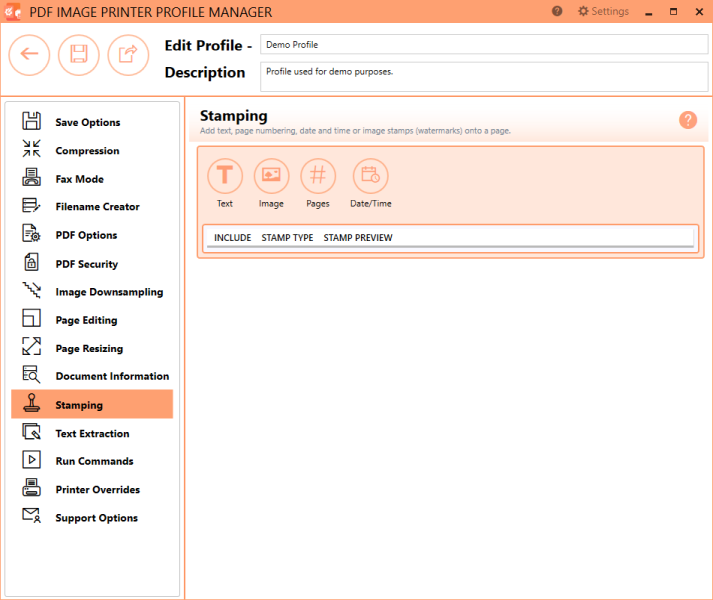
Using Stamping Editor
The Stamping Editor allows users to add new stamps, move stamps up or down, edit existing stamps, and make other formatting changes.
•Add new stamps - Select a button across the top to add a new stamp.
•Select an existing stamp - Hover over stamp type until the desired stamp is highlighted, and click to edit.
•Hide details of selected stamp - Click the left-most close arrow to hide details of selected stamp. Selecting another stamp type will also close the previous stamp.
•Move stamp up or down - Click the up and down arrows from within the edit window of a stamp type to re-order stamps. Stamps are applied to the page in the order they are listed, top to bottom.
•Delete stamps - Click the trash bin to delete unwanted stamps.
Stamp Types
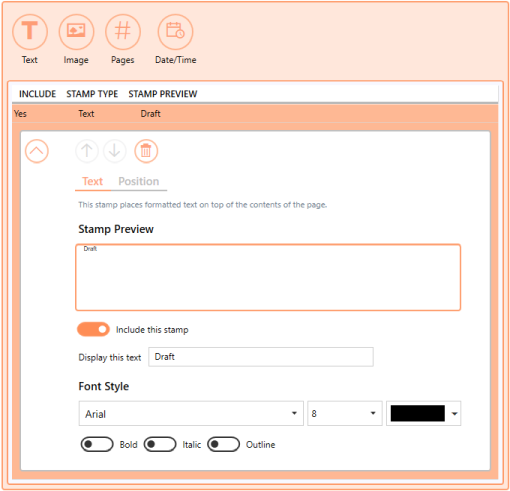
Text Stamp
This stamp places formatted text on top of the contents of the page. By default, the text "Draft" is populated for the text stamp. Enter your desired text into the Display this text field.
The font style of the text can be customized by changing the font type, font size, font color, and by enabling bold, italic or outline font styles. The stamp preview box will update to reflect any changes made to the text stamp settings.
Environment variables and registry keys and run command macros can be used in the text of the stamp and are expanded to their value when the stamp is created on the page. See Using Environment Variables and Registry Keys for details on using those values in your stamps.
See Also: Add Text Watermark Stamp to Each Page
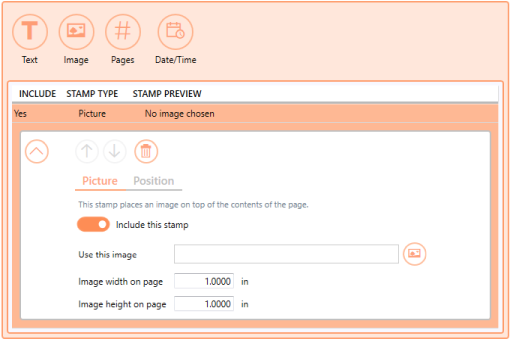
Image Stamp
This stamp places an image on top of the contents of the page. Select the file icon to browse to your desired image. It is recommended the image be a PNG, but a JPEG can also be selected. PDF Image Printer has support for alpha channels, so the PNG image can be transparent. If PDF Image Printer cannot find the selected image when creating the output file, no image stamp will be added to your output file.
For advanced users and programmers automating the printer, environment variables and registry keys can be used to specify all or part of the path to the stamping image, as explained in Using Environment Variables and Registry Keys.
A folder named Images has been provided in the product installation folder. Any images used for stamping can be placed here. When using an image from this folder, the location of the image command is stored in the profile using a macro. This allows the image and profile to be deployed and to work on any computer, no matter where the product is installed.
Adjust image width on page and image height on page as desired. The image size set should either match the dimensions of the image or at least maintain the aspect ratio. By default, image width on page and image height on page are set to 1.0000 inch or 2.5400 cm.
See Also: Add Image Watermark Stamp to Each Page
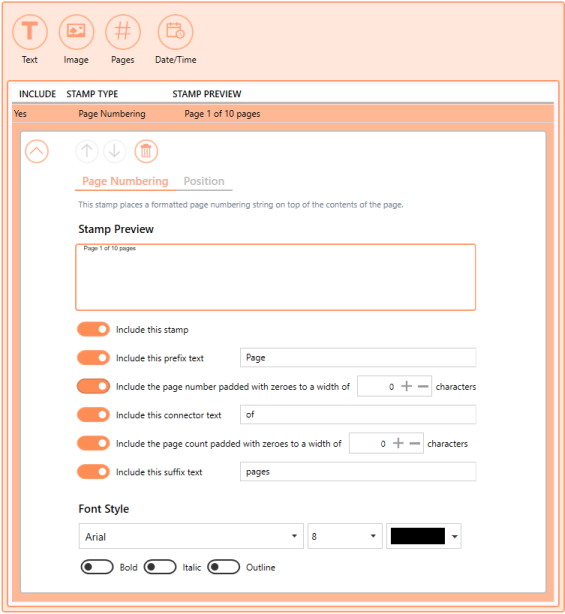
Page Numbering Stamp
This stamp places a formatted page numbering string on top of the contents of the page.
Use the settings toggles to customize the page numbering stamp formatting.
•Include this prefix text - Add custom text before page numbers (ex. Page).
•Include the page number padded with zeros to a width of - Add the specific page number and increase/decrease the number of padding zeros.
•Include this connector text - Add custom text between the page number and page count (ex. of).
•Include the page count padded with zeros to a width of - Add the total page count and increase/decrease the number of padding zeros.
•Include this suffix text - Add custom text after page numbers (ex. pages).
The font style of the text can be customized by changing the font type, font size, font color, and by enabling bold, italic or outline font styles. The stamp preview box will update to reflect any changes made to the page numbering stamp settings.
Environment variables and registry keys and run command macros can be used in the prefix, suffix and connector text of the page numbering stamp. They are expanded to their value when the stamp is created on the page. See Using Environment Variables and Registry Keys for details on using those values in your stamps.
See Also: Add Page Numbering Watermark Stamp to Each Page
Date and Time Stamp
This stamp places a formatted date and time string on top of the contents of the page.
Use the settings toggles to customize the date and time stamp formatting.
•Include this prefix text - Add custom text before date and time (ex. Created on).
•Include this suffix text - Add custom text after date and time.
Select your desired date and time formatting using the Display using this format drop box. By default, the format is set to Full Date and Time.
•Short Date
•Short Time
•Long Date
•Long Time
•Full Date with Short Time
•Full Date and Time
•General Date with Short Time
•General Date and Time
•Round Trip (ISO 8601) Date and Time
•RFC1123 Date and Time
•Sortable Date and Time
•Universal Sortable
•Universal Full Date and Time
•Month and Day
•Month and Year
Select your desired locale (language/location) to be applied to the date and time using the Use this locale drop box. By default, the locale will be set to match the locale of the computer.
The font style of the text can be customized by changing the font type, font size, font color, and by enabling bold, italic or outline font styles. The stamp preview box will update to reflect any changes made to the date and time stamp settings.
Environment variables and registry keys and run command macros can be used in the prefix and suffix text in a date and time stamp. They are expanded to their value when the stamp is created on the page. See Using Environment Variables and Registry Keys for details on using those values in your stamps.

See Also: Add Date and Time Watermark Stamp to Each Page
Stamp Position
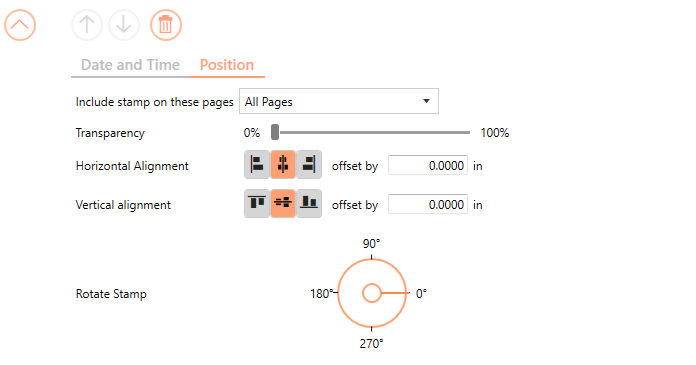
Include stamp on these pages
Choose which pages of the output file to stamp:
•All Pages
•First Page Only
•Even Pages Only
•Odd Pages Only
•All Pages Except First Page
Transparency
By default, transparency is set to 0%. Use the sliding scale to set the desired degree of transparency. 100% transparency will make the stamp invisible.
Horizontal Alignment
Choose how to horizontally align the stamp on top of the contents of the page.
•Left will align the stamp to the left side over the page contents.
•Middle will center the stamp over the page contents.
•Right will align the stamp to the right side over the page contents.
This alignment can be offset by a desired value. You can change the units by selecting Settings from the top right hand corner of the Profile Manager window, and toggling between inches (in) and centimeters (cm).
Vertical Alignment
Choose how to vertically align the stamp on top of the contents of the page.
•Top will align the stamp to the top over the page contents.
•Middle will center the stamp over the page contents.
•Bottom will align the stamp to the bottom over the page contents.
This alignment can be offset by a desired value. You can change the units by selecting Settings from the top right hand corner of the Profile Manager window, and toggling between inches (in) and centimeters (cm).
Rotate Stamp
Use the dials to select the degree of rotation of the stamp. Stamps can be rotated in 5 degree increments.