Convert to PDF Printing Preferences

Contents
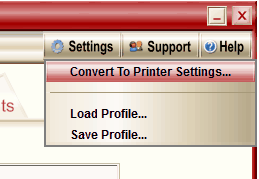
The Printing Preferences dialog can be shown by selecting Settings - Convert to Printer Settings from the Settings caption button in the Convert to PDF application. Settings changed through this menu item will only affect the original Convert to PDF printer.
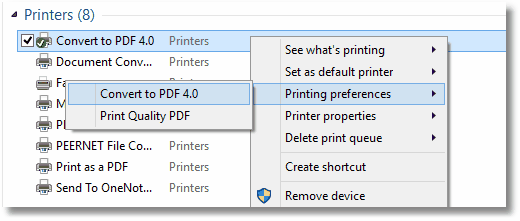
To make changes to any copies of the Convert to PDF printer you need to go the Printers folder on your computer. See Locating the Printers Folder for information on how to access the Printers folder for your version of Windows. The Printing Preferences dialog for the Convert to PDF printer and any copies can be accessed from this folder.
1.Open your Printers folder.
2.Right-click the Convert to PDF 4.0 printer or any named copy and select Printing Preferences from the context menu.
|
Note: If you are running Windows 7 or later and have multiple copies of the Convert to PDF printer you will only see one of your Convert to PDF printers. Right-clicking the printer will show a context menu with each option containing a submenu listing each copy of the printer.
|
The printing preferences can control the paper size and orientation, as well as margins and print quality. They are also used to customize the behaviour of the application interface, such as launching the application minimized or to automatically start converting any files printed. The Convert to PDF printer can also be customized to always use a specific printer profile to control the settings used to create the PDF file. Selecting F1 when in any control on the printing preferences dialog will display help for the dialog.
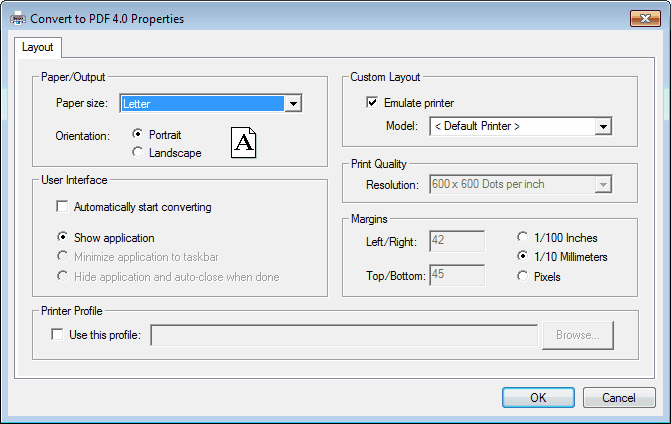
Paper/Output
This option allows you to choose the Paper size and Orientation of the pages in the PDF.
Just as you can choose to print on Letter-sized paper or Legal-sized paper with a regular printer, similar options are available for the Convert to PDF printer. As Convert to PDF is a virtual printer it is not bound by hardware constraints such as only having Letter or Legal sized paper trays to choose from there is even more flexibility in the paper size. The paper sizes available are only limited by the paper sizes that are defined on the computer.
|
Note: Setting paper size does not work from all applications. There are some applications, such as Microsoft Word, where the application can override what the printer has set for the paper size. |
User Interface
Normally, the Convert to PDF application will launch and wait for you to press the Start button to create the PDF file each time you print to the printer. This behaviour can be changed to best suit how you want to work. When Automatically start converting is enabled, you can choose between the three display options given.
Display Option |
Automatically Start Converting |
User Interface Option |
Show Application |
Off |
The application opens showing the Options tab and will wait for you to click the Start button |
On |
The PDF conversion is automatically started and application displays the Results tab. |
|
Minimize the application to taskbar |
Off |
Disabled, cannot be chosen. |
On |
The PDF conversion is automatically started. The application launched minimized to the taskbar. Clicking on the taskbar icon will show the Results tab. |
|
Hide application and auto-close when done |
Off |
Disabled, cannot be chosen. |
On |
The PDF conversion is automatically started but is not visible and is automatically closed when the PDF file has been created. |
|
Note: For minimize and hide application modes, the application will be brought to the foreground if a prompt is required to be answered by the user. A common prompt would be if the PDF file being created is about to overwrite an existing file of the same name on disk. |
Printer Profile
This option is off by default. Convert to PDF automatically saves the last used settings each time you close the application and these settings are retrieved on the next print.
When you use a printer profile, you are using a snapshot of the PDF creation settings that you have previously saved through Settings - Save Profile… from the application's Caption buttons. The printer profile determines what the PDF creation options are initially set to when the application is launched or when Automatically start converting is enabled. See Creating and Using Printer Profiles for more information.
Custom Layout
By default this option is on, and the printer being emulated is the printer you have chosen as your system default printer. You can change this to any printer you have installed.
The Convert to PDF printer will simulate the chosen printer by using its print resolution and margins. By matching the print resolution and margins, the PDF will have the same line and page breaks, thus ensuring that the created file will look the same as the printed output of the original document.
|
Note: Your current system default printer is shown in your Printers folder with a small circle with a white check mark placed over the printer icon. |
Print Quality
If you are emulating another printer, this option is disabled. If you are not emulating another printer, you can choose from print resolutions ranging from 72 DPI to 1200 DPI. The higher the resolution chosen, the longer it will take to print the document.
Margins
If you are emulating another printer, this option is disabled. If you are not emulating another printer, you can set the printer hardware margins here. The printer hardware margins are combined with the paper’s print area margins to properly position the document on the page.