This section is for users of previous versions of PDF Image Printer who are currently using the script file who want to move completely to the latest version. It discusses any breaking changes with the new printer driver and offers the changes needed to migrate to version 12.
If you have been using the script file (e.g. pnpdf11s.ini) to customize previous versions of PDF Image Printer, see the section, Compatibility Mode for Earlier Versions of PDF Image Printer, first for steps to make version 12 work the same with minimal effort on your part.
Breaking Changes
Profiles
The most significant change with PDF Image Printer 12 is that the settings used to create the output file are now stored in a profile and the printer is then configured to use a particular profile. Custom profiles can be created, exported and imported using the Profile Manager. In many cases, a profile will replace the need for the script file; in other cases, the script file can be reduced to simply indicating which conversion profile to use.
Simplified Run Commands
The run commands available in the script file have been reduced to only running a command at the start and end of the printing job. There is the option to run a command at the start of the print job, after a successful print, or after a failed print, or after both a successful and failed print, and at the end of the print job. When a run command is executed the last parameter is always a path to a text file that contains a list of the file(s) created by the conversion process.
The options to run commands at the start of each page and on the end of each file have been removed from the script file. The conversion profiles do have options to set up multiple commands each for start of the print job, on successful print, on failed print and on end of job.
See Using the Run Commands to see how to set up new commands, or Run Commands in the Printer Script File Settings section.
Control Strings
Control string support has been reduced down to three key control strings - NewFile, OutputDir and OutputFileName. Additionally, these can only be enabled and configured in a conversion profile. The script file settings for control strings is deprecated. See the Control Strings section for enabling and using this feature.
Updated and Deprecated Script File Sections
With the new version, many script file sections have been deprecated in favor of the more powerful options for these same features in a profiles. If you were using these features, you will need to create and use a profile either instead of the script file, or in conjunction with the script file.
•Watermark - deprecated, see Stamping
•Endorsements - use the updated Stamping settings
•Advanced File Naming - use the updated Filename Creator settings
•Error Reporting - use the updated Support Options
Sample Migration Scenarios
This section covers some of the more common use-cases with script files and how to migrate them to using the new profiles.
•Setting Default Output Location and Conversion Settings
•Use the Script File to Set the Conversion Profile
•Change the Output Folder and Filename on Each Print
•Customizing How the Files are Named
Turning off Prompting
When using the script file, the file save prompting was often turned off, and commonly the overwrite option turned on to prevent further prompting.
New options have been introduced for handling overwrite situations, and as a result the old script file setting Overwrite is no longer valid, and is now ignored.
The new setting in the profile, "If the file already exists when saving" replaces Overwrite and has three options:
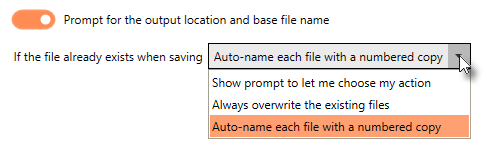
You will want to set this option in your profile to either "Always overwrite the existing files" or "Auto-name each file with a numbered copy". Setting this in a conversion profile and using the profile instead of the script file is the preferred way control this now. For older programs, a new script file setting was introduced that can be used if needed:
[Save] ;Values for When Saving, NEW in Version 12 ;NoPromptOnOverwriteCopyProtectExistingFile ;NoPromptOnOverwriteReplaceExistingFile ;PromptOnOverwriteForCopyProtectOrReplaceOrCancel When Saving=NoPromptOnOverwriteReplaceExistingFile |
Setting Default Output Location and Conversion Settings
If the script file was used to configure the output location, and/or filename, and the conversion settings used by all users, update this to version 12 by creating a custom profile with the same conversion settings and set to save in the same output location with the same filename.
Saving an exported copy of this new profile allows you to push this setup to all your users as covered in the section Installing PDF Image Printer with Custom Settings. For only one or two users, the profile can be easily imported and then set as the default profile.
Step by Step Instructions
1.Launch the PDF Image Printer Dashboard.
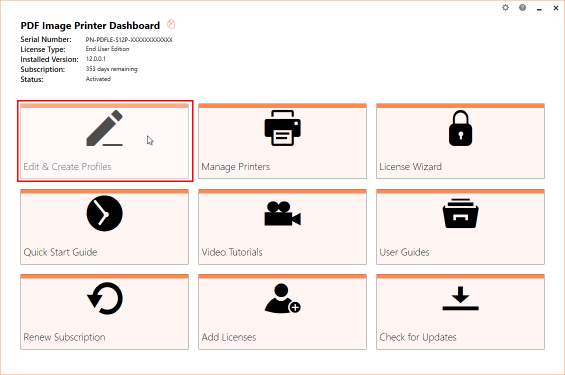
2.Select "Edit & Create Profiles" to open Profile Manager.
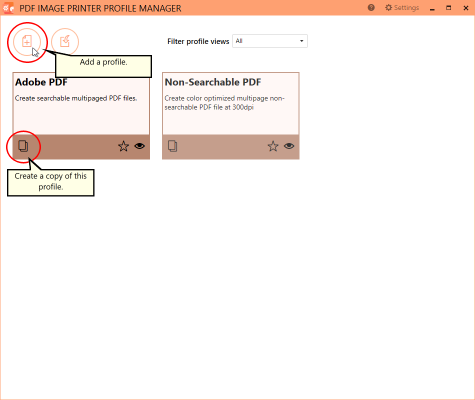
3.You can either create a copy of a system profile, if it has similar settings to what you require, by selecting "Create a copy of this profile", or create a personal profile by selecting "Add a profile".
4.Name the profile, add a description, and click Save.

5.On the Save Options tab, set the output location.This can be the same path for all users, or, as shown here, a path to a shared folder on a server where each user has their own folder. The %USERNAME% environment variable is used here so the profile can be copied to other users and their name will automatically be used. Other environment variables can also be used as needed.

6.Go through the tabs and adjust the rest of the settings as desired. The topics in the Working with PDF Image Printer section provide detailed instructions on how to adjust the settings to create different types of images/files.
7.Click Save at the top of the screen when you are done editing the profile.
8.To create a custom install to push out to your users, see the section on creating the export file in Installing PDF Image Printer with Custom Settings.
9.If you only need to set up one or two users. click Save at the top of the screen, and then Export to create an external copy of the profile. On each users' machine, import the new profile and follow the steps in Change Default Profile to set the new profile as the default profile for PDF Image Printer.
Use the Script File to Set the Conversion Profile
A new script file setting has been added to the Devmode settings section that can be used to set which conversion profile the printer will apply when printing. The profile set in the script file overrides the conversion profile set on the printer through the Printer Management screen.
This is similar to pushing a customized printer or importing a conversion profile and changing the printer's default profile but works by placing the script file and the exported conversion profile on the user's computer instead.
The script file is normally placed in the temp folder, and the exported conversion profile can be placed anywhere the printing process will have permission to read.
[Devmode settings] Printer Profile=C:\PEERNETFiles\MyCustomProfile.pnpdfprofile |
Change the Output Folder and File Name on Each Print
The script file can still be used to customize the output folder and file name on-the-fly before each print job. The main change is that now all other settings that are not modified in between print jobs should be set using an exported profile referenced in the Devmode settings section Printer Profile setting.
[Devmode settings] Printer Profile=C:\PEERNETFiles\MyCustomProfile.pnpdfprofile
[Save] Output directory=C:\PEERNET\OutputFiles Output filename=CustomFilename |
Customizing How the Files are Named
The Advanced Naming section in the script file has been deprecated. If this section was being used to customize how the file was named, a profile will need to be created and the Filename Creator options used to control the file naming format instead.
A common use of custom naming was to add a unique ID to each file name using the now deprecated JobID variable. The JobID variable has been replaced with a built-in unique id which uses a Globally Unique Identifier (GUID) as part of a file name or folder path.
As an example, the old-style multipaged format string below has been customized here to use the output file name and the JobID as part of the output basename. This would create a file name similar to document_00001.pdf.
[Advanced File Naming] Format string S=%s_%3d Format string SJ=%3d_%s_%3d Format string M=%s_%5d Format string MJ=%3d_%s Use default extension S=1 Use default extension SJ=1 Use default extension M=1 Use default extension MJ=1 Variables S=$(OutputFileName);$(FileNumber) Variables SJ=$(JobID);$(OutputFileName);$(FileNumber) Variables M=$(OutputFileName);$(JobID) Variables MJ=$(JobID);$(OutputFileName) |
Using the new GUID as part of the filename through the Filename Creator, the output filename would now be similar to document_e6ce05fd71b24c29bd024188cfdc110d.pdf.
Step by Step Instructions
1.Launch the PDF Image Printer Dashboard.
2.Select "Edit & Create Profiles" to open Profile Manager.
3.Select "Add a profile" to create a new profile or open an existing profile.
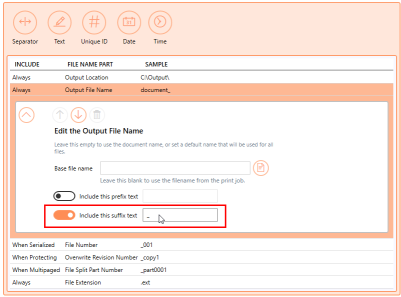
4.On the Filename Creator tab, go to file name part for Output File Name and add the underscore (_) as a suffix to this file part. This will provide a separator between the Output File Name, and the unique ID.
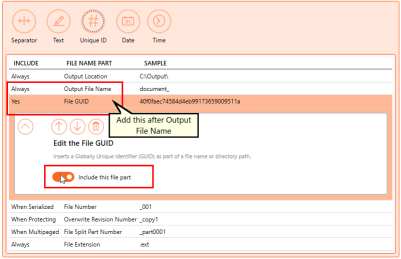
5.Then, with the Output File Name section selected. add the file name part for Unique ID (GUID). This file name part should be added after the Output File Name.
6.Click Save, then Back, and close Profile Manager.
Using this profile as the default profile will now give the desired output file name with a unique identifier for each filename. There are many other new options available to control the file naming. See the following sections for additional information: