Defining a JDBC data source

Contents
JDBC data sources are managed through the Drivers item in the Project Pane.
Note that the sample project Chapter06_JDBC.pnj contains examples of added Drivers items which you can try out. You can access this project by clicking File – Open Project in the application menu, then enabling the Open a sample project option.
PEERNET Reports Designer comes with several, predefined JDBC data sources, which you can view by clicking the ![]() to expand the Drivers item in the Project Pane. You can use these predefined data sources when adding a JDBC database table to your project file. If you select one of these predefined data sources when adding a table, you will still have to populate some of the required fields at setup time:
to expand the Drivers item in the Project Pane. You can use these predefined data sources when adding a JDBC database table to your project file. If you select one of these predefined data sources when adding a table, you will still have to populate some of the required fields at setup time:
Predefined Driver |
Setup Information |
Java ODBC Bridge |
Type the data source name in the URI field, and type the user name and password (if required). |
SimpleText JDBC Driver |
Type the path to the data files in the URI field. For an example, see Accessing a SimpleText database. |
Cloudscape RMI |
Replace <host?> in the URI field with the name of your host. A class path for the corresponding JAR file must also be set up. For more information about class paths, see Chapter 22: Working with Class Paths. |
Oracle |
Replace <host?> and <database?> in the URI field with the name of your host and the name of your database. A class path for the corresponding JAR file must also be set up. For more information about class paths, see Chapter 22: Working with Class Paths |
MySQL |
Replace <host?> and <database?> in the URI field with the name of your host and the name of your database. A class path for the corresponding JAR file must also be set up. For more information about class paths, see Chapter 22: Working with Class Paths. |
MS SQL Server |
Replace <host?> in the URI field with the name of your host. A class path for the corresponding JAR file must also be set up. For more information about class paths, see Chapter 22: Working with Class Paths. |
Sybase |
Replace <host?> and <database?> in the URI field with the name of your host and the name of your database. A class path for the corresponding JAR file must also be set up. For more information about class paths, see Chapter 22: Working with Class Paths. |
IBM Informix |
Replace <database_server_name?> in the URI field with the name of your database server. A class path for the corresponding JAR file must also be set up. For more information about class paths, see Chapter 22: Working with Class Paths. |
IBM DB2 |
Replace <host?> and <database?> in the URI field with the name of your host and the name of your database. A class path for the corresponding JAR file must also be set up. For more information about class paths, see Chapter 22: Working with Class Paths. |
SAS |
Replace <host?> and <portNumber?> in the URI field with the name of your host and the port number. A class path for the corresponding JAR file must also be set up. For more information about class paths, see Chapter 22: Working with Class Paths. |
If you want to use one of these drivers set up in a specific way all the time, you can duplicate the driver and populate the fields as desired, then select this duplicate driver when adding a table.
For information on how to duplicate a driver, see the To duplicate a driver procedure later in this section.
You can also set up a new JDBC data source to use in your project file. The first step in defining a new JDBC data source is to install the required database’s JDBC driver onto your computer. Every database vendor has its own JDBC drivers, and the setup process for these drivers varies from vendor to vendor (setup program, client SDK, or just JAR files).
The following table provides reference information for the most popular database vendors, including the JAR file name and setup method. Refer to the database vendor’s JDBC documentation or website for more information and/or updates.
Database |
JAR files |
Setup Information |
Oracle |
ojdbc14.jar |
Copy from server or from Oracle website. Oracle Technology Network (and click Download) |
MySQL |
mysql-connector-java-3.0.8-stable-bin.jar |
Download setup MySQL Connector/J from MySQL website. |
MS SQL Server |
msbase.jar mssqlserver.jar msutil.jar |
Download from Microsoft website. |
Sybase |
jconn2d.jar |
Download jConnect for JDBC from Sybase website. |
IBM Informix |
ifxjdbc.jar |
Download Informix JDBC Driver from IBM website. |
IBM DB2 |
db2jcc.jar |
Copy from server or download from IBM website (bundled with client or other software). http://www.ibm.com |
SAS (SAS/SHARE Server) |
sas.core.jar sas.intrnet.javatools.jar |
Copy from server or from SAS website. SAS Software Downloads |
Once you have installed the required JDBC driver onto your computer you must add a class path for the JAR files. The class path can either be the full path containing the JAR file name, or just the path (full folder name).
For example, c:\jdbc\xyz.jar or c:\jdbc\.
Note, however, that you can also copy JAR, CLASS, and ZIP files for use in your project to the \lib folder under the PEERNET Reports installation directory. Files copied to this location will be automatically referenced, and do not have to be added as class paths to be used in your project. For more information about class paths, see Chapter 22: Working with Class Paths.
After installing the driver and setting up the class path, you can then add the JDBC data source to your project file.
To add a JDBC data source to your project file
1.Double-click the Drivers item.
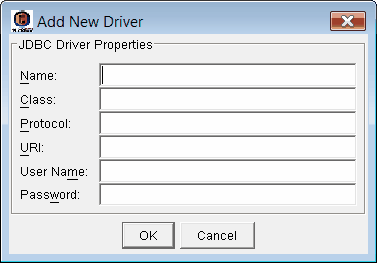
2.In the Driver Information dialog box, type your new driver information:
·Name
·Class
·Protocol
·URI (Universal Resource Identifier)
·User Name
·Password
3.Click OK. Your JDBC data source is added as a sub-item in the Drivers list.
The Name is the name you want to give to this new driver.
The User Name and Password fields are used to connect to the database.
The Class, Protocol, and URI fields are populated differently for different databases. Refer to the following table for information about these fields:
Database |
Class |
Protocol |
URI |
Oracle |
oracle.jdbc.driver.OracleDriver |
jdbc:oracle:thin: |
@<host?>:1521:<database?> |
MySQL |
org.gjt.mm.mysql.Driver |
jdbc:mysql: |
//<host?>/<database?> |
MS SQL Server |
com.microsoft.jdbc.sqlserver.SQLServerDriver |
jdbc:microsoft:sqlserver: |
//<host?>:1433 |
Sybase |
com.sybase.jdbc2.jdbc.SybDriver |
jdbc:sybase:Tds: |
<host?>:2048/<database?> |
IBM Informix |
com.informix.jdbc.IfxDriver |
jdbc:informix-sqli: |
//<host?>:1526/<database?>:INFORMIXSERVER=<dababase_server_name?> |
IBM DB2 |
com.ibm.db2.jcc.DB2Driver |
jdbc:db2: |
//<host?>:50000/<database?> |
SAS (SAS/SHARE Server) |
com.sas.net.sharenet.ShareNetDriver |
jdbc:sharenet: |
//<host?>:<portNumber?> |
Replace <host?> in the URI with the address (either host name or IP address) of your host where the database is installed, replace <database?> with the name of the database you want to access, and replace the port number if you use a different one on the database server.
For example. if the host address is aspen, the database name is Hr, and the server name is dat1, for IBM Informix, the URI can be: //aspen:1526/hr:INFORMIXSERVER=dat1
If you experience a problem connecting to MySQL, verify if your specific database user has been granted permission on the database server side. First, log in to your MySQL server with a command-line client:
mysql --user=monty --password=guess database_name
Note that monty and guess are your login user name and password, database_name is the database to which you want to connect.
Then, use the GRANT command to grant permission to the user monty:
mysql> GRANT ALL PRIVILEGES ON database_name.* TO monty@'199.199.199.18' IDENTIFIED BY 'guess;
Replace 199.199.199.18 with the IP address of the user monty. For more information, refer to your MySQL User Guide.
If you experience a problem connecting to Microsoft SQL Server, ensure you are using Mix mode on the server side. To do so, open Enterprise Manager and go to the instance under SQL Server Group. Right-click, and click Properties. Click the Security tab, and select SQL Server and Windows for Authentication. As well, use a database user name and password to obtain access.
After adding items to the drivers list, you can view and edit their properties, rename them, duplicate them, and delete them from your project file.
To view the properties of a driver
1.Click the ![]() to expand the Drivers item.
to expand the Drivers item.
2.Select a driver. The driver’s properties will appear in the Properties Pane.
To edit the properties of a driver
1.Click the ![]() to expand the Drivers item.
to expand the Drivers item.
2.Right-click the driver you want to edit, and click Edit Driver.
3.In the dialog box that appears, adjust the driver’s properties as required.
To rename a driver
1.Click the ![]() to expand the Drivers item.
to expand the Drivers item.
2.Right-click the driver you want to rename, and click Rename Driver.
3.Type a new name for the driver in the edit field.
To duplicate a driver
1.Click the ![]() to expand the Drivers item.
to expand the Drivers item.
2.Right-click the driver you want to duplicate, and click Duplicate Driver. A copy of the driver appears in the list.
To delete a driver from your project file
1.Click the ![]() to expand the Drivers item.
to expand the Drivers item.
2.Right-click the driver you want to delete, and click Delete Driver.
3.In the Delete Confirmation dialog box, click Yes.