Chapter 22: Working with Class Paths

Contents
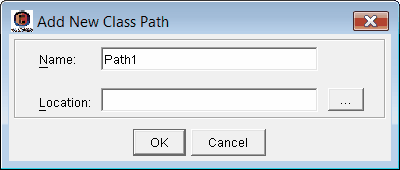
The Class Paths item allows you to add and manage your project’s class paths. Double-click the Class Paths item to display the Add New Class Path dialog box. The Location field of this dialog box can contain either a name and location of a folder, or a name and location of a JAR, CLASS, or ZIP file that you want to reference in your project file.
Alternatively, you can copy JAR, CLASS, and ZIP files for use in your project to the \lib folder under the PEERNET Reports installation directory. Files copied to this location will be automatically referenced, and do not have to be added as class paths to be used in your project.
To add a class path to your project file
1.Double-click the Class Paths item.
2.In the Add New Class Path dialog box, type a name for the class path.
3.Type or browse to the class path location (folder, JAR file, or ZIP file).
4.Click OK.
To view the properties of a class path
1.Click the ![]() to expand the Class Paths item.
to expand the Class Paths item.
2.Click a class path. The class path’s properties will appear in the Properties Pane.
To edit the properties of a class path
1.Click the ![]() to expand the Class Paths item.
to expand the Class Paths item.
2.Right-click the class path you want to edit, and click Edit Path.
3.In the dialog box that appears, adjust the class path’s properties as required.
To rename a class path
1.Click the ![]() to expand the Class Paths item.
to expand the Class Paths item.
2.Right-click the class path you want to rename, and click Rename Path.
3.Type a new name for the class path in the edit field.
To duplicate a class path
1.Click the ![]() to expand the Class Paths item.
to expand the Class Paths item.
2.Right-click the class path you want to duplicate, and click Duplicate Path. A copy of the class path appears in the list.
To delete a class path from your project file
1.Click the ![]() to expand the Class Paths item.
to expand the Class Paths item.
2.Right-click the class path you want to delete, and click Delete Path.
3.In the Delete Confirmation dialog box, click Yes.