The trimming feature is an easy way to remove unwanted margins or borders from your pages. While similar to cropping, trimming is an automatic process. All areas to the left, top, right and bottom of the document where the color falls at or below the chosen color intensity level are removed. As soon as a color that is above the intensity level is found, trimming on that side stops.
A common use of this feature would be to remove the lighter shades of grey on scanned images, as we do in the example below. This also works with color images as Raster Image Printer will use a greyscale representation of the page to determine trimming.
A side effect of trimming can be a change in outputted page size. If you need to remove the grey from the sides, and also keep the original page size, see also Copy Page Contents to a New Page Size.
All trimming settings are controlled through the profile.
Step by Step Instructions
1.Launch the Raster Image Printer Dashboard.
2.Select "Edit & Create Profiles" to open Profile Manager.
3.Select "Add a profile" to create a personal profile, or create a copy of one of our system profiles.
4.Name the profile, add a description, and click Save.
5.On the Page Editing tab, under Trim Existing Margins by Color Intensity, use the arrow buttons to select which sides of the document to trim. You can trim Left, Top, Right or Bottom, or any combination of all four.
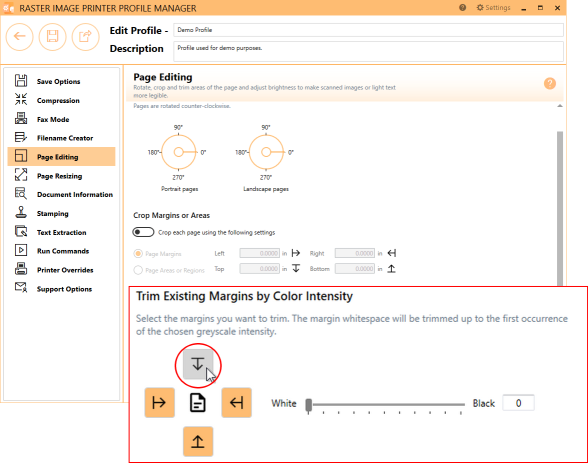
6.Use the sliding scale or enter a value to choose the level of grey to remove. If the slider is all the way to the left, or White, only pure white pixels will be removed. For a scanned image, the border is generally not pure white so the intensity should be moved to the right. The darker the grey on the border, the further towards Black you will need to move the slider.

7.Click Save-Back, and close Profile Manager.
If you plan to use these settings regularly, you may wish to make this personal profile the default profile used by Raster Image Printer.
i.Select the printer you wish to edit and use the Profile drop box to select your desired default profile.
ii.Select "Manage Printers" to open Printer Management.
iii.Select the Save icon to save changes.
iv.Select the Home icon to return to the Dashboard.
8.Close the Dashboard. Now when you print your document to Raster Image Printer, the grey will be trimmed from all four sides stopping at the designated intensity level.