The steps below demonstrate using the Email tab to send an email when a file fails to convert.
Step by Step Instructions
1.Launch the Raster Image Printer Dashboard.
2.Select "Edit & Create Profiles" to open Profile Manager.
3.Select "Add a profile" to create a personal profile, or create a copy of one of our system profiles.
4.Name the profile, add a description, and click Save.
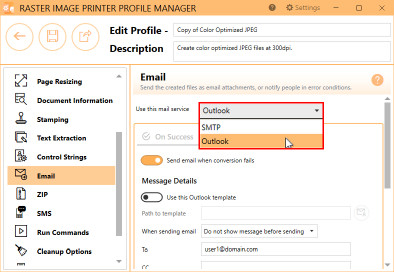
5.On the Email tab, under Use this mail service, select Outlook or SMTP.
a.If you select Outlook, the application must be installed and an email account created in order to send email.
b.If you select SMTP, click the Settings button to open the SMTP Settings flyout. The server name, port, connection type and any required authentication settings for your SMTP server should be available from your IT department or your email provider. Here, we are using GMail's SMTP settings. See SMTP Settings for more details on this panel.
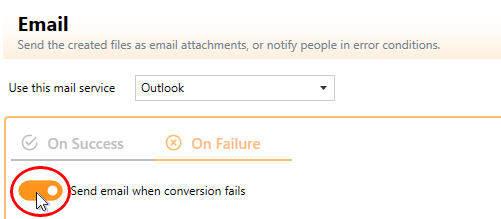
6. Select On Failure and enable Send email when conversion fails
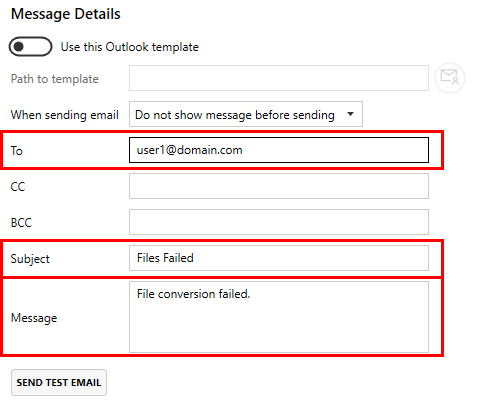
7.Enter your desired Message Details (if you are not using an Outlook template). The Message Details parts To, Subject, and Message are required.
8.Click Save-Back, and close Profile Manager.
If you plan to use these settings regularly, you may wish to make this personal profile the default profile used by Raster Image Printer.
i.Select the printer you wish to edit and use the Profile drop box to select your desired default profile.
ii.Select "Manage Printers" to open Printer Management.
iii.Select the Save icon to save changes.
iv.Select the Home icon to return to the Dashboard.
9.Close the Dashboard. Now when you print your document to Raster Image Printer, you will receive an email notification after a failed conversion.