To make migration to version 12 easier for our clients controlling Raster Image Printer using a script file, we have introduced in version 12.0.025 a compatibility mode that tells the latest version to run as if it was version 11. This compatibility mode enables support for the following deprecated file sections:
•Advanced File Naming
•Run - RunAtStart and RunAtEnd only
This compatibility was further enhanced in version 12.0.027 to add compatibility settings in the script file settings that can be used instead of enabling it on the printer. See the following two new settings:
•V11CompatibilityModeEnabled in the Save section
•Wait For Job Completion in the DevMode section
Enabling Compatibility Mode in the Script File
Added in 12.0.027, compatibility mode can be turned on through the script file using the V11CompatibilityModeEnabled setting. When this is enabled, the script file settings from previous versions are recognized and used. This allows most users to rename their PNRAS11S.INI script file to PNPDF12S.INI, add the following setting and be done with migration.
[Save] ; ; NEW in v12 build 12.0.027 and up ; V11 compatiblity mode was introduced for customers migrating from v11 to v12 ; When set to 1, this switches the file naming style back to v11 from v12 allowing ; existing v11 style script files to be used as well as getting the same naming ; as configured in v11. ; V11CompatibilityModeEnabled=1 |
The other compatibility setting that you may need to add to your script file is to lock the print job in the print queue until the file is created. The default behavior in version 12 is that the print job leaves the queue as soon as it is spooled, but before we create the file. In version 11, the print job was locked in the print queue until the output file was created. Enabling this setting will lock the print job in the queue, just like previous versions.
[Devmode settings] Resolution=300 Printer Profile= Orientation= Color=1 Paper size=
; ; NEW in v12 build 12.027 and up ; Wait For Job Completion set to 1 indicates the ; Microsoft Print Subsystem will wait for the job to complete ; converting all printed pages to images before the print job ; is removed from the printer's queue. ; Default is 0, which means don't wait. ; Wait For Job Completion=1 |
Enabling Compatibility Mode on the Printer
Compatibility mode is enabled per printer or in the Save section of the PNPDF12S.INI. This lets you create a copy of Raster Image Printer 12, rename it Raster Image Printer 11.0, turn on compatibility and have it automatically look in the Windows TEMP folder for a PNRAS11S.INI script file.
When controlling settings using a script file, the file is commonly located in your Windows TEMP folder. You can find this folder quickly using the environment variable shortcut %TEMP%. This is usually the temp folder in the AppData folder for the logged in user, %USERPROFILE%\AppData\Local\Temp. There is also a system temp folder under the C:\Windows\temp folder. In rare cases the script file is placed there.
If you have stored your script file is a different, custom, location, see the section Setting a Custom Path to the Script File after enabling compatibility mode.
The other version 11.0 behavior that you may need to replicate is when the print job leaves the print queue. In previous versions, the print job stayed in the print queue while the file was being created. With version 12, the print job leaves the print queue after it is spooled and before we create the file. Turning on compatibility forces the print job to stay in the print queue until the file is created. See the section Locking the Print Job in the Print Queue Until File Created to customize this setting.
To enable compatibility mode for a printer, begin by opening the Dashboard (double-click the Raster Image Printer icon on your desktop or select Raster Image Printer 12 from the Start menu), and selecting "Manage Printers" to open Printer Management.
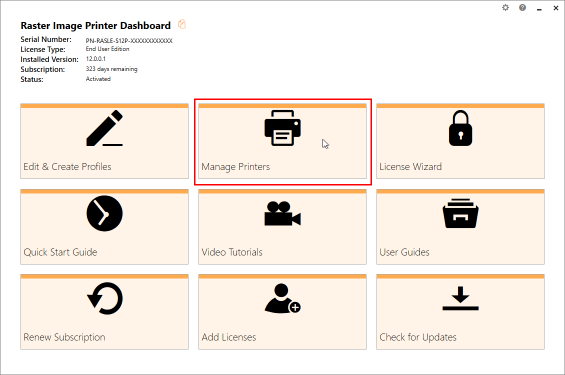
On launch, Printer Management will list all of existing printer(s), and show the default profile currently assigned to each printer. If Raster Image Printer has just been installed, there will only be one printer listed with the name Raster Image Printer 12, and the default profile will be set to Color Optimized JPEG.
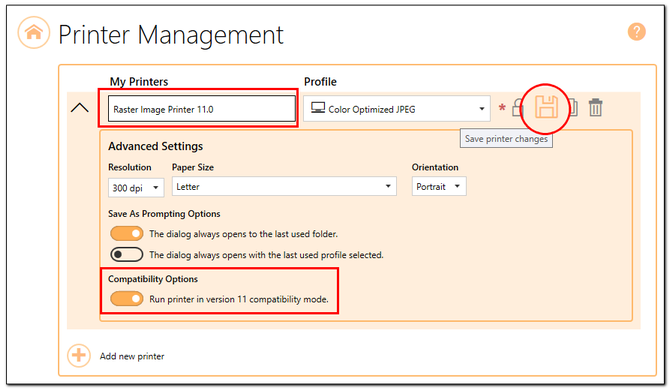
The first step is to either rename the current printer to Raster Image Printer 11.0, or create a new printer named Raster Image Printer 11.0. Take note to name it "Raster Image Printer 11.0" and not just " Raster Image Printer 11".
Here we have renamed Raster Image Printer 12 to "Raster Image Printer 11.0". Keep in mind that you cannot rename the printer if you have the previous version installed, as that printer already exists.
Next, we opened the advanced options by clicking the down arrow to the left of the printer name and enabled the Run printer in version 11 compatibility mode to turn on compatibility mode. The last step is to Save the changes by clicking the save icon to the right of the printer.
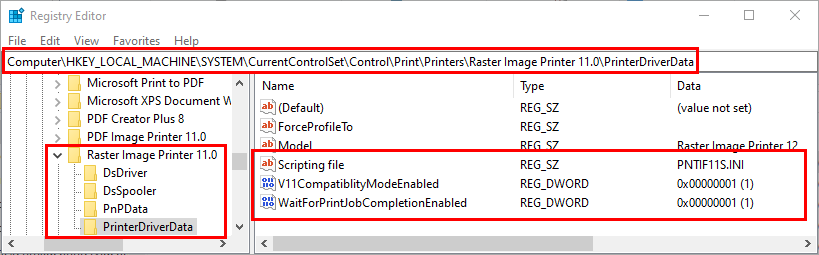
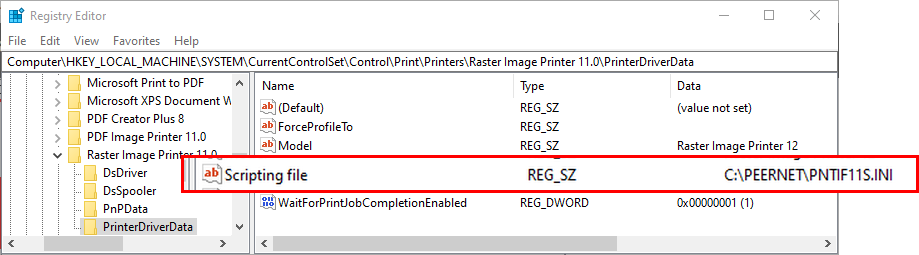
This creates three registry keys for in the printer's private driver data section with the necessary information. With this information in place, your version 12 Raster Image Printer will now look and act like version 11. These keys are located here:
HKEY_LOCAL_MACHINE\SYSTEM\CurrentControlSet\Control\Print\Printers\Raster Image Printer 11.0\PrinterDriverData |
Setting a Custom Path to the Script File
In some cases, the script file path is stored in a custom location and not the Windows TEMP folder. If this is the case for you, after you enabled compatibility mode. you will need to update the Scripting file registry key value to your path to the script file. When this key contains only the name of the script file and not path or folder information, the printer will automatically look in Windows TEMP.
Locking the Print Job in the Print Queue Until File Created
When a file is printed to Raster Image Printer, it is first submitted to the Raster Image Printer print queue. From here, our driver picks up the print job and then begins creating the PDF file or image.

Clients migrating from version 11.0 and earlier may find this behavior different. In previous versions, the print job stayed in the print queue while the file was being created. With version 12, the print job leaves the print queue after it is spooled and before we create the file.
To have the same behavior with the print job in the queue in version 12, we introduced a registry key value that can be added to the printer. When this registry key value exists and is set to 1, the print job is locked in the print queue until the output file is created. This is a global printer setting and will affect all users, programs and services, who use the printer on this computer. This registry key is automatically created, and set to 1 when compatibility mode is enabled on a printer.
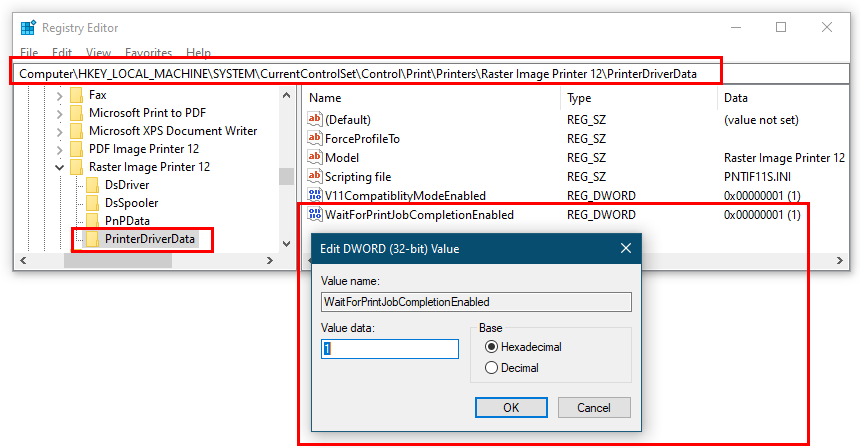
You can also create this key manually. Open the PrinterDriverData registry key for the Raster Image Printer 12 printer. If this is for a custom named printer, open the PrinterDriverData key for your custom named printer instead.
HKEY_LOCAL_MACHINE\SYSTEM\CurrentControlSet\Control\Print\Printers\Raster Image Printer 12\PrinterDriverData |
Create a new DWORD key value named WaitForPrintJobCompletionEnabled and set the data in the new value to 1. To disable it, set the value to 0, or delete the registry key.
C:\Scripts\MyRASTERScript.INI |