Creating a PDF file from any document

Contents
Creating a PDF file can be done in just a few steps from any Windows application that can print.
1.Print your document to the Convert to PDF printer to display the Convert to PDF application.
2.Select your PDF options as desired and click the Start button.
3.View the created PDF files from the Results tab.
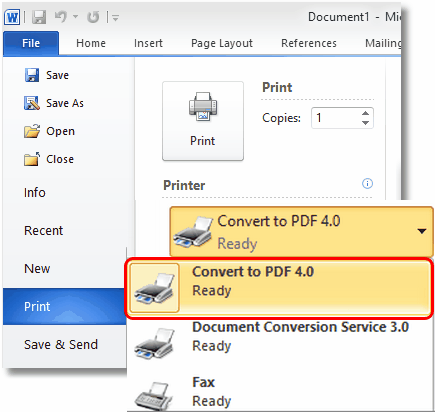
1. Print the document
•Open the document you would like to use to create a PDF. This is normally whatever application you use to view or edit the original file. Here, we are using a Word document and Microsoft Word.
•From the application's menu, print the document to the Convert to PDF 4.0 printer. For example, in Word you would do the following:
oIn Word 2007 and later, you would select the Microsoft Office Button ![]() , then click Print. If you do not see the Microsoft Office Button, select File – Print from the application menu or ribbon.
, then click Print. If you do not see the Microsoft Office Button, select File – Print from the application menu or ribbon.
oSelect the Convert to PDF 4.0 printer from the list of available printers.
oClick on OK to send the document to the printer.
2. Select your PDF options
After the document has been sent to the printer, the Convert to PDF application will be displayed showing the Options tab. From the Options tab, you can set the name of the PDF file, its location and various options for the type of PDF file you want to create. The different sections of the Options tab are described below.
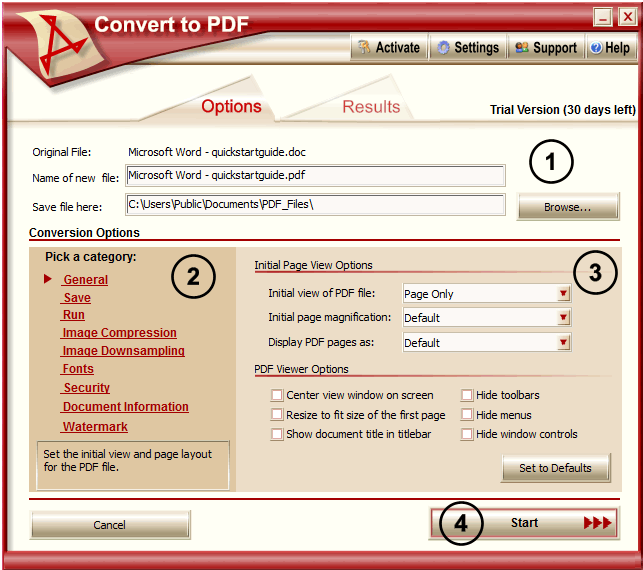
|
Choose the file name and folder in which to save your new PDF file. The Browse… button can be used to find and select the folder. The name of the document you are converting is also shown. |
‚ |
Use the category list on the left hand side to find and change any options that you need to modify. The red arrow designates the currently selected category – its available options are displayed on the panel on to the right. Move to any of the categories by clicking on its category title. |
ƒ |
Available options for the selected options category are displayed in this panel. The contents here will change depending on what category is selected. The Set to Defaults… button appears on all panels and will reset the options for that category back to the factory defaults. |
„ |
Select Start to begin creating your PDF. |
3. View the created files
When the PDF creation has been started, you are automatically moved to the Results tab. This tab displays the progress of the PDF file creation, gives you the ability to Cancel the process if desired and shows the files as they created in the File Creation Results list.
From this tab you can click the Back to Options button at any point to return to the Options tab and make changes to the PDF creation settings.
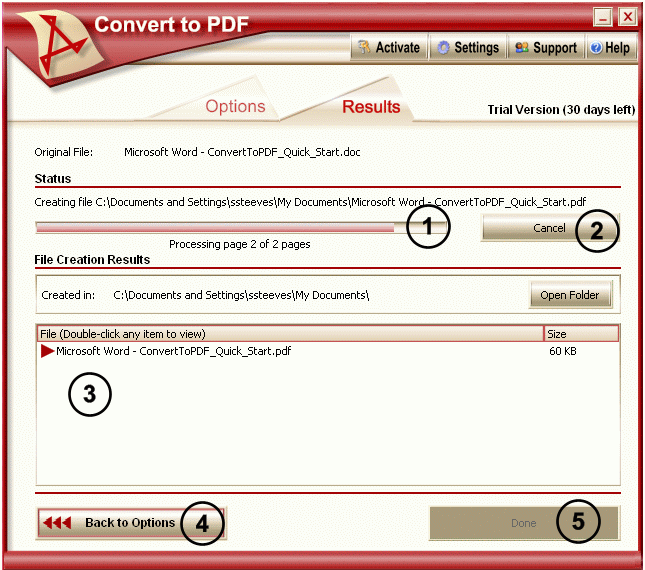
|
This status bar shows the progress of each page as your document is converted. A summary of the current page being converted and how many pages are left is also shown. |
‚ |
The creation of the PDF file can be stopped if desired using the Cancel button. |
ƒ |
As the PDF files are created, they are listed in the File Creation Results list. When the red triangle next to the name changes to a red check mark, you can double-click on that file in the list to view it. Created files are automatically viewed in your regular PDF viewer if the auto-view option is selected from the Save category options. |
„ |
Use the Back to Options button to return to the Options tab. This is a convenient way to change settings and re-create the PDF without having to print your original document again. |
… |
Done is enabled once conversion is complete. This exits the Convert to PDF application. Changes made to the conversion options are saved automatically upon each exit. |