PEERNET Sato Printer

Contents
The PEERNET Sato Printer allows for the production of labels on most Sato model printers. Label formats are generated and printed in a WYSIWYG format, allowing access to the printers' built-in typefaces, integrated bar code support, and many other printer-specific features.
The PEERNET Sato Printer will use the Sato printers' native command syntax to generate label formats where possible. Those features that are not supported by your particular Sato printer will be simulated by rendering them as graphics.
The configuration dialog for this printer contains 4 tabs that allow you to configure various aspects of the printer.
Configuration Options - Graphics Settings
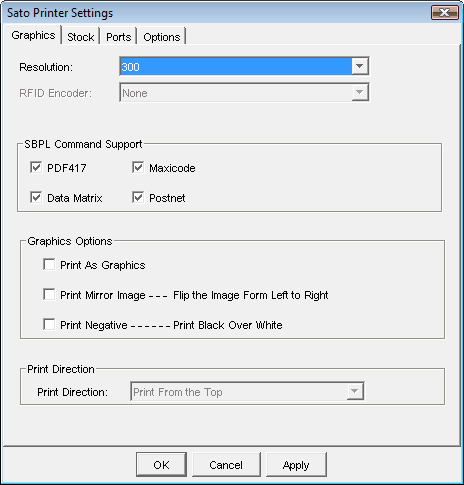
Graphics Options tab of the Sato Configuration Dialog
Resolution
This setting controls the resolution of the output at the physical printer in dots per inch (dpi). You can currently choose from 3 settings: 203 dpi, 300 dpi, or 600 dpi. The default setting is 300 dpi.
RFID Encoder
This settings allows you to specify the type of RFID encoder that is present in your printer. The default setting is Disabled, as not all Sato printers contain an integrated RFID encoder. Consult your printers' documentation for details on the RFID encoder included with your printer (if any).
SBPL Command Support
This section allows for specification of items that may not necessarily be natively supported on all Sato printer models. Items that are selected are assumed to be natively supported by the printer, and native commands will be generated to print them. If one or more of these items are not natively supported by your Sato printer, unselecting them will cause the PEERNET Reports Designer to simulate them by rendering them as graphic images.
Graphics Options
These options control how graphics are treated on the label format, and how the overall label format is generated.
Print As Graphics - when selected, this option causes the entire label format to be treated as a graphic or a series of graphic images, and essentially bypasses all native support for any item, including text, bar codes, lines and other natively supported elements.
Print Mirror Image - when selected, this option will attempt to print the label as a mirror image of what is currently displayed in the design view by flipping the elements of the label from left to right.
Print Negative - when selected, this option will attempt to print the label as a negative image, with all white portions printed black and all black portions printed white.
Print Direction
This section controls where the top of form on the label is located relative to the direction of printing. The default for this setting is Print From the Top. This option is currently disabled for Sato bar code printers.
Configuration Options - Stock Settings
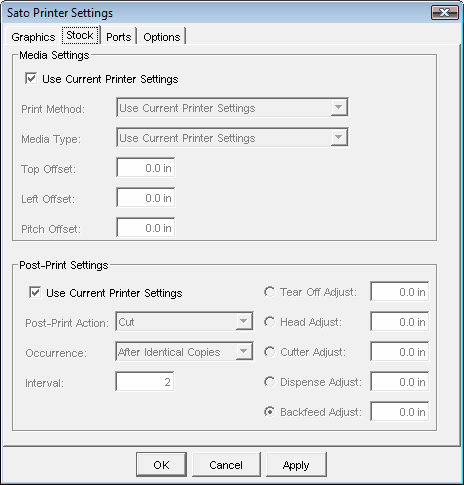
Stock Options tab of the Sato Configuration Dialog
Media Settings
These options allow you to control the specifics about the stock that you are using in your printer and how the printer functions to actually print data on the stock.
If the Use Current Printer Settings checkbox is selected, all other options in the Media Settings group are disabled and any customizations for these settings are taken from the printer itself. This allows you to make changes to these settings at the printer console itself without having to change these settings here for several different label formats that are going to the same printer.
Print Method - this allows you to specify what kind of media to use, either Direct Thermal or Thermal Transfer. The Direct Thermal setting indicates that the printer will not use a ribbon to print; in this case, the stock used must be heat sensitive. The Thermal Transfer setting results in the use of a ribbon to print. Consult your printers' documentation for more details regarding which media type is the most appropriate for your printer.
Media Type - this setting allows you to configure how the labels are arranged on the stock that you are currently using. Continuous is generally used for stock where the labels are arranged without any kind of physical separator between individual labels. Transmissive is used for those stocks where the labels are arranged with physical gaps between them. Reflective is typically used when the labels on the stock are arranged with some sort of reflective mark used to separate individual labels.
Top Offset - This option allows you to adjust the vertical offset of the start of the print area. The amount specified for the top offset will be applied to the vertical coordinate of the base reference point at the beginning of the print area.
Left Offset - This option allows you to adjust the horizontal offset of the start of the print area. The amount specified for the left offset will be applied to the horizontal coordinate of the base reference point at the beginning of the print area.
Pitch Offset - This option allows you to specify an extra offset to the character pitch for any text that is printed on the label.
|
Minimum Value |
Maximum Value |
||
|
Imperial (in) |
Metric (mm) |
Imperial (in) |
Metric (mm) |
Top Offset |
-3.27 |
-83.1 |
3.28 |
83.2 |
Left Offset |
-3.27 |
-83.1 |
3.28 |
83.2 |
Pitch Offset |
-0.32 |
-8.1 |
0.32 |
8.2 |
Post-Print Settings
All post-print options allow the user to specify actions to take place after a label or several labels is/are printed. Many of the options available here rely on specific functionality of the printer (such as the presence of a cutter). In these cases, it is necessary to consult your printers' documentation to determine whether a specific post-print action is valid for your particular printer.
If the Use Current Printer Settings checkbox is selected, all other options in the Post-Print Settings group are disabled and any customizations for these settings are taken from the printer itself. This allows you to make changes to these settings at the printer console itself without having to change these settings here for several different label formats that are going to the same printer.
Post-Print Action - specifies the action to take after a particular number of labels has been printed (by default, after each label is printed). The default setting is None, which means that no action is taken after a label is printed. Available actions here are:
•Tear-Off
When Tear-Off is specified, the printer will automatically feed the label to the tear bar after printing for easy removal. Other options that can be specified when this print mode is chosen include the Tear-Off Adjustment.
•Cut
When Cut is specified, the printer will feed the label to the cutter and cut the label. Additional options that can be specified when 'Cut' is chosen as the post-print action include the Head Adjustment, the Cutter Adjustment and the Backfeed Adjustment.
•Dispense
When Dispense is specified, the printer will automatically feed the label through the dispenser and peel the label from the backing, at which point the printer will pause until the label is taken. Other options that are available here include the Head Adjustment and Dispense Adjustment.
•Linerless
When Linerless is specified, it is assumed that you are using linerless stock in the printer, and have the Sato linerless platen roller in order to advance the printed labels properly for application. Other options available when 'Linerless' is selected include the Cutter Adjustment and the Backfeed Adjustment.
Occurrence - allows the user to change when the specified print mode is done. This option is only available if 'Cut' is specified as the print mode; for all other print mode settings, this option is disabled. Available actions here are:
•After Every Page
Specifies that the selected print mode should be done after each page is printed (or after each label is printed).
•After Specified Interval
Specifies that the selected print mode should be done after a specified number of pages or labels are printed. Refer to the 'Interval' setting below for more information.
•After Identical Copies
Specifies that the selected print mode should be done after the number of copies of each page or label has been printed.
•After Job
Specifies that the selected print mode should be done after all of the pages or labels have been printed.
Interval - Used in conjunction with the 'After Specified Interval' setting of the Occurrence drop-down, allows the user to specify the number of labels to print before the selected post-print action is performed. This value is independent of the number of copies to print. This setting has a range of 1 to 999999 with a default value of 1, and is ignored completely if the value for Occurrence is anything other than 'After Specified Interval'.
Tear-Off Adjustment - allows the user to adjust the label stop position when a label is presented at the tear bar in tear-off mode. Available when 'Tear-Off' is selected as the post-print action, the tear-off adjustment allows the user to adjust the position of the tear, which by default occurs at the end of the label (i.e. the label height).
Head Adjustment - allows the user to adjust the label stop position relative to the print head. Currently only available when either 'Cut' or 'Dispense' is selected as the post-print action, the head adjustment allows the user to adjust the stop position of the label after the cut or dispense action relative to the print head, which by default occurs at the end of the label (i.e. the label height).
Cutter Adjustment - allows the user to adjust the label stop position relative to the cutter. Currently only available when either 'Cut' or 'Linerless' is selected as the post-print action, the cutter adjustment allows the user to adjust the position of the cut, which by default occurs at the end of the label (i.e. the label height).
Dispense Adjustment - allows the user to adjust the label stop position relative to the label dispenser. Currently only available when 'Dispense' is selected as the post-print action, the dispense adjustment allows the user to adjust the stop position of the of the label after it has been presented for dispensing, which by default occurs at the end of the label (i.e. the label height).
Backfeed Adjustment - allows the user to adjust the label stop position after the selected action by reversing the label feed. Currently only available when either 'Cut' or 'Linerless' is selected as the post-print action, the backfeed adjustment allows the user to adjust the stop position of the label by specifying a distance to retract the label after the selected action, which by default occurs at the end of the label (i.e. the label height).
|
Minimum Value |
Maximum Value |
||
|
Imperial (in) |
Metric (mm) |
Imperial (in) |
Metric (mm) |
Tear-Off Adjustment |
-0.32 |
-8.1 |
0.32 |
8.2 |
Head Adjustment |
-0.32 |
-8.1 |
0.32 |
8.2 |
Cutter Adjustment |
-0.32 |
-8.1 |
0.32 |
8.2 |
Dispense Adjustment |
-0.32 |
-8.1 |
0.32 |
8.2 |
Backfeed Adjustment |
-0.32 |
-8.1 |
0.32 |
8.2 |
Configuration Options - Options Settings
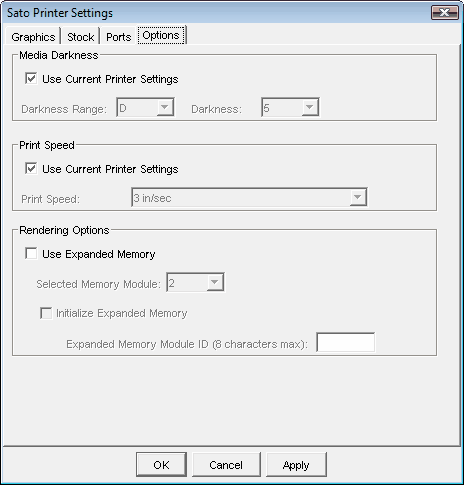
Options tab of the Sato Configuration Dialog
These settings allow the user to exert fine-grain control of several Sato printer options, including print speeds, print head function, and printer memory settings.
Media Darkness Settings
These settings allow the user to make adjustments to the darkness setting of the print head.
If the Use Current Printer Settings checkbox is selected, all other options in the Media Darkness Settings group are disabled and any customizations for these settings are taken from the printer itself. This allows you to make changes to these settings at the printer console itself without having to change these settings here for several different label formats that are going to the same printer.
Darkness Range - specifies the darkness range in which to apply the darkness setting, described below. This has the effect of exerting finer control over how dark or light the components on a label are rendered. The default specifies a darkness range value of 'A'.
Darkness - specifies the amount of heat applied by the print head to the media within the specified darkness range. The default darkness setting is '3'.
We highly recommend setting the darkness range to 'D' and the darkness to '3' to ensure the best overall quality in the printed output. This is especially important for generating high-quality bar codes that are printed in the 90 and 270 degree rotations. |
Print Speed Settings
The options presented here allow you to make adjustments to the various speed settings available on Sato printers.
If the Use Current Printer Settings checkbox is selected, all other options in the Print Speed Settings group are disabled and any customizations for these settings are taken from the printer itself. This allows you to make changes to these settings at the printer console itself without having to change these settings here for several different label formats that are going to the same printer.
Print Speed - specifies the rate at which labels are printed. The default is to use the current printer settings.
|
Minimum Speed |
Maximum Speed |
||
|
Imperial (in) |
Metric (mm) |
Imperial (in) |
Metric (mm) |
Print Speed |
2.0 |
50.8 |
4.0 |
101.0 |
We highly recommend setting the print speed to '3 in/sec' to ensure the best overall quality in the printed output. This is especially important for generating high-quality bar codes that are printed in the 90 and 270 degree rotations. |
Rendering Options
Sato printers can be purchased with an optional expanded memory module installed. Expanded memory can enhance the capabilities of Sato printers, as it allows for the storage and recall of custom fonts, frequently used graphics and even entire label formats.
Use Expanded Memory - This setting, if checked, allows you to specify which memory location is used for storage of downloaded fonts and images. Sato printers recognize up to 2 different memory modules. This option is not enabled by default, since most Sato printers do not come with expanded memory modules installed.
Initialize Expanded Memory - Expanded memory modules installed on Sato printers do not come pre-initialized for use. The first time that you use an expanded memory module you must initialize it first; failure to do so will result in all expanded memory commands to fail with no indication of failure (except that your label format will most likely not print correctly). If the Initialize Expanded Memory checkbox is selected, you must supply an expanded memory module identifier that is used to identify the memory module during initialization. The identifier cannot be longer than 8 characters and must consist of alpha-numeric characters only (a-z, A-Z, and 0-9).
Limitations
1. The following bar codes are not fully supported by Sato printers, and will always be simulated as graphics when printed:
•All 4-State bar codes
•Anker
•Planet
•Facing Identification Mark (FIM)
•Plessey
•Standard 2 of 5
•SCC-14 (UCC/EAN variants)
•SSCC-18
•UCC/EAN 128
•Code128 Auto
2. The following bar codes are simulated as graphics only under certain conditions:
•PDF417
PEERNET Reports Designer will make every attempt to generate this bar code using native command syntax; however, this bar code will be simulated as a graphic if any of the following conditions are met:
othe specified number of columns is outside the acceptable range of 1 - 30, or
othe specified number of rows is outside the acceptable range of 3 - 40, or
othe specified X dimension is outside the acceptable range of 3 - 9, or
othe specified Y dimension is outside the acceptable range of 4 - 24, or
othe specified ECC level is outside the acceptable range of 1 - 8
•DataMatrix
This bar code will be simulated as a graphic if the specified X dimension is outside the acceptable range of 3 - 12.
3. The following graphic items are not natively supported by the Sato command syntax, and are simulated as graphics:
•Arcs
•Polygons
•Ellipses and ovals (including circles)
•Rounded rectangles
•Diagonal lines
4. PEERNET Reports Designer makes use of 2 vector fonts that are built-in to the Sato printer, as most Sato printers do not normally come with expanded memory which would enable the use of generated bitmap or True Type fonts. This will result in all text elements rendered on the printer to look different than they are displayed in the Design View.
5. Printing inverse text (white text on a black background) has not been implemented in the Sato built-in thermal printer that is included in PEERNET Reports Designer. If you require inverse printing and you are using a Sato thermal printer, we recommend printing the entire label or report as an image. Simply select the Print as Graphics checkbox on the Graphics tab of the Sato Configuration Dialog to enable this feature in these cases.