Accessing a Microsoft Excel workbook (XLS) database

Contents
You can access a Microsoft Excel workbook as a database. Each worksheet in a workbook is seen as a separate table in the database. Each row in a spreadsheet constitutes one row of data in the table. Column names, if present, must be in the first row of a worksheet. Dates should be in the format @Date(yyyy,mm,dd). For details on Excel specifications, see Excel spreadsheet specifications at the end of this section.
The following steps will guide you through setting up an ODBC data source link to an Excel file, and using the spreadsheet(s) in the file as table(s) in the application.
Note that the sample project Chapter06_ODBC_Excel.pnj and the sample database SampleData.xls are used in the following procedure. You can access this project by clicking File – Open Project in the application menu, then enabling the Open a sample project option.
Note that steps 1 - 3 are applicable only if you are running a 32-bit operating system. If you are running a 64-bit operating system (such as Windows Vista or Windows XP-64), you will need to access and run the 32-bit ODBC administration application, which is not available from the Control Panel. The 32-bit ODBC administration application is called odbcad32.exe and can be found in the C:\Windows\SysWOW64 directory.
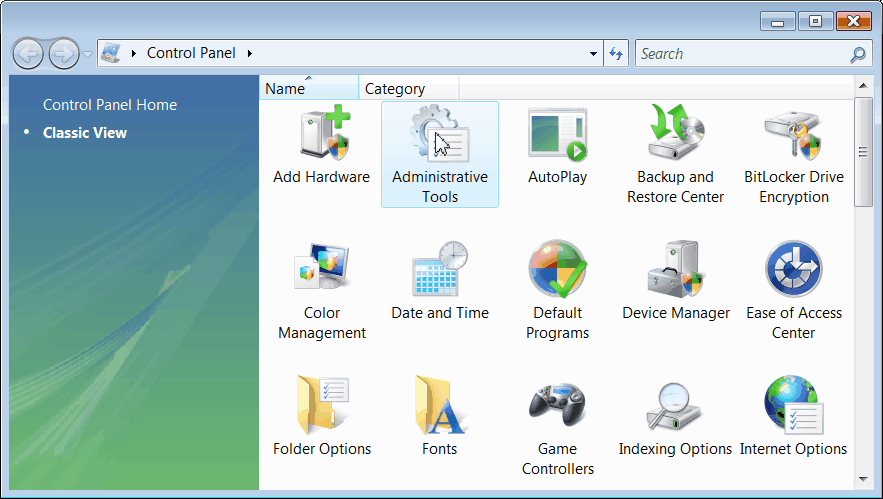
1.Click the Start menu – Settings – Control Panel to display the Control Panel window.
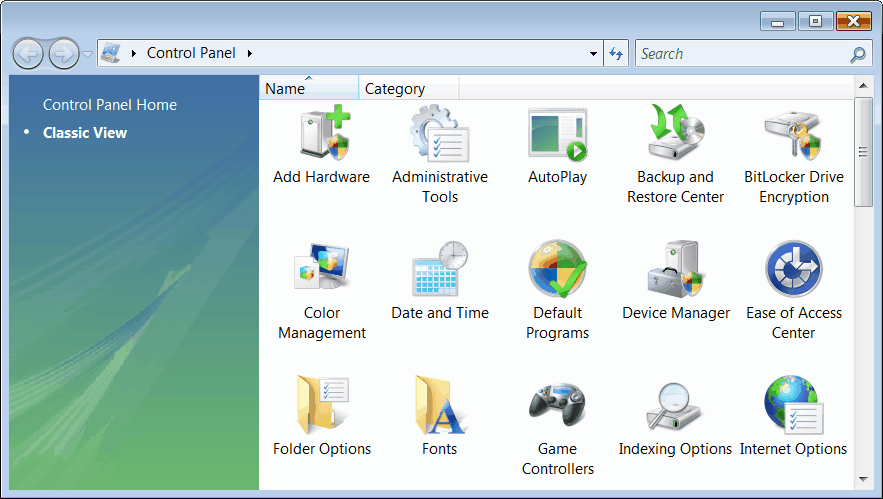
2.Double-click the Administrative Tools icon. This will display the Administrative Tools window.
If you are running a version of Microsoft Windows previous to Windows 2000, double-click the icon labeled 32-bit ODBC or ODBC, and skip to Step 4.
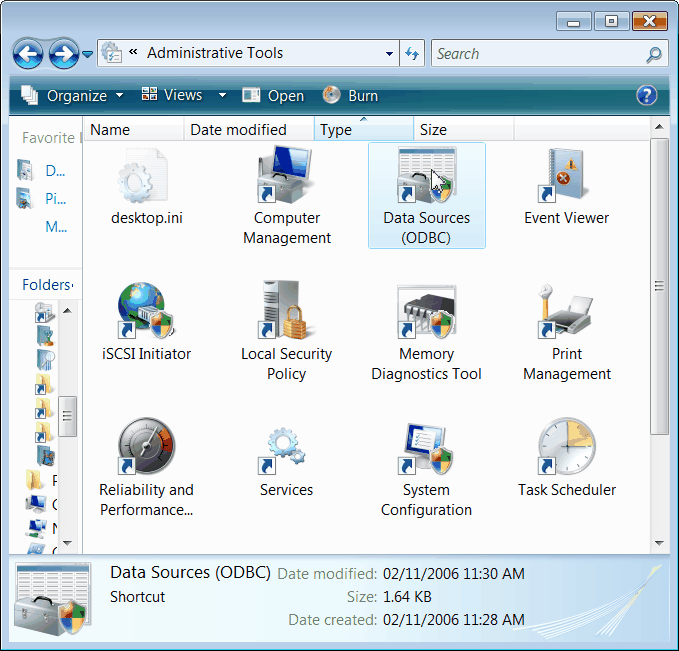
3.From the Administrative Tools window, double-click the Data Sources (ODBC) icon to display the ODBC Data Source Administrator application.
4.The ODBC Data Source Administrator opens. The ODBC Data Source Administrator manages the connections between database drivers and data sources. These connections are used to link to the database.
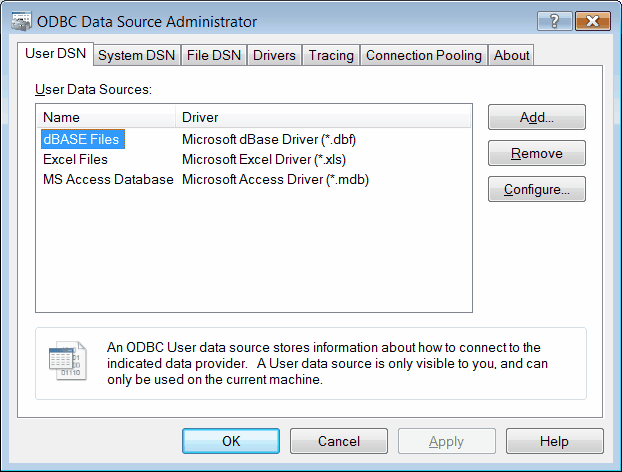
Database drivers are components that allow any application to communicate with the database using ODBC requests and return the requested information to the application. Each type of database will have its own driver.
Data sources are the actual database or files the drivers access. They are identified by a Data Source Name (DSN). There are two categories of data sources used here: User DSN and System DSN.
User DSN’s are data source connections that are local to the computer and can be accessed only by the user who created the connection.
System DSN’s are data source connections that are local to a computer, but not dedicated to a user. The system or any user with sufficient privileges can use a data source set up with a system DSN.
The ODBC Data Source Administrator is used to add, configure, and delete the connection, or links you create between the database drivers and the data sources.
Note that deleting a database-driver link does not delete the actual database file(s) on the computer.
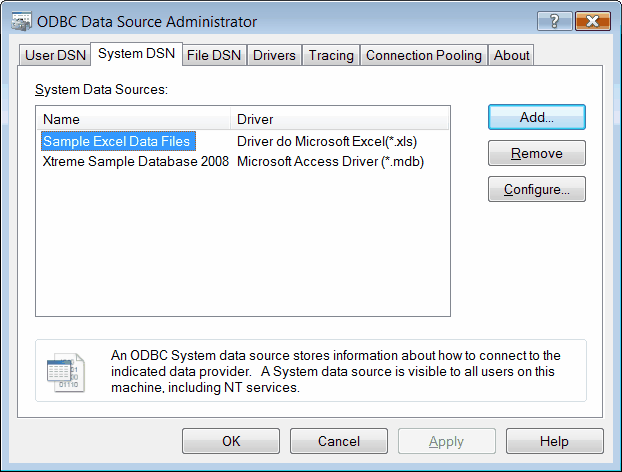
5.In the ODBC Data Source Administrator, click the System DSN tab. From here, click the Add button to display the Create New Data Source dialog box.
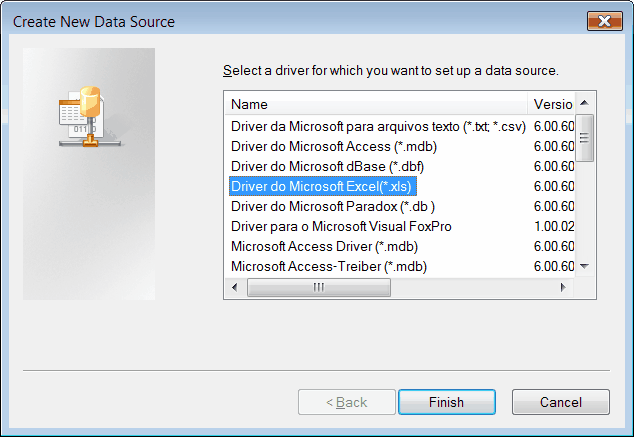
6.The Create New Data Source dialog box lists the available database drivers installed on the computer, as well as the version of the database driver. By default, the first driver in the list is already selected. To create a new data source that uses an Excel file, scroll down and select Microsoft Excel Driver (*.xls) from the list of drivers.
7.Click the Finish button to display the ODBC Microsoft Excel Setup dialog box.
8.The ODBC Microsoft Excel Setup dialog box specifies the name and description of this data source, and where to look for the file. Type a Data Source Name, as well as a description. The description will allow you to easily remember what this data source represents.
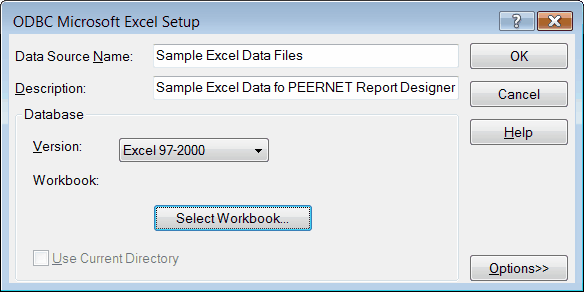
9.To tell the driver where to find the database, select the Version that matches your version of Microsoft Excel. Click the Select Workbook button to bring up the Select Directory dialog box.
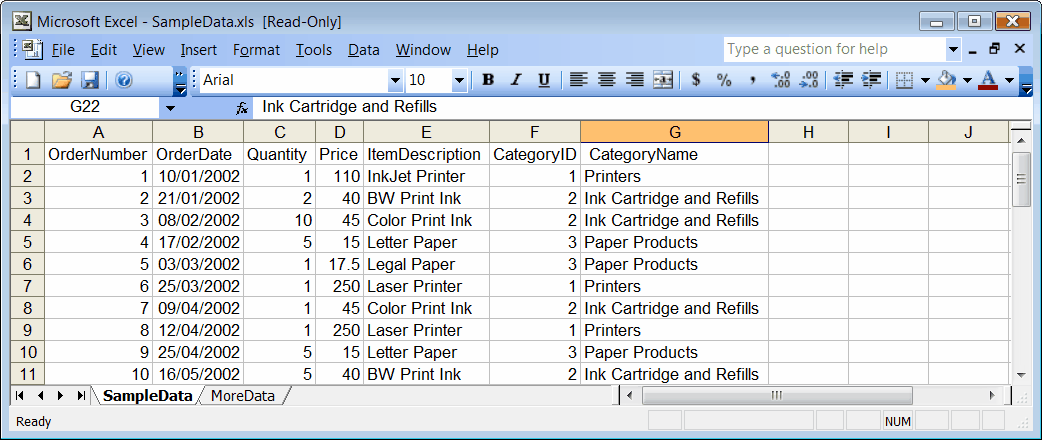
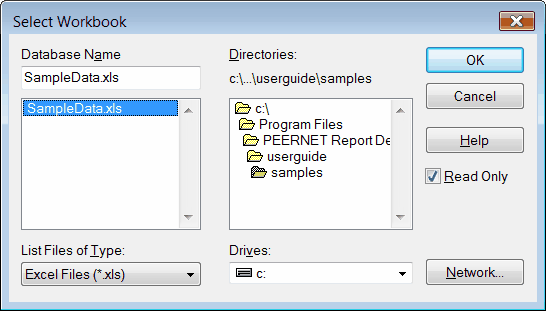
10.Use the Select Workbook dialog box to locate and select a Microsoft Excel Workbook file. Search for the desired workbook file using the Directories, List Files of Type, and Drives boxes, or click Network to search for a workbook on the network. Database Name shows the selected file. To prohibit updates to this file, select the Read Only checkbox. In this example, the /userguide/samples folder under the installation directory is used. Select the sample file named SampleData.xls listed in the Database name list box and click OK.
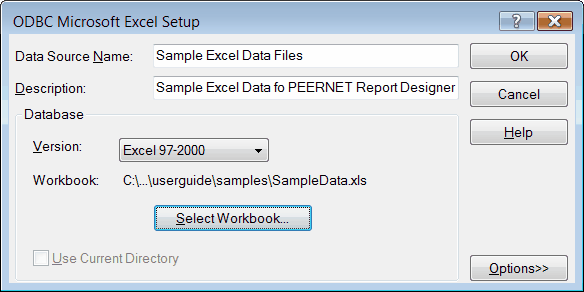
11.The ODBC Microsoft Excel Setup dialog box now displays the directory selected in the previous step.
12.Clicking the Options button expands the dialog box. Typically, you will not need to change the default options. The default value for the number of Rows to Scan is 8. You can enter any number from 1 to 16. Do not confuse this number with the number of rows in the table. The entire table will be available to you regardless of this number. The number of Rows to Scan simply indicates how many rows the Excel driver will use to determine the type of data in each column. If data is encountered that does not match the data type guessed for the column, the data type will be returned as a NULL value.
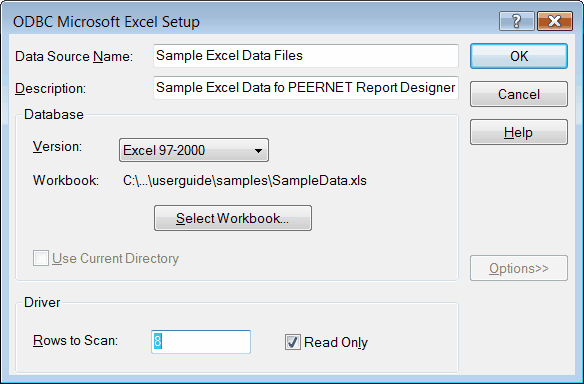
13.Excel files are opened as read-only by default. Uncheck the Read Only attribute to allow updates to the Excel database. Click the OK button to accept the new data source and return to the ODBC Data Source Administrator dialog box.
14.The data source just defined, Sample Excel Data Files, is now listed as a System Data Source. Also shown is the driver this data source will use. The data source is now ready to be used. Click OK to close this dialog box.
15.Launch PEERNET Reports Designer and, using the dialog box that is displayed, open or create the project in which you want to use this data source.
Here, the sample project file Chapter06_ODBC_Excel.pnj is opened.
16.To add the newly created Excel data source as a table in the project, double-click the Tables item to bring up the Link Table dialog box.
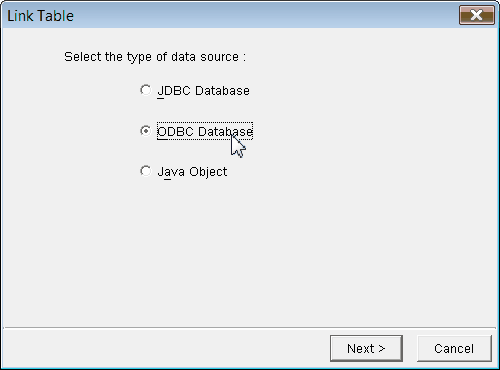
17.The first step of the Link Table wizard presents a choice of three types of data sources. Enable the ODBC Database option, and click Next.
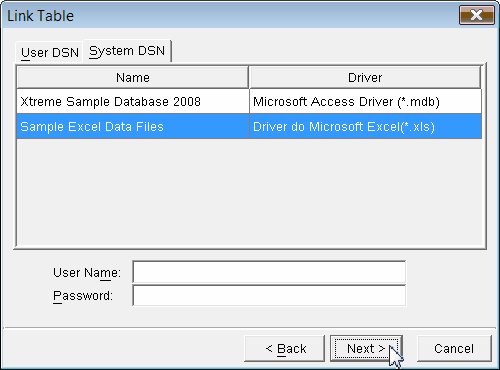
18.The next page lists all User and System DSN’s currently available. Click the System DSN tab to show the Excel data source that was added in previous steps. Select the Excel data source. The User Name and Password fields do not apply to Excel data sources. If your Excel file is password-protected, you will not be able to link to it. Click Next.
19.Each worksheet in the Excel file will be listed as table. Select the tables you want and click the Link button to add them to the project. To select more than one table, hold the CTRL key down as you select. Here, we select the table SampleData$.

20.Click the ![]() to expand the Tables item and view the newly added table in the list. Double-click this table to view its data.
to expand the Tables item and view the newly added table in the list. Double-click this table to view its data.
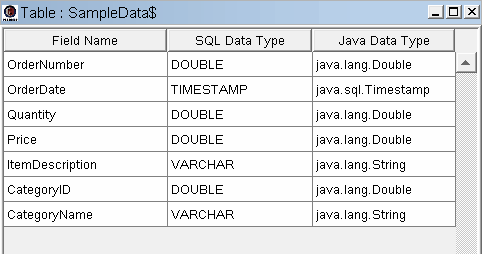
21.The Design View of the table lists the columns in the table, along with the data type of the data in each column.
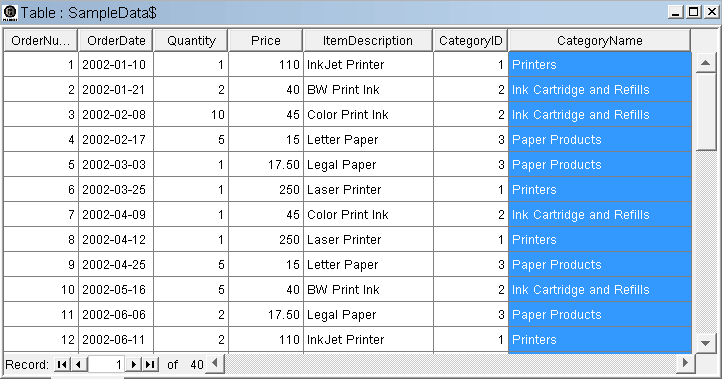
22.The Datasheet View shows the actual data in this data source.
23.If you intend to rename the table in your project, it is important to do so now, before using this table in any report or label. This prevents you from having to redefine the record source for the report or label.
To rename the table, right click the table, and select Rename Table.
Excel spreadsheet specifications:
•Column names, if present, must be in the first row of a worksheet. Column names must not exceed 64 characters. Any character, including spaces, may be used, however all non-alphanumeric characters will be replaced with underscores. Unspecified (blank) column names will be replaced with driver-generated names (for example, Col1 for column 1).
•Excel versions 3.0, 4.0, 5.0/7.0, 97 and 2000 are supported.
•Password-protected Excel files are not supported. Trying to link to password-protected Excel files will produce an error.
•Because the underlying data format does not have any way to differentiate between an empty string and NULL data, a query with a search condition containing an empty string will not match any empty strings in the table. This is because the empty string is treated as a NULL in this case, and NULL never matches anything (not even another NULL).
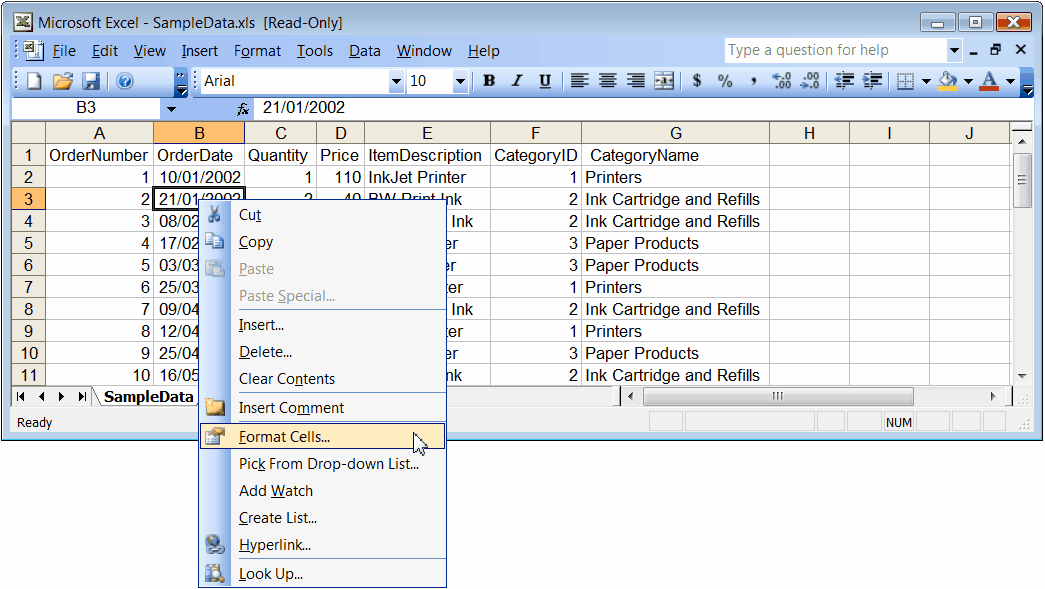
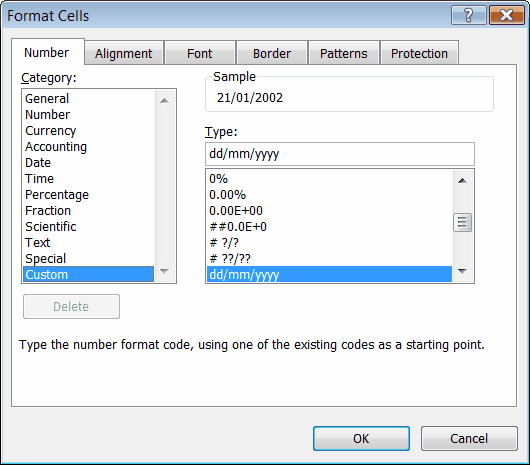
•If dates are not in the format @Date(yyyy,mm,dd), the cell format must match the data exactly (for example, 21/06/96 must have a custom format of dd/mm/yy).