Prior to version 12, the Run at End command was triggered for each file created, and the name of each file created could be passed to the command using a macro, $(OutputFileName). Other macros could also be passed to the command.
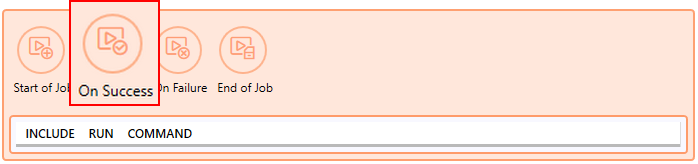
As of version 12, there are now two new Run at End commands, On Success and On Failure. On Success commands run after all the files have been successfully created. On Failure commands run when a error occurs while creating the files.
Both commands by default will pass as the last argument the path to a text file containing a list of any files created. The On Success and On Failure commands are different from the End of Job command. The End of Job command always runs when the print job is finished, while only one of On Success or On Failure runs, depending on the state of the print job.
The included PNExec12.exe tool allows you to reproduce the previous Run at End or On File Close command behavior in the current version. It allows you to execute a command ( *.exe) for each file created, making it easier to migrate from earlier versions.
If you just want to run a program or application, and don't need it to run for every file you create, see Launch an Application or Program.
PNExec12.exe Utility
The included utility has been provided for your use in the On Success and On Failure run commands. It expects as a last argument the the path to a text file of files to process. It is located in the RunCommands folder in your PDF Image Printer install folder. This is usually C:\Program Files\PDF Image Printer 12\RunCommands\.
PNExec12 Macros
The Run Command macros can be used with this utility to pass in print job arguments. To pass the created file to the utility, use one of the following macros:
$(OutputFilePath)
The final output file, a fully qualified path to the created file, in quotation marks.
$(OutputFilePathNoQuotes)
Same as $(OutputFilePath), but without quotation marks.
Command Line Arguments |
|
|---|---|
/C="path to command" |
Required, pass in the full path to the command to execute. Use quotes if there are spaces in the path. Single quotes can also be used. |
/A=" 'arg 1' arg2" |
Optional, extra arguments to pass to the command. Use double quotes around the entire argument string, and single quotes around any argument in the string that needs to be passed quoted. Optionally, you can use single quotes around the entire argument string and double quotes around any argument in the string that needs to be passed quoted. /A='"arg 1" arg2' This argument can contain the $(OutputFilePath) or $(OutputFilePathNoQuotes) macro. If it does, the macro is replaced with the name of the file from the file list for each file we run. If the macros are not present in this argument, or this argument is not used, the quoted file name for the file in the list the command is being run for is appended to the end of the command. Other run command macros can also be used here. |
/WAIT=<time in seconds> |
Optional; how many seconds PNExec12.exe will wait for the command to complete. When not provided or a negative number - waits indefinitely for the command to finish (complete) If set to 0 = does not wait for the command to complete If greater than 0 - waits that many seconds for the command to complete |
/MODE=<window state> |
Pass in the initial windows state for the command you are running. The default windows state is to show the window (5 - SW_SHOW). To hide the window, pass /MODE=0. 0 - Hide the window (SW_HIDE). 1 - Activates and display the window (SW_SHOWNORMAL). 2 - Show the window minimized (SW_SHOWMINIMIZED). 3 - Show the window maximized (SW_SHOWMAXIMIZED). 4 - Show the window but do not activate it (SW_SHOWNOACTIVATE). 5 - Activates and and display the window (SW_SHOW). |
PNExec12 Logging - If there is an error running the command, a log file is created in the %TEMP% folder. The log file name has the pattern pnexec12-{GUID}.txt. |
|
Sample Migration For Run Commands
For users migrating from the older-style commands from version 11 or previous, the following shows the changes needed to update your commands for version 12 and later. To see how to add a new command, go to the step-by-step instructions below.
Single Argument Command
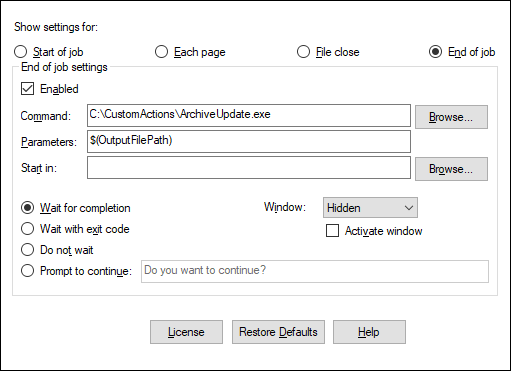
This is a sample run at end command in PDF Image Printer 11.0 using ArchiveUpdate.exe, a fictional utility used for demonstration only. It is not an included utility. In this example, the utility expects the full path to the output file that was created and waits for the command to complete before printing is finished.
PDF Image Printer 11.0 End of job settings in Printer Preferences:
PDF Image Printer Script File settings for Run at End :
[Run] RunAtEnd enable=1 RunAtEnd command=C:\CustomActions\ArchiveUpdate.exe RunAtEnd parameters=$(OutputFilePath) RunAtEnd directory= RunAtEnd window=Hidden RunAtEnd window active=0 RunAtEnd wait=0 RunAtEnd prompt=Do you want to continue? |
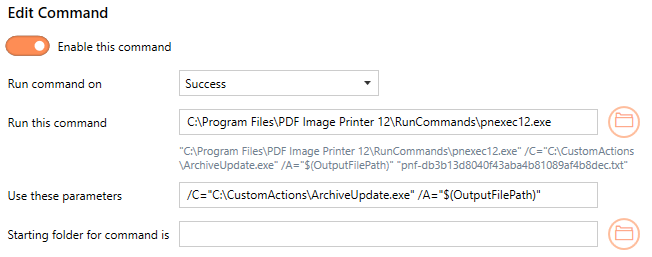
In PDF Image Printer 12, using the PNExec12.exe utility in the profile to call the fictional ArchiveUpdate.exe for each output file created would look like the following:
Multiple Custom Arguments Command
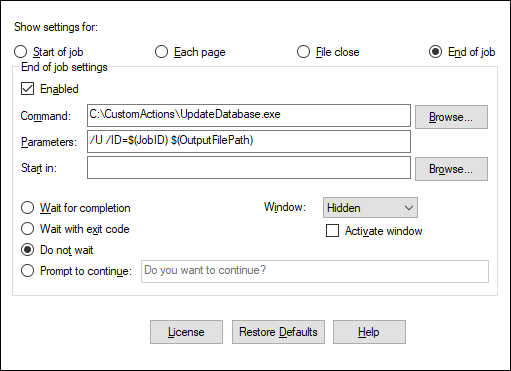
This next sample run at end command in PDF Image Printer 11.0 uses another a fictional utility, UpdateDatabase.exe, for demonstration only. It is not an included utility. In this example. the utility takes three custom arguments: a command switch /U, the JobID of print job and the full path to the output file that was created. It launches the utlity but does not wait for the application to finish. This is an example of when you don't need to wait for the application to finish, you just want to fire and forget.
PDF Image Printer 11.0 End of job settings in Printer Preferences:
PDF Image Printer Script File settings for Run at End :
[Run] RunAtEnd enable=1 RunAtEnd command=C:\CustomActions\UpdateDatabase.exe RunAtEnd parameters=/U /ID=$(JobID) $(OutputFilePath) RunAtEnd directory= RunAtEnd window=Hidden RunAtEnd window active=0 RunAtEnd wait=2 RunAtEnd prompt=Do you want to continue? |
In PDF Image Printer 12, using the PNExec12.exe utility in the profile to call the fictional UpdateDatabase.exe for each output file created would look like the following.

Step by Step Instructions
The steps below demonstrate how to use the PNExec12.exe tool and the new Run Commands tab to call a fictional utility, ArchiveUpdate.exe that takes the full path to the output file that was created. This tool name is for demonstration only and is not an included utility.
1.Launch the PDF Image Printer Dashboard.
2.Select "Edit & Create Profiles" to open Profile Manager.
3.Select "Add a profile" to create a personal profile, or create a copy of one of our system profiles.
4.Name the profile, add a description, and click Save.
5.On the Run Commands tab, click the On Success button to add an On Success command.
6.The command will be added already enabled and the details expanded. Leave the Append file list to command parameters enabled. You need this argument so that the command will run for each file created. Next to Run this command, enter the full path and file name of the PNExec12.exe:
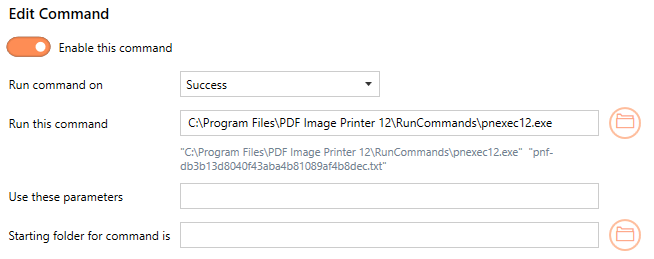
7.In the Use these parameters field, add any parameters needed by the command being run. For our fictional tool, we need to pass the full output file name. We can do this using the macro $(OutputFilePath). The PNExec12 utility will automatically replace this value with the quoted output file path from text file when it processes the list of files created. As we do not want to see the command running, we also pass the /Mode=0 argument to hide the window. And lastly, since we do not want to see PNExec12 utility running, change Show command window as to Hidden and disable Bring window to foreground.
8.Click Save-Back, and close Profile Manager.
If you choose to enable run commands, you may also want to disable prompting by the Save As dialog each time you print.
i.To turn off prompting by the Save As dialog, disable Prompt for the output location and base file name.

If you plan to use these settings regularly, you may wish to make this personal profile the default profile used by PDF Image Printer.
i.Select the printer you wish to edit and use the Profile drop box to select your desired default profile.
ii.Select "Manage Printers" to open Printer Management.
iii.Select the Save icon to save changes.
iv.Select the Home icon to return to the Dashboard.
9.Close the Dashboard. Now when you print your document to PDF Image Printer, all created output images will be passed to the program you specified to be processed.