New for Document Conversion Service 3.0.010 is high-performance clustering and failover management within the Watch Folder Service.
What is Clustering?
Clustering allows you to install Document Conversion Service on more than one computer, point each computer at the same group of files, and have all the computers working together to convert the files in that folder. This can greatly increase your conversion performance. If you are dealing with large sets of files to be converted, clustering is an easy way to increase your conversion speed and keep your data centralized.
You will need a separate license of Document Conversion Service for each computer you plan to use in the cluster.
High Availability and Failover Support
A side benefit of clustering is failover, or high availability support. As more than one computer is actively converting documents, if one computer has to be restarted or brought off line while other maintenance is performed, the other computers watching the clustered folder are still running and converting until the first one is back up and running again.
Clustering with Watch Folder Service
The Watch Folder Service includes a sample Watch Folder section, Clustered ConvertToTIFF Watch Folder, that is pre-configured for clustered processing. This watch folder section uses a network share folder, C:\PEERNET\WatchFolders\CLUSTERED, that is created as part of the Document Conversion Service install. See Clustering - Use the PEERNET CLUSTERED Share Folder for steps on setting up this type of clustered processing.
A more common approach is to have Document Conversion Service and Watch Folder Service installed on several computers and watching a network share that is separate from any of the computers in the cluster. See Clustering - Using an External Network Share for instructions on setting up clustering in this environment.
Clustering - Use the PEERNET CLUSTERED Share Folder
In this scenario, the shared folder that contains the files and/or folders to be processed is on the first computer in the cluster. All of the other computers simply point to the shared folder and process the files from there. The key here is to install Document Conversion Service and create the DCSAdmin account with the same user name and password on all computers in the cluster.
Setting up the First Node in the Cluster
1.Install Document Conversion Service and when prompted, allow the install to create the local DCSAdmin administrative account. Keep note of the password used when creating the DCSAdmin as you will need to use the same password on all the other computers.
2.The install will create a network shared folder, C:\PEERNET\WatchFolders\CLUSTERED.
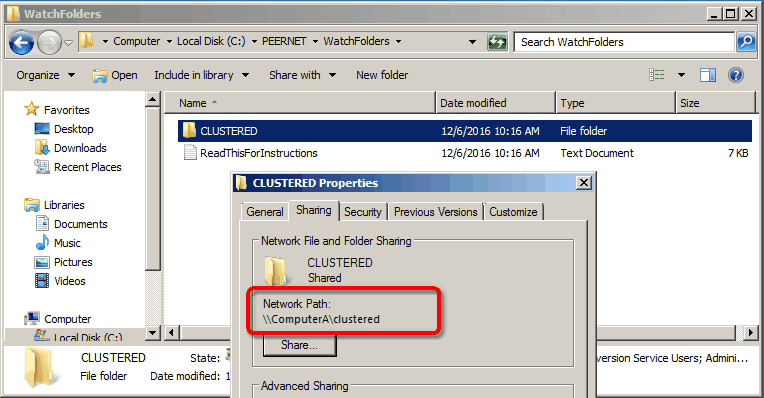
3.The Watch Folder Service contains a sample Watch Folder configuration using this folder for clustered processing. Leave this configuration as set. The input location, C:\PEERNET\WatchFolders\CLUSTERED\ConvertToTIFF\Input, is where you will copy the files to be processed.
 |
Code Sample - Clustered Conversion for Base Node |
<WatchFolders> <!-- This watch folder is configured for clustered processing --> <!-- The InputFolder, FailedFolder, CompletedFolder and OutputFolder can point to shared folders --> <add Name="InputFolder" Value="C:\PEERNET\WatchFolders\CLUSTERED\ConvertToTIFF\Input"/> <add Name="SearchFilter" Value="*.*"/> <add Name="IncludeSubFolders" Value="True"/> <add Name="DeleteInputSubFolders" Value="True"/> <add Name="FailedFolder" Value="C:\PEERNET\WatchFolders\CLUSTERED\ConvertToTIFF\Failed"/> <add Name="CompletedFolder" Value="C:\PEERNET\WatchFolders\CLUSTERED\ConvertToTIFF\Completed"/> <add Name="OutputFolder" Value="C:\PEERNET\WatchFolders\CLUSTERED\ConvertToTIFF\Output"/>
<!-- Keep thse folders on separate computers for clustering. --> <add Name="StagingFolder" Value="C:\PEERNET\WatchFolders\CLUSTERED\ConvertToTIFF\Staging"/> <add Name="WorkingFolder" Value="C:\PEERNET\WatchFolders\CLUSTERED\ConvertToTIFF\Failed"/>
...
<!-- Clustered Processing --> <!-- This forces batch mode processing with synchronous wait and --> <!-- no date time stamp used in the Failed\Completed folders --> <add Name="ClusteredProcessing.Enabled" Value="true"/> <!-- Override this for clustering to customize pickup --> <!-- <add Name="ClusteredProcessing.MaxFilesToPickup" Value="4"/> -->
|
|
4.Start Document Conversion Service and Watch Folder Service on this computer.
Setting up the Other Nodes
For all the other computers you want in the cluster, do the following.
1.Install Document Conversion Service and when prompted, allow the install to create the local DCSAdmin administrative account. Use the same password used when the first node in the cluster above. It is this matching account, as well as the shared network drive that allows the clustered processing to take place. If the passwords do not match, clustering will not work.
2.The install will also create a network shared folder, C:\PEERNET\WatchFolders\CLUSTERED on this computer but on this node, the shared folder is only used to keep the staging and working folders for each node separate.
3.Open the watch folder configuration file in DCS Editor by going to DCS Dashboard - Watch Folder Settings - Edit Configuration, or by going to Start - All Programs - PEERNET Document Conversion Service 3.0 - Watch Folder - Configure Watch Folder Settings.
4.Scroll to the Clustered ConvertToTIFF Watch Folder section, or use the Find and Replace tool to find the section in the file. Set the InputFolder setting to use the shared computer path to the first node in the cluster instead of the hard drive on this computer.
|
Code Sample - Clustered Conversion |
<WatchFolders> <!-- This watch folder is configured for clustered processing --> <!-- The InputFolder, FailedFolder, CompletedFolder and OutputFolder can point to shared folders --> <add Name="InputFolder"Value="\\ComputerA\CLUSTERED\ConvertToTIFF\Input"/> <add Name="SearchFilter" Value="*.*"/> <add Name="IncludeSubFolders" Value="True"/> <add Name="DeleteInputSubFolders" Value="True"/> <add Name="FailedFolder" Value="\\ComputerA\CLUSTERED\ConvertToTIFF\Failed"/> <add Name="CompletedFolder" Value="\\ComputerA\CLUSTERED\ConvertToTIFF\Completed"/> <add Name="OutputFolder" Value="\\ComputerA\CLUSTERED\ConvertToTIFF\Output"/>
<!-- Keep thse folders on separate computers for clustering. --> <add Name="StagingFolder" Value="C:\PEERNET\WatchFolders\CLUSTERED\ConvertToTIFF\Staging"/> <add Name="WorkingFolder" Value="C:\PEERNET\WatchFolders\CLUSTERED\ConvertToTIFF\Failed"/>
...
<!-- Clustered Processing --> <!-- This forces batch mode processing with synchronous wait and --> <!-- no date time stamp used in the Failed\Completed folders --> <add Name="ClusteredProcessing.Enabled" Value="true"/> <!-- Override this for clustering to customize pickup --> <!-- <add Name="ClusteredProcessing.MaxFilesToPickup" Value="4"/> -->
|
|
5.If desired, you can use the setting ClusteredProcessing.MaxFilesToPickup to customize how many files at a time are picked up by each computer. This allows you to offload processing to the faster computers, but still provide you with fail over protection if one of the computers in the cluster goes down.
6.Save the file; the DCS Editor will validate the file when saving and prompt to resolve any syntax errors.
7.Start Document Conversion Service and Watch Folder Service on this computer.
8.Repeat these steps to add more computers to the cluster.
Starting Conversion
Once all the nodes in the cluster have configured, and Document Conversion Service and Watch Folder Service are started on each computer, you can then start dropping files into the C:\PEERNET\WatchFolder\CLUSTERED\ConvertToTIFF\Input on the first computer, ComputerA, for conversion.
Each computer in the cluster will check the InputFolder for files to process and will pick up a subset of files to process. The number of files picked up defaults to the NumberOfDocumentsInParallel settings in the General settings section of the application configuration file but can be overridden in each individual watch folder section using the ClusteredProcessing.MaxFilesToPickup setting.
Clustering - Using an External Network Share
A more common approach would be an existing network share and several computers (or virtual machines) all looking at the same location on the share drive for files to process. With this approach, you will need an account that has access to the network share that can be used to run the Watch Folder Service on each computer, and Document Conversion Service installed on all of the computers in the cluster using the local DCSAdmin account created during installation.
Setting up the Network Share
On the network share you will need four folders as shown below. The network share names here are just sample names;replace these with your actual network share name and paths.
Folder on Network |
Watch Folder Setting |
Description |
|---|---|---|
\\NetworkShareA\Clustered\Input |
InputFolder |
This is the folder that is watched for files (and folders if IncludeSubfolders is true) to convert. |
\\NetworkShareA\Clustered\Output |
OutputFolder |
The converted files are copied into this folder when the conversion is done. |
\\NetworkShareA\Clustered\Failed |
FailedFolder |
If any file fails to convert, they are copied into a folder under this location. |
\\NetworkShareA\Clustered\Completed |
CompletedFolder |
This is optional. If set, the source files and folders that are dropped into the InputFolder location are copied into this folder when the conversion is complete. If this setting is set to an empty string ("") or is not included is the settings the source files are deleted. |
Setting up the Computers
The following steps need to be done for each computer you want as part of the cluster.
1.Install Document Conversion Service and, when prompted, allow the install to create the local DCSAdmin administrator account.
2.Go to Start - Control Panel - System and Security - Administrative Tools - Services (or type "Services" into the search field on the Start menu). The Watch Folder Service Log On credentials need to be changed to use the domain or other account that has access to the network share location. This is critical as the Watch Folder Service will run under this account and needs to have full access to the network share to be able to read/write and lock the files as part of the clustered conversion. The setup initially sets the service to use the DCSAdmin as part of the install.
3.In the Services control panel applet, locate the service PEERNET Watch Folder Service and double-click it to open its Properties dialog.
4.On the Log On tab, set the service account to the domain or other account that has access to the network share. This account will also need the Logon As A Service right. This right is automatically granted through the services panel when possible, otherwise talk to your IT Admin to add this privilege to the account.
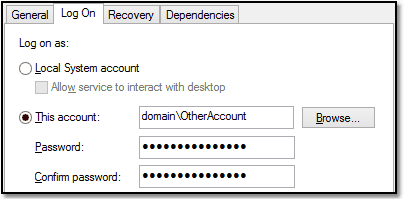
5.Click Apply and close the Services panel. Do not start the service at this point!
6.Open the Watch Folder Service configuration file in the DCS Editor by going to DCS Dashboard - Watch Folder Settings - Edit Configuration, or by going to Start - All Programs - PEERNET Document Conversion Service 3.0 - Watch Folder - Configure Watch Folder Settings.
7.Find and edit the Clustered ConvertToTIFF Watch Folder section to use the network share path for its InputFolder, OutputFolder and FailedFolder. If you are using the CompletedFolder, set the path for that as well. Keep the StagingFolder and WorkingFolder local to each computer in the cluster.
|
Code Sample - Clustered Conversion |
<WatchFolders> <!-- This watch folder is configured for clustered processing --> <!-- The InputFolder, FailedFolder, CompletedFolder and OutputFolder can point to shared folders --> <add Name="InputFolder" Value="\\NetworkShareA\Clustered\Input"/> <add Name="SearchFilter" Value="*.*"/> <add Name="IncludeSubFolders" Value="True"/> <add Name="DeleteInputSubFolders" Value="True"/> <add Name="FailedFolder" Value="\\NetworkShareA\Clustered\Failed"/> <add Name="CompletedFolder" Value="\\NetworkShareA\Clustered\Completed"/> <add Name="OutputFolder" Value="\\NetworkShareA\Clustered\Output"/>
<!-- Keep these folders on separate computers for clustering. --> <add Name="StagingFolder" Value="C:\PEERNET\WatchFolders\CLUSTERED\ConvertToTIFF\Staging"/> <add Name="WorkingFolder" Value="C:\PEERNET\WatchFolders\CLUSTERED\ConvertToTIFF\Failed"/>
...
<!-- Clustered Processing --> <!-- This forces batch mode processing with synchronous wait and --> <!-- no date time stamp used in the Failed\Completed folders --> <add Name="ClusteredProcessing.Enabled" Value="true"/> <!-- Override this for clustering to customize pickup --> <!-- <add Name="ClusteredProcessing.MaxFilesToPickup" Value="4"/> -->
|
|
8.If desired, you can use the setting ClusteredProcessing.MaxFilesToPickup to customize how many files at a time are picked up by each computer. This allows you to offload processing to the faster computers, but still provide you with fail over protection if one of the computers in the cluster goes down.
9.Save the file; the DCS Editor will validate the file when saving and prompt to resolve any syntax errors.
10.Start Document Conversion Service and Watch Folder Service on this computer.
11.Repeat these steps to add more computers to the cluster.