This tutorial will show you how to add file conversion to your Visual Basic .NET application using PEERNET.ConvertUtility. The tutorial creates a simple Visual Basic Windows forms application with a single button that converts a file when pressed and displays the results in a list box when finished. It also assumes that Document Conversion Service is installed on your local computer.
•Step 1: Creating a Simple Application
•Step 2: Adding the PEERNET.ConvertUtility Library
•Step 3: Converting a File
•Step 4: Displaying the Conversion Results
•Step 5: Testing the Application
1. Creating a Simple Application
In this first step we will create a simple Visual Basic .NET forms application with a single button and a list box.
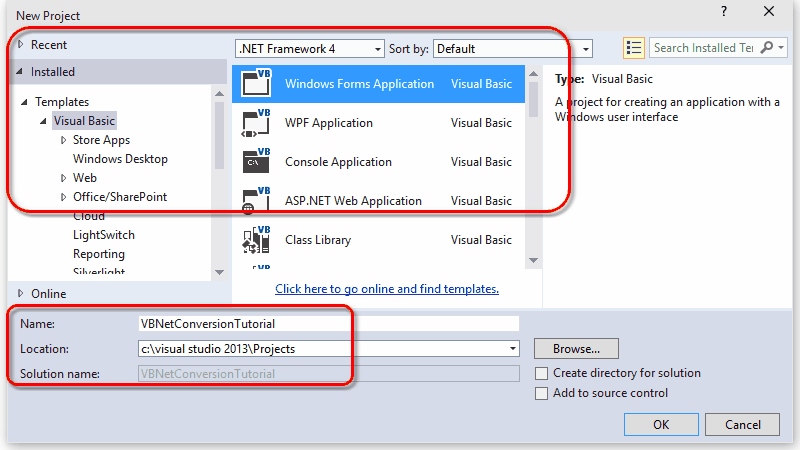
1.Start Visual Studio .NET and select New Project from the start page or File - New - Project... from the menu.
2.Select the Visual Basic Windows Forms Application template and target the .NET Framework 4.
3.Enter a name and location for this sample and press OK.
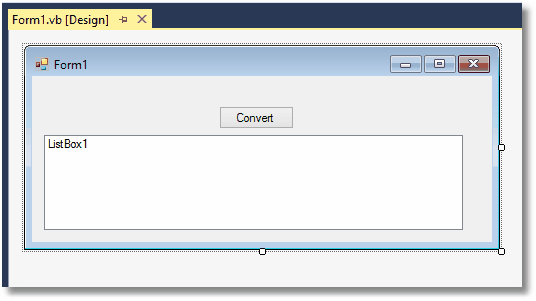
4.Next, add two controls onto the new form.
a.From the toolbox, drag a button onto Form1 and change the text of the button to "Convert".
b.Go back to the toolbox and drag a listbox onto the form.
c.Change the width of both the form and the listbox to be able to display more information in the listbox.
2. Adding the PEERNET.ConvertUtility Library
In this section we will add PEERNET.ConvertUtility support to the project.
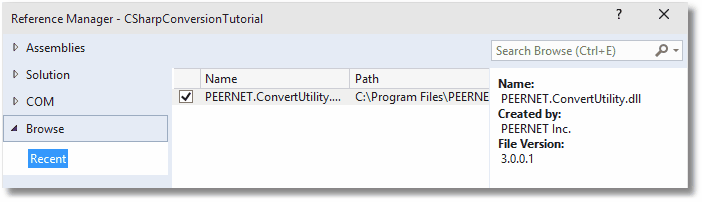
1.In the solution explorer, right click the project and select Add Reference.
2.Click the Browse tab and add a reference to the PEERNET.ConvertUtility.dll into the project. It is located in the \Samples\Redist folder under the Document Conversion Services installation folder.
3.Right click on Form1 and open the source code view by selecting View Code.
4.Add the following statement to the top of the Form1.vb file.
Imports PEERNET.ConvertUtility |
3. Converting a File
Now we have all the pieces we need to convert a file and display the results into the listbox.
1.On the design view of Form1, double click the button added above to create the Click event and switch to code view.
2.In the Button1_Click method, add the following code to call ConvertFile to convert a file to a 200dpi TIFF image.
a.Replace the underlined arguments with your own input filename, output folder, and converted filename.
b.The output folder must exist before calling ConvertFile.
c.The call to ConvertFile is a blocking call and will not return until the conversion is complete. When it returns we then want to display the results of the conversion in the listbox.
d.A Try-Catch-Finally block is in place so that, success or failure, the call to DisplayResultsItems is always executed and the result of the conversion will always be displayed in the listbox.
Private Sub Button1_Click(sender As System.Object, _ e As System.EventArgs) _ Handles Button1.Click
Dim resultItem As PNConversionItem Dim strOutputFolder As String
resultItem = Nothing strOutputFolder = "C:\Test\Output"
Try Button1.Enabled = False ListBox1.Items.Clear() ListBox1.Items.Add("Converting...")
' Directory must exist If Not Directory.Exists(strOutputFolder) Then Directory.CreateDirectory(strOutputFolder) End If
' This is the single call needed to convert a file resultItem = PNConverter.ConvertFile( "C:\Test\File.pdf", _ "C:\Test\Output", _ "ConvertedFromPDF", _ True, _ False, _ False, _ "TIFF 200dpi OptimizedColor", _ String.Empty, _ String.Empty, _ Nothing, _ String.Empty, _ String.Empty, _ String.Empty)
Catch ex As Exception ListBox1.Items.Add(String.Format("An error occurred during conversion. {0}", _ ex.ToString())) Finally Button1.Enabled = True DisplayResultsItems(resultItem) End Try End Sub |
4. Displaying the Conversion Results
All of the conversion methods in PEERNET.ConvertUtility return a results item, or in the case of converting a list or a folder of files, a list of results items.
This item contains information about the original conversion request and the results of the conversion. The results of the conversion can be a list of created files or a collection of error messages detailing why the file was not converted.
1.Add the following method into Form1.vb. This method will display the name of the file we tried to convert, and then will list the new file that was created. If the conversion failed, the error messages are displayed instead.
Private Sub DisplayResultsItems(result As PNConversionItem) ' The PNConversionResult object in each item contains the error and file list. If (Not result.ConversionResult.Errors Is Nothing And _ |
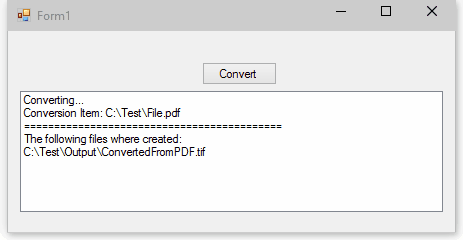
5. Testing the Application
To test the application, Document Conversion Service has to be running as PEERNET.ConvertUtility communicates with Document Conversion Service to perform the file conversion.
1.From the system tray icon menu select Run Conversion Service to start the service. If this menu item is disabled the service is already running.

2.When the service has finished initializing, build and run your VB.NET project.
3.Click on the button to convert your file. The listbox will display the message "Converting..." and then the results of the conversion.