Printing labels

Contents
Once you’ve finished designing your report, you can send it to a local or network printer, or to one of the PEERNET built-in printers.
To launch a label print job
1.Click the ![]() to expand the Labels item.
to expand the Labels item.
2.Click a label.
3.Click File – Print.
4.Set your label printing options as desired.
5.Click OK.
The appearance of the Print dialog box will vary depending on the type of paper stock you have chosen for the label. From this dialog box you can select the printer to which to send the job, set the range of pages to print, set the number of copies to print, and insert a printer adjustment level for the horizontal and vertical edges. As well, you can click the Options button to access more, printer-specific settings (media tray, resolution, color).
If the paper stock you have selected contains more than one row or column, you will also be able to set the starting position for the printer (see below), and select the Normal or Stacked option.
The Normal option allows you to print left to right, top to bottom.
The Stacked option allows you to print top to bottom, left to right. The starting position for the printer is indicated by the red square in the Start At graphic.
You can change the selected starting position by clicking a different cell in the graphic.
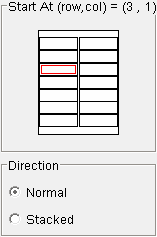
In the example above, the starting position has been set to (3,1), and the direction option has been set to Normal. So, the first label will be printed in cell (3,1), the second in cell (3,2), the third in cell (4,1), the fourth in cell (4,2), and so on.
If the direction option was set to Stacked instead, the first label would be printed in cell (3,1), the second in cell (4,1), the third in cell (5,1), the fourth in cell (6,1), the fifth in cell (7,1), the sixth in cell (1,2), the seventh in cell (2,2), and so on.