The steps below demonstrate how to use the Filename Creator tab to customize the output filename by adding custom text.
Step by Step Instructions
1.Launch the PDF Image Printer Dashboard.
2.Select "Edit & Create Profiles" to open Profile Manager.
3.Select "Add a profile" to create a personal profile, or create a copy of one of our system profiles.
4.Name the profile, add a description, and click Save.
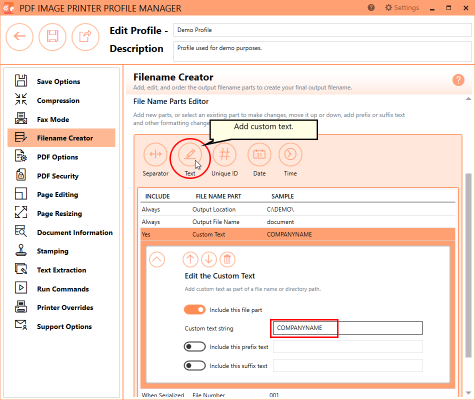
5.On the Filename Creator tab, add the file name part for Custom Text. Enter your desired custom text (ex. company name, group name, department name). This text can be added before or after the Output File Name.
6.Click Save-Back, and close Profile Manager.
If you plan to use these settings regularly, you may wish to make this personal profile the default profile used by PDF Image Printer.
i.Select the printer you wish to edit and use the Profile drop box to select your desired default profile.
ii.Select "Manage Printers" to open Printer Management.
iii.Select the Save icon to save changes.
iv.Select the Home icon to return to the Dashboard.
7.Close the Dashboard. Now when you print your document to PDF Image Printer, the output filename will have CompanyName added to the filename from the print job.