File Browser

Contents
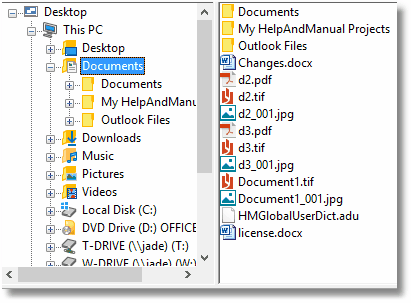
The file browser acts in a similar manner to Windows Explorer, and is used to locate and select the files and folders to be added to the job list. The file browser is divided into two windows: the tree view and the list view.
Navigating and Selecting Items in the Treeview
The tree view is a hierarchal representation of your computer. Each item in the tree represents a folder; if the folder has subfolders, its tree item will have sub-items. You can expand a tree item and reveal these sub-items by clicking on the plus sign (+) to its left. Clicking a minus sign (-) contracts tree items and hides sub-items.
You can navigate through the tree view using either the mouse or the arrow keys. An item in the tree is selected when it is highlighted (usually appearing as white text on a blue background). The up and down arrow keys will move the selection through the tree a single item at a time. As well, clicking an unselected item with the mouse will move the selection to that item.
Navigating and Selecting Items in the Listview
The contents of the folder currently selected in the tree view are displayed in the list view. As you move through the tree selecting different folders, you will notice the contents of the list view changing. If there are no items displayed in the list view, then there are no subfolders or supported files in the selected folder.
Changing the View
There are several different ways you can view the items in the list view. The style you choose for the list view can be changed by using the commands in the View menu, or by clicking the view style buttons on the toolbar.
Large Icons style - Each file or folder appears as a large icon with its name displayed below it. Items are displayed from left to right, top to bottom.
Small Icons style - Each file or folder appears as a small icon with its name displayed to the right of it. Items are displayed from left to right, top to bottom.
List style - Each file or folder appears as a small icon with its name displayed to the right of it. Items are displayed in columns, from left to right, top to bottom.
Details style - Each file or folder appears on its own line, with additional information arranged in columns to the right. The leftmost column displays the file or folder as a small icon beside its name. Subsequent columns display detailed information about the file or folder, such as its size (in kilobytes), file type, and the date and time it was last modified.
Navigation
You can navigate through the list view using either the mouse or the arrow keys. An item in the list is selected when it is highlighted (usually appearing as white text on a blue background). The arrow keys will move the selection through the list a single item at a time. As well, clicking an unselected item with the mouse will move the selection to that item.
Selecting Files
More than one item can be selected at a time in the list view. The ability to select multiple items is useful when you want to add groups of files to a job. To select more than one file at a time, you can use any of the following methods:
Consecutive Files Using the Mouse - If the files are consecutive, click the first file you want to select. Then, point to the last file in the consecutive list, press and hold the SHIFT key, and click the file. All files in between will be selected.
Consecutive Files Using the Keyboard - A consecutive list of files can also be selected using the arrow keys on the keyboard in conjunction with the SHIFT key. Move the selection to the first file in the list. While pressing and holding the SHIFT key, press the down arrow key to extend the selection. Each time the down arrow key is pressed, the next file in the list is added to the selection. Depending on the starting point of the selection, the other arrows keys can be used to add or remove files from the selection.
Non-Consecutive Files Using the Mouse - If the files are not consecutive, click the first file you want to select. Then, select additional files by pressing and holding the CTRL key while clicking the files.
Selection Rectangle - You can also select files by including them in a selection rectangle. Position the mouse pointer by a desired file, click and hold the left mouse button, and move the mouse in any direction. You will see a rectangle being drawn on the screen as you move the mouse, and all items in the rectangle will become selected. When all of the desired files are selected, release the mouse button. The rectangle disappears but the files will remain selected.
Select All - Finally, if you want to select all the files in the list view, you can simply click Edit - Select All, or press CTRL + A on the keyboard.
You can also use the Invert Selection command (found in the Edit menu, or by pressing CTRL + I on the keyboard) which allows you select all deselected items, and deselect all selected items. As well, the Clear Selection command (also found in the Edit menu) allows you to deselect all items.