Creating and Using Printer Profiles

Contents
Printer profiles are snapshots of the PDF creation settings. They are created through the Convert to PDF application and saved as a file on your computer with the extension .ppr. Using a printer profile ensures that every PDF you create will have the same settings. If you have more than one printer profile created, this lets you quickly switch between different sets of options without having to go through and change each of the Category panels in the Options tab.
1. Creating a Printer Profile
Creating and a printer profile can be done in just a few steps.
•Print to the Convert to PDF printer to display the Convert to PDF application.
•Make any changes to the PDF creation settings as needed.
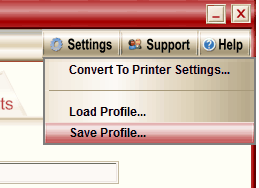
•Click the Settings button in the upper right corner and choose Save Profile… to store your settings to disk.
2. Using a Saved Printer Profile
You can load a saved profile after printing to the Convert to PDF printer to temporarily use the settings in the profile when creating your PDF.
•Print to the Convert to PDF printer to display the Convert to PDF application.
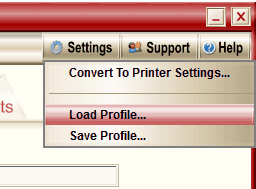
•Click the Settings button in the upper right corner and choose Load Profile… to load the saved settings.
3. Always Using the Same Printer Profile
You can also set the Convert to PDF printer to always use a saved printer profile each time you print.
•With the Convert to PDF application open, click the Settings button and choose Convert to Printer Settings…. Alternatively, you can also access the preferences through the Printer folder as outlined in Convert to PDF Printing Preferences.
•In the Printer Profile section, enable printer profiles by checking to the Use this profile checkbox.

•Then use the Browse… button to find and select the desired profile, or type the path to the .ppr into the edit field.

•Click Apply and/or OK to save the changes.