Grouping and sorting labels

Contents
You can use the Grouping and Sorting dialog box to output your labels in a particular order.
Note that the sample project Chapter11_Customizing.pnj contains a label called Label1 that you can use to try out the grouping and sorting commands outlined in this section. You can access this project by clicking File – Open Project in the application menu, then enabling the Open a sample project option.
To sort labels in descending order of a specific field
1.Click the Grouping & Sorting ![]() button on the toolbar.
button on the toolbar.
2.In the first row of the Field/Expression column, select a value from the drop-down list.
3.In the first row of the Sort Order column, select Descending from the drop-down list.
To sort labels in ascending order of a specific field
1.Click the Grouping & Sorting ![]() button on the toolbar.
button on the toolbar.
2.In the first row of the Field/Expression column, select a value from the drop-down list.
3.In the first row of the Sort Order column, select Ascending from the drop-down list.
Additionally, you can use a combination of ascending and descending selections on fields to sort your labels. This can be done by creating additional rows in the Grouping & Sorting table.
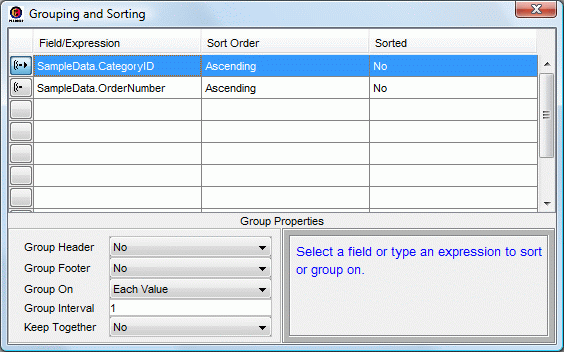
For example, the Grouping & Sorting table shown above will result in a report where the records are sorted in ascending order (lowest to highest numbers) of CategoryID. Then, when one or more records contain the same value for CategoryID, the records are sorted in descending order (highest to lowest numbers) of Order_Number.
To delete a row from the Grouping & Sorting options
1.Right-click the row you want to delete.
2.Click Delete Row.
3.In the Delete Confirmation dialog box, click Yes.
To insert a row into the Grouping & Sorting options
1.Right-click the row below the point where you want to insert a row.
2.Click Insert Row.
To move a row up in the Grouping & Sorting options
1.Right-click the row you want to move up.
2.Click Move Up.
To move a row down in the Grouping & Sorting options
1.Right-click the row you want to move down.
2.Click Move Down.
As well, each row of the Grouping and Sorting dialog box has a corresponding Group Properties section, which appears when you select the row.
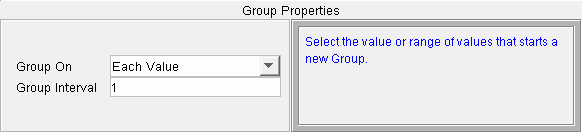
The Group Properties section allows you to further customize the settings for your groups:
Group On
You can use this drop-down list to set the value that determines when a new group is created. For example, you can choose to group on prefix characters (letters and numbers), time values (hours or minutes), or date values (year, quarter, month, week, or day).
Group Interval
You can use this box to set the value interval that determines when a new group is created. For example, if you set Group On to Prefix Characters, then set Group Interval to 3, a new group will be created each time the first three letters or numbers in the field change. That is, records where this field starts with the characters 555 will be in one group, records where this field starts with the characters 556 will be in another.